EmailTooltester is supported by readers like you. When you purchase through our links, we may earn a commission that helps keep our reviews independent and free.
Interested in signing up or switching to ActiveCampaign? First of all, I’d like to say great choice – over the past few years, they've consistently won our awards for Best Email Tool and Best Email Deliverability.
It's an amazing tool, with an impressive feature set and tons of benefits for small to medium-sized businesses. While there are easier tools out there, especially for beginners, the learning curve is completely worth it thanks to the advanced email marketing features you’ll soon be using.
In this ActiveCampaign tutorial, we will explain how to get started and provide a step-by-step tutorial to help you master the ins and outs of this complete email marketing tool. We will focus on getting your account set up, uploading a contact list, sending your first email campaign, and finally, migrating from your existing provider to ActiveCampaign (if you have one). By the end of our full tutorial, you should be familiar with the basics ActiveCampaign and ready and raring to reach your email marketing goals.
Who is this ActiveCampaign Tutorial for?
This ActiveCampaign tutorial is perfect if:
- You’re a beginner and need a step-by-step walkthrough of how to get started with ActiveCampaign
- You’re looking to set up a basic email or newsletter campaign in ActiveCampaign
However, ActiveCampaign is a comprehensive tool that comes packed with some very advanced features (e.g. triggered campaigns, sales follow-ups, automated segmentation, and more). We won’t be covering these in detail in this tutorial; however, we've added some video tutorials on setting up autoresponders and more advanced automations at the bottom of this article. We'd also recommend checking out the ActiveCampaign help center where you’ll find plenty of useful guides.
Check out our ActiveCampaign video tutorial on Youtube:
Step 1: Creating your ActiveCampaign Account
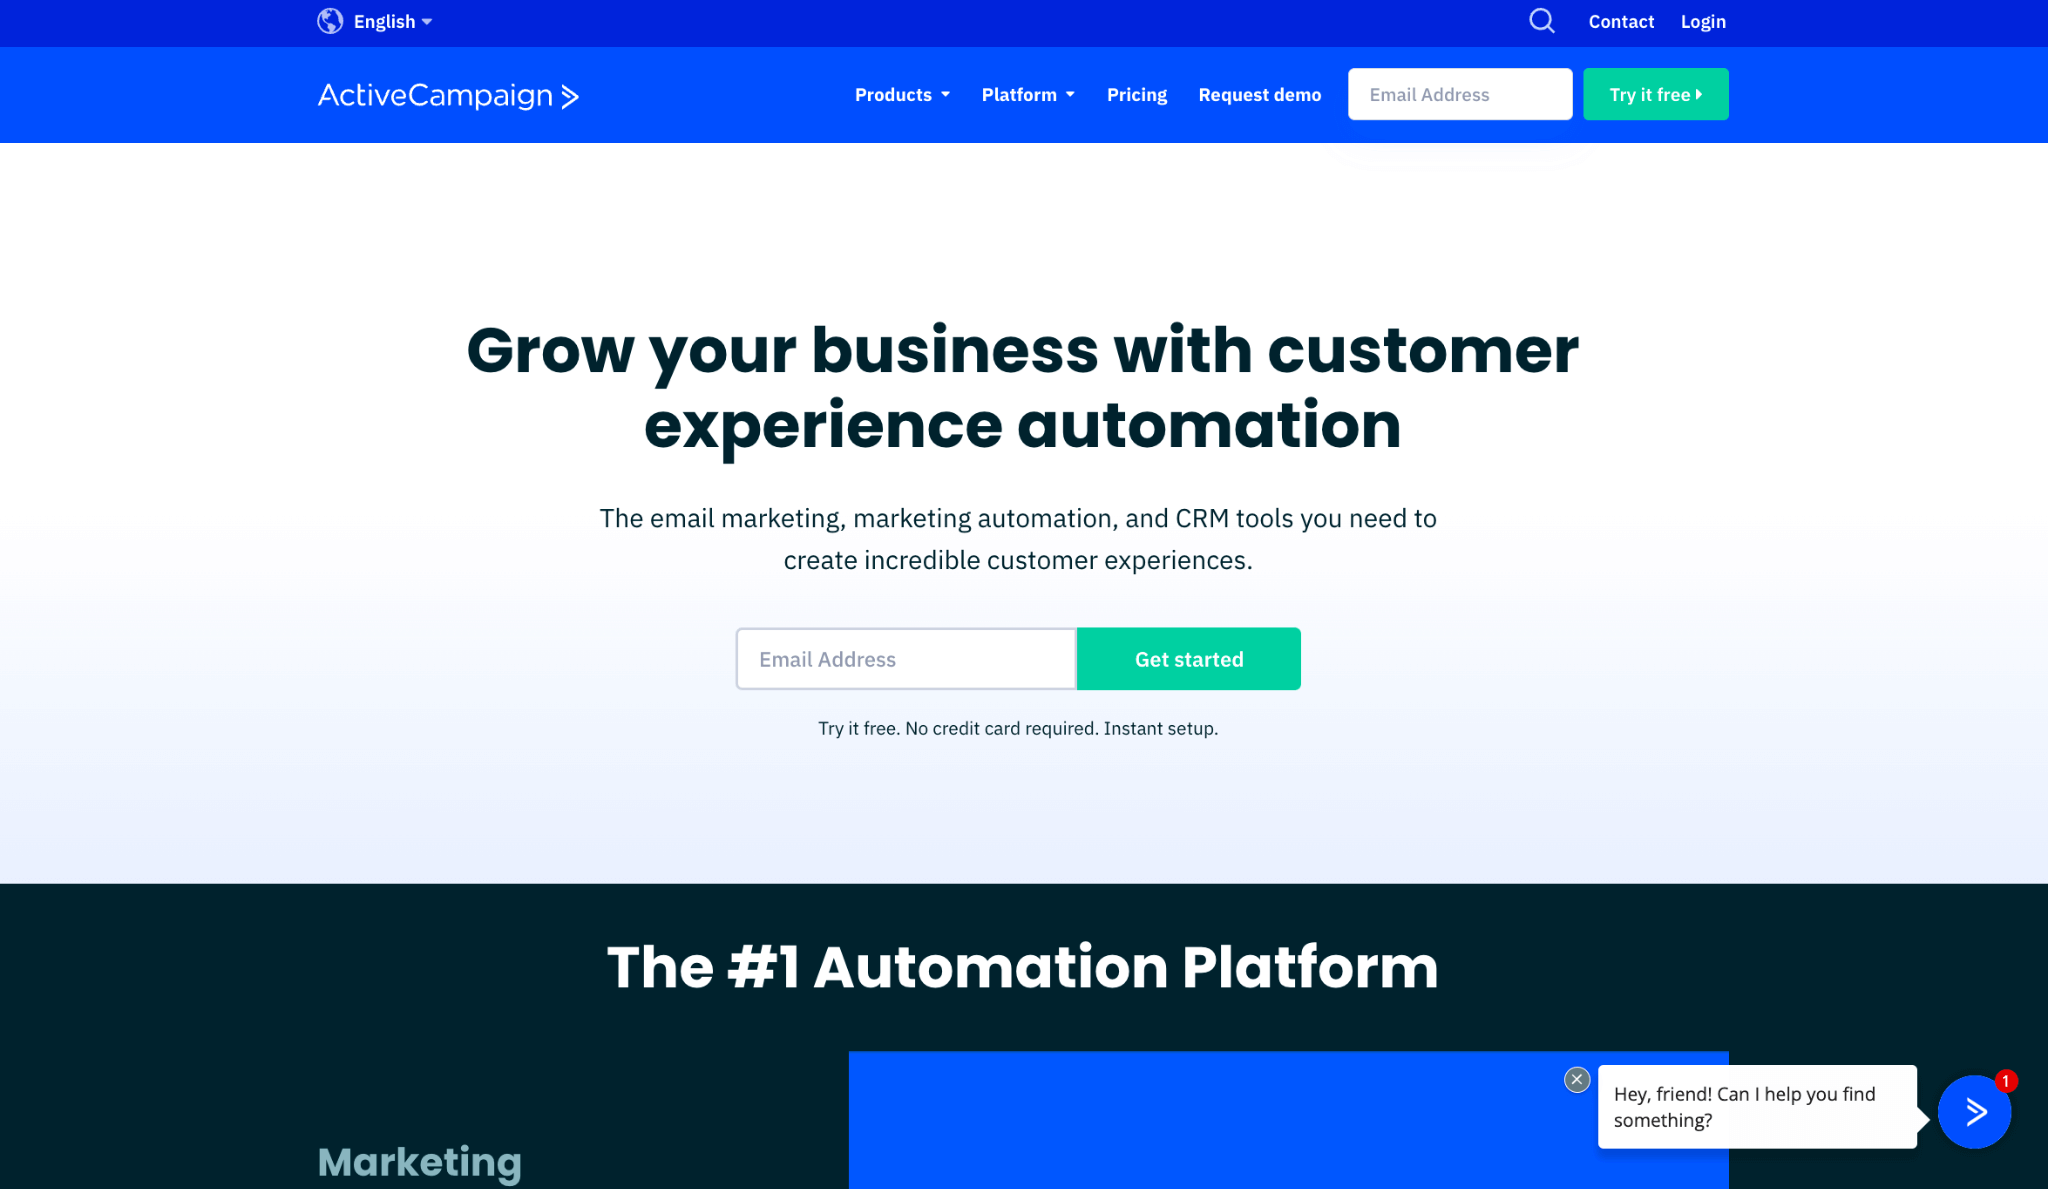
First things first, your ActiveCampaign account creation. As you can see, the signup process is pretty self-explanatory, the registration bar is right in the middle of the homepage. All you need to do is enter your email address and click “Get started” to begin.
By entering your email address here you’ll be signing up for a free trial and the great news is that there's no credit card required at this stage. You’ll also be able to get your account up and running straight away – there's no need to wait for any confirmation or approval.
It's also beneficial to know that there’s a support chatbot in the bottom right-hand corner in case you have any questions during this initial setup. I have to admit, this is a really nice touch from the ActiveCampaign team, especially considering they offer this support before you have even signed up. You just need to enter your email address in the chatbot when asking the query and they’ll kindly send the answer directly to your inbox.
And to be completely transparent, when I asked for support during this initial stage, I entered my phone number and a customer support agent called me the very next day to see if they could help me with setting up my account. I guess you can either take this as them being incredibly attentive or desperate to get you set up. Just be wary if you don’t want to receive any phone calls, in this case, providing only your email address would be the better option!
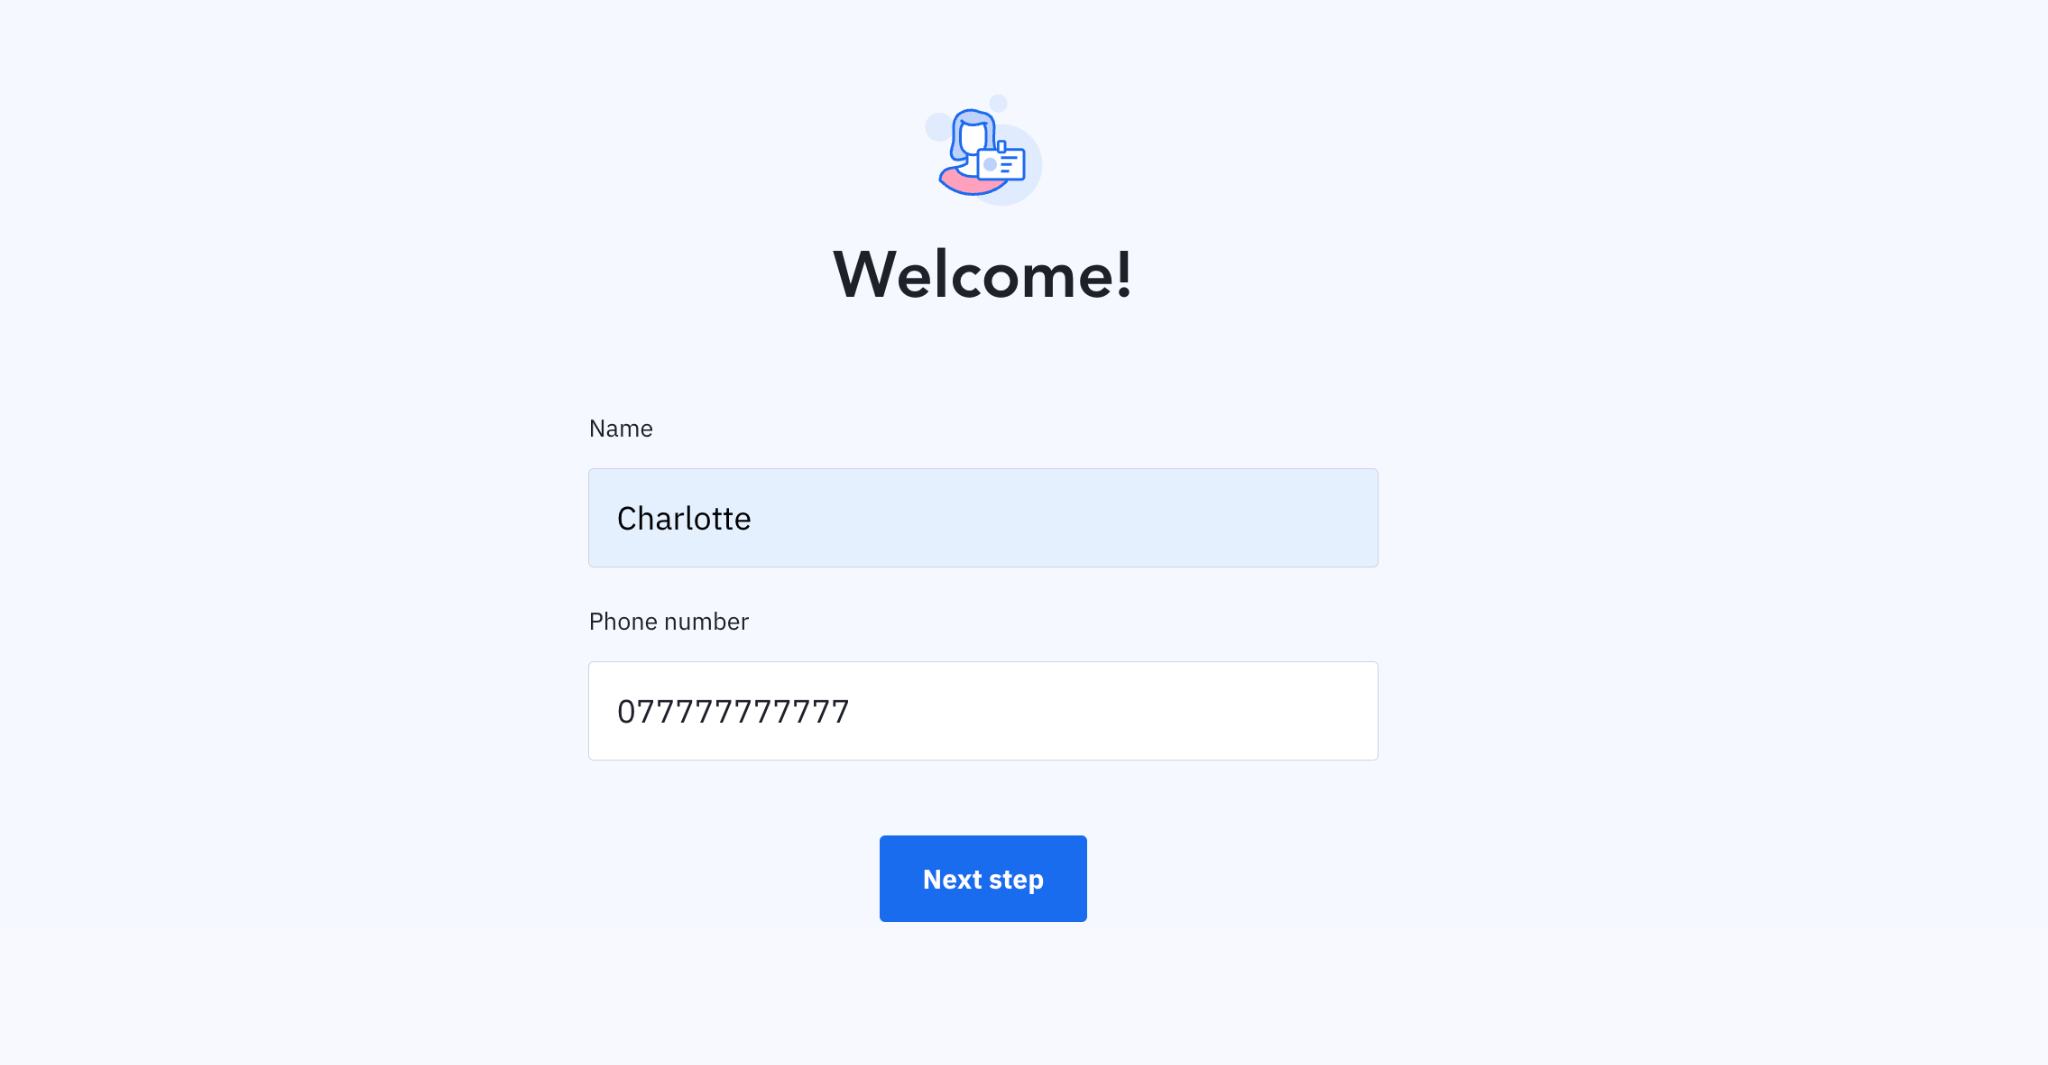
1. After you’ve entered your email address, you’ll be taken to a Welcome page where they will ask for your name and phone number.
2. Once you’ve entered this, you’ll be taken to a landing page where they’ll ask you the following questions:
- how many contacts you’ll want to upload
- how many employees are in your business
- which industry you are working in
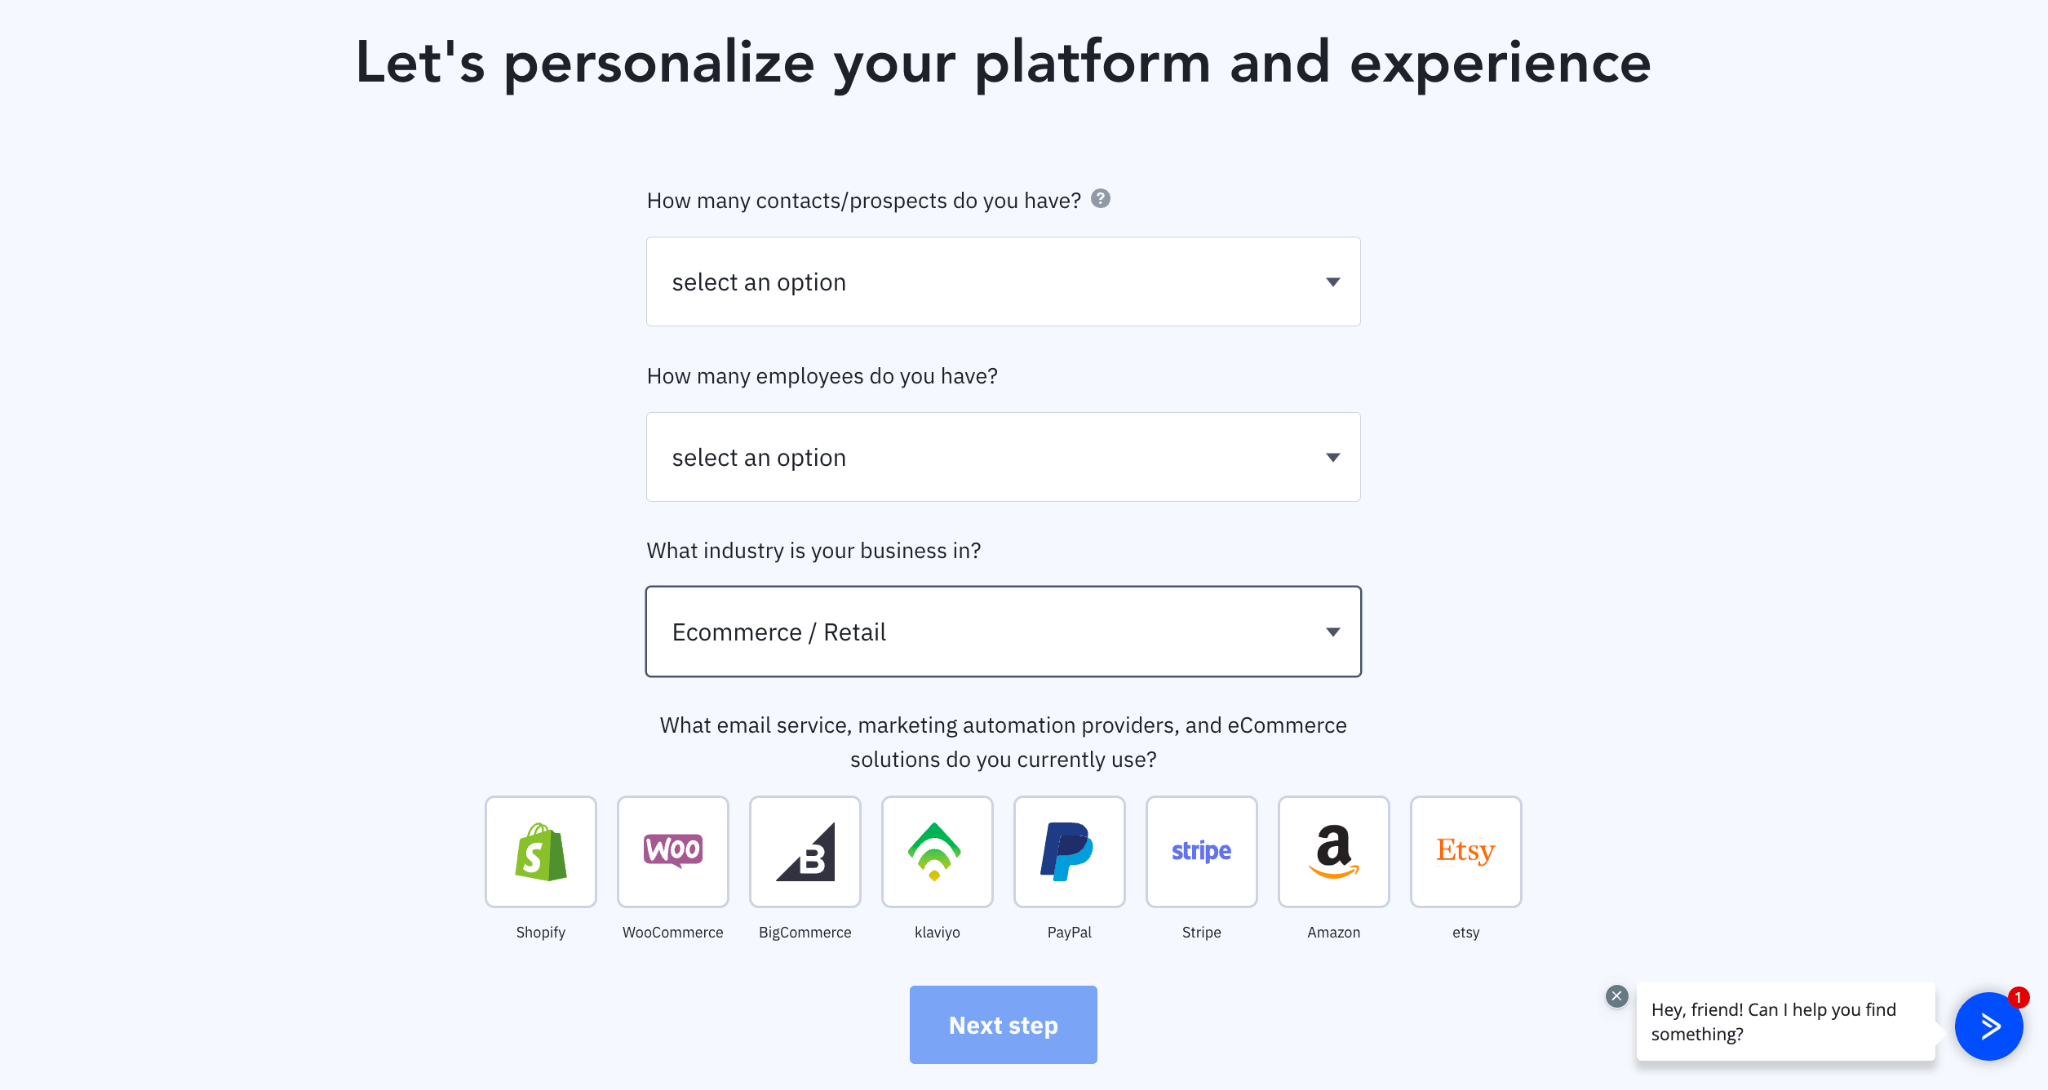
They’ll also ask you which services you currently use based on your industry. These vary for each industry.
For example, let's say I am setting up my email platform for the eCommerce industry, therefore I’ll be presented with Shopify, WooCommerce, Klaviyo, and other e-commerce integrations. By selecting your existing services, you’ll be able to connect ActiveCampaign with your website or online store at a later stage, which will be useful for collecting newsletter subscriptions, and for tracking purposes.
3. Then finally, you’ll be asked to set your account password, which needs to be a minimum of 10 characters. As always, make sure this is a secure password as the data you’ll be storing here is sensitive to your company and especially, your customers/users.
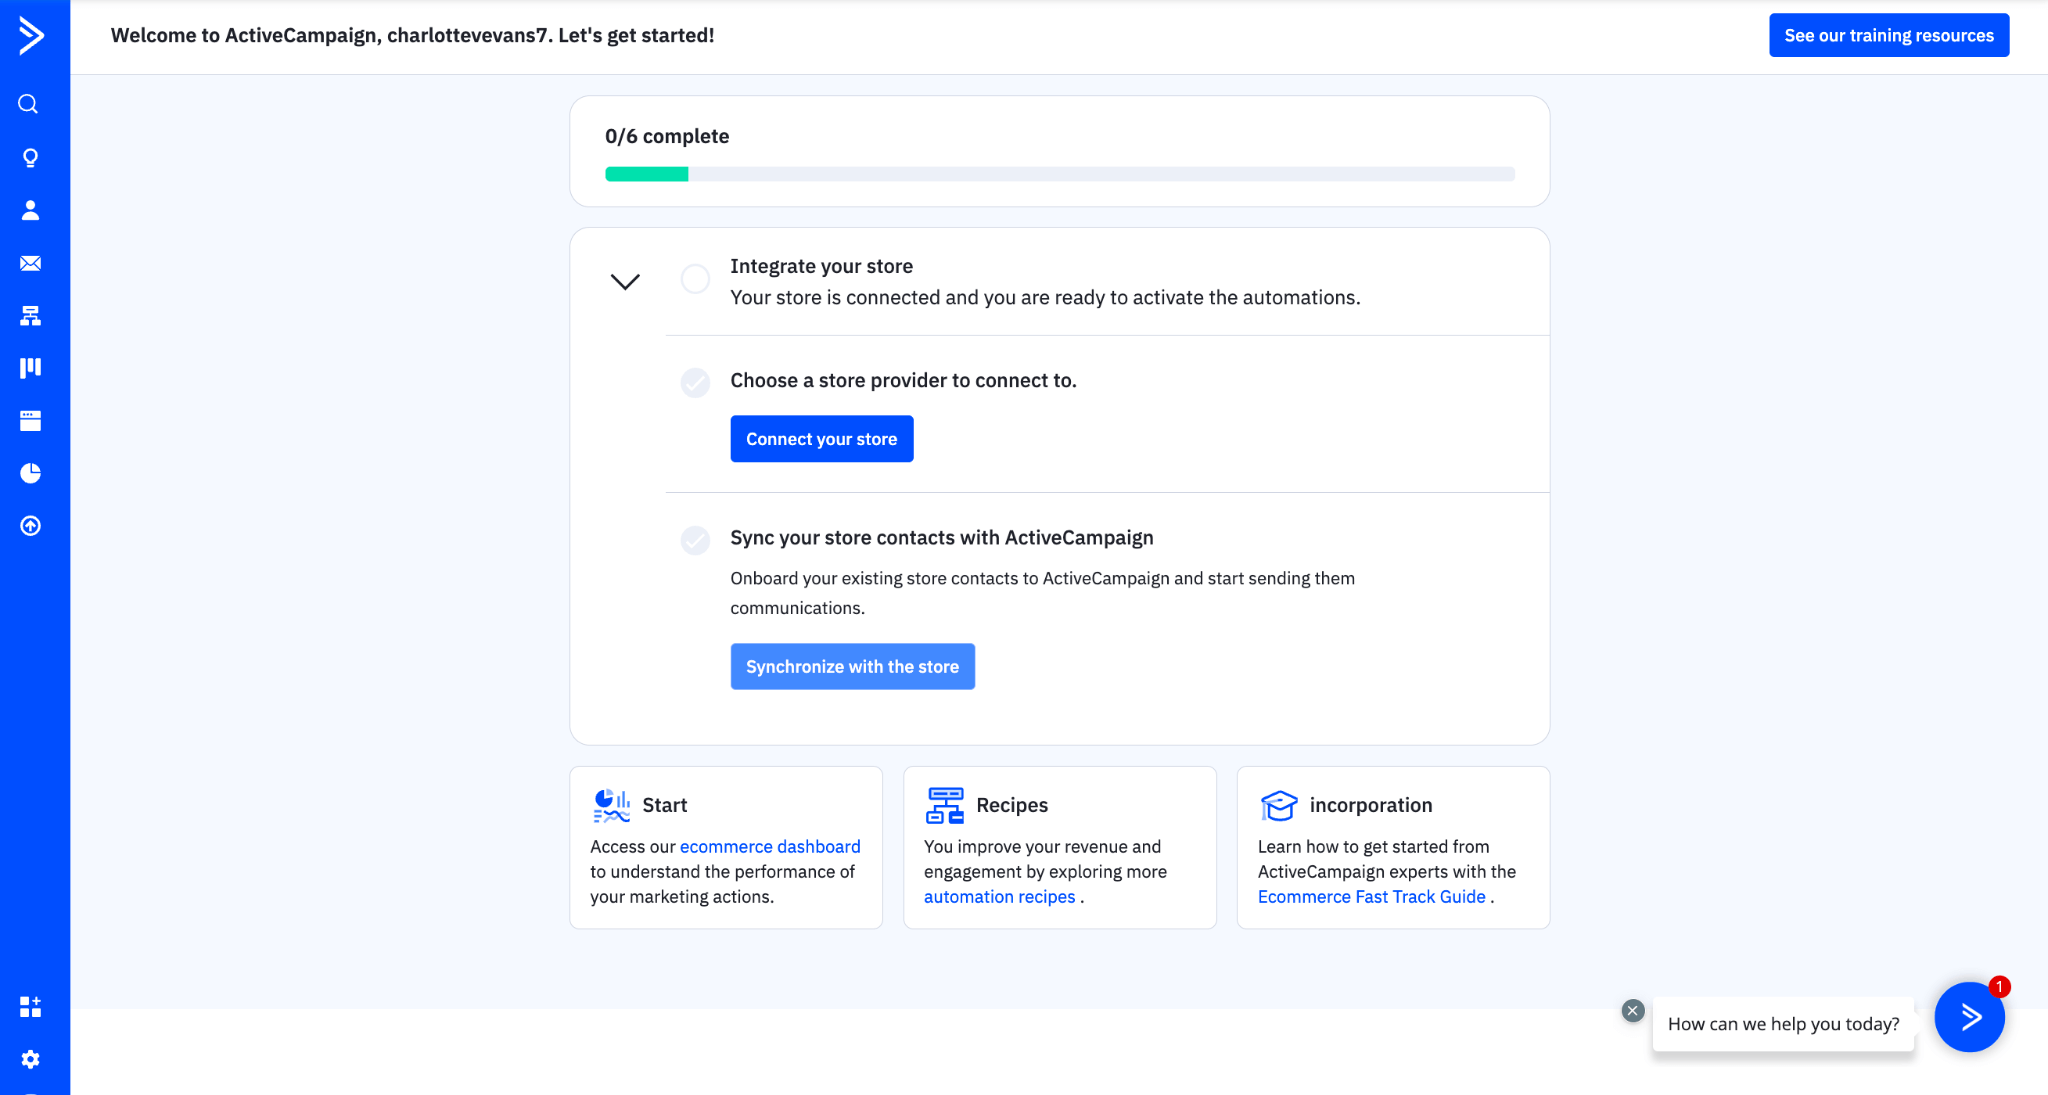
4. Hooray! Now you’ve filled out all of that information, you’ll finally be guided to your ActiveCampaign dashboard.
Step 2: Customize Your ActiveCampaign Settings
Account Settings
- Head over to Settings, which is the cog button in the left-hand corner. You’ll first be taken to the account tab.
- In this Settings tab, you’ll be able to change the personal details that you entered during the initial setup, so don’t worry if you entered the wrong email address or name.
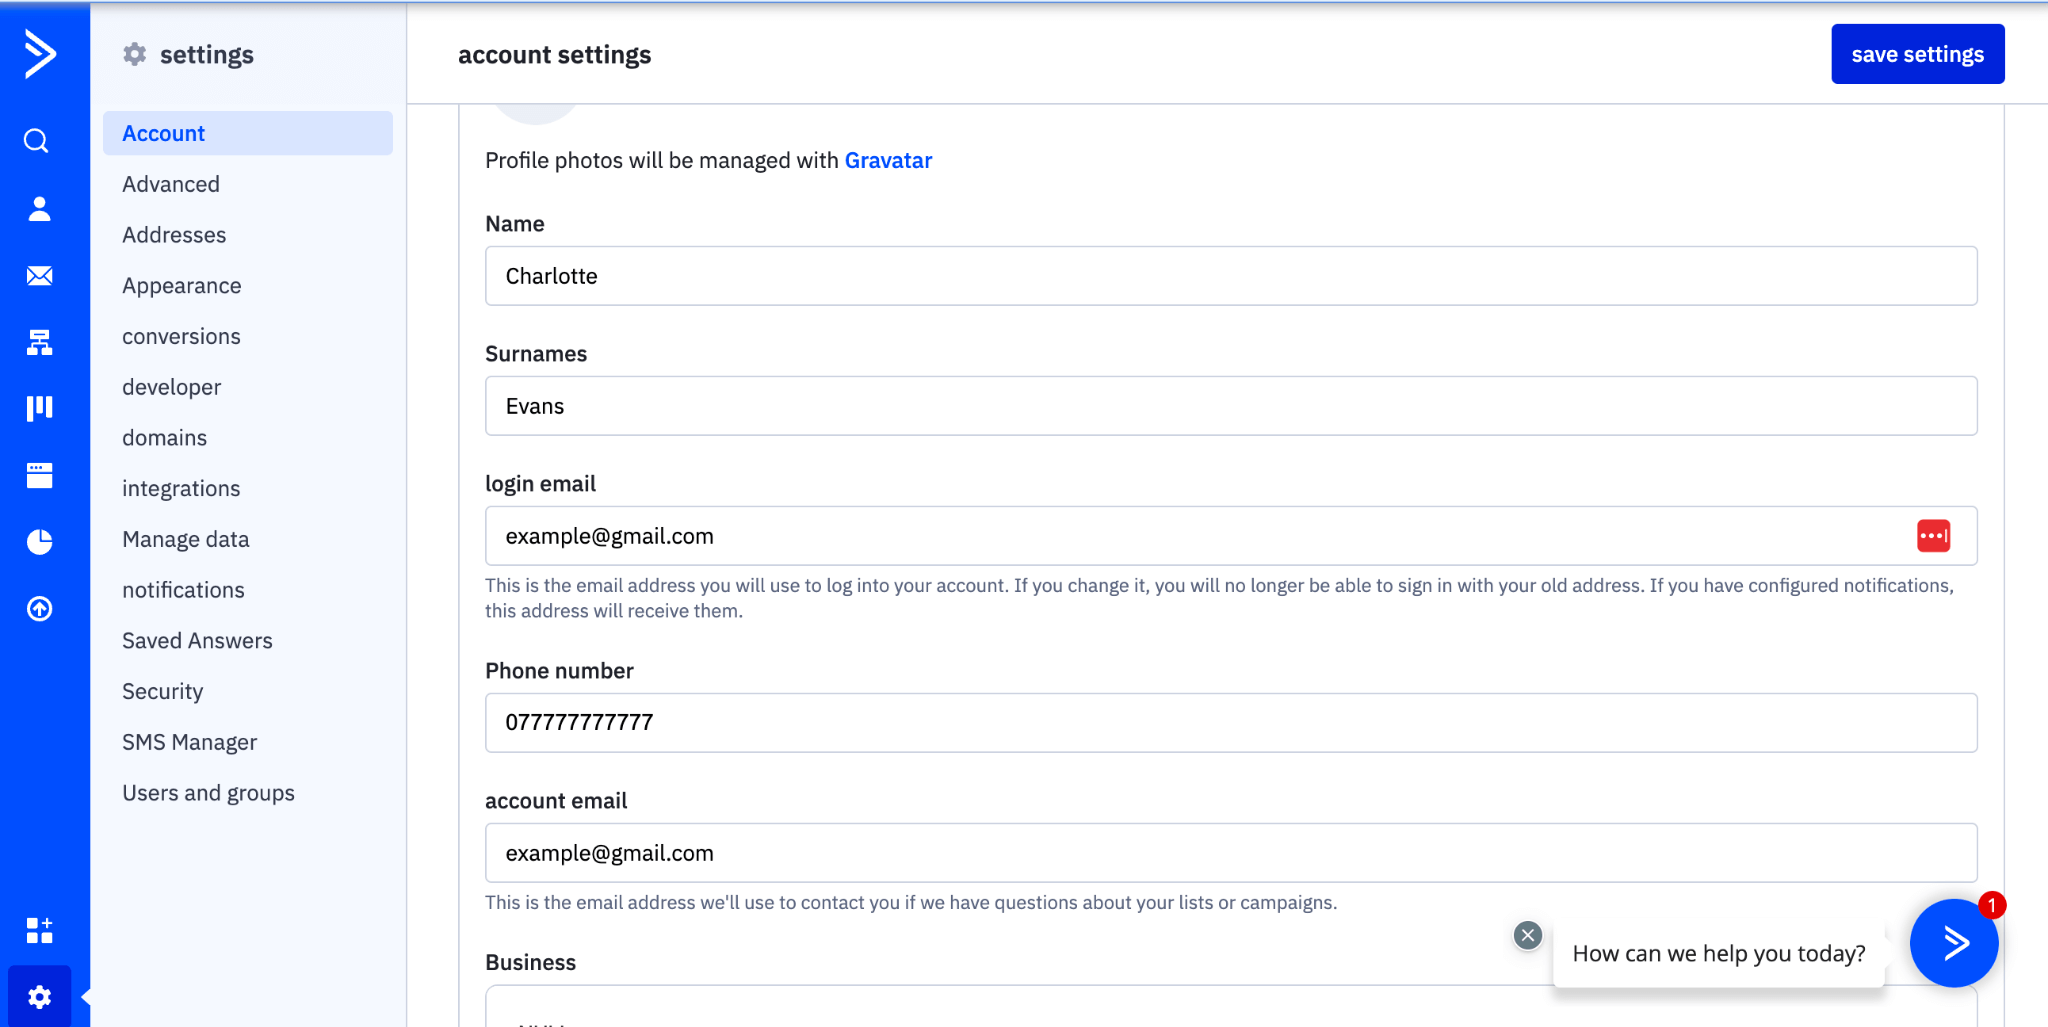
3. You can also add your personal email signature, change your timezone, and more importantly, your language within the Account Settings tab.
You can adjust your language settings to one of the following supported languages:
- Czech
- Dutch
- English
- French
- German
- Hungarian
- Indonesian
- Italian
- Polish
- Portuguese
- Brazilian Portuguese
- Russian
- Slovenian
- Spanish
Their platform also provides (limited) customer support for the following languages:
- Danish
- Finnish
- Simplified Chinese
- Turkish
- Vietnamese
Note: This list of supported languages is pretty impressive compared to other email providers out there. Yet another reason why we recommend Activecampaign.
Advanced Settings 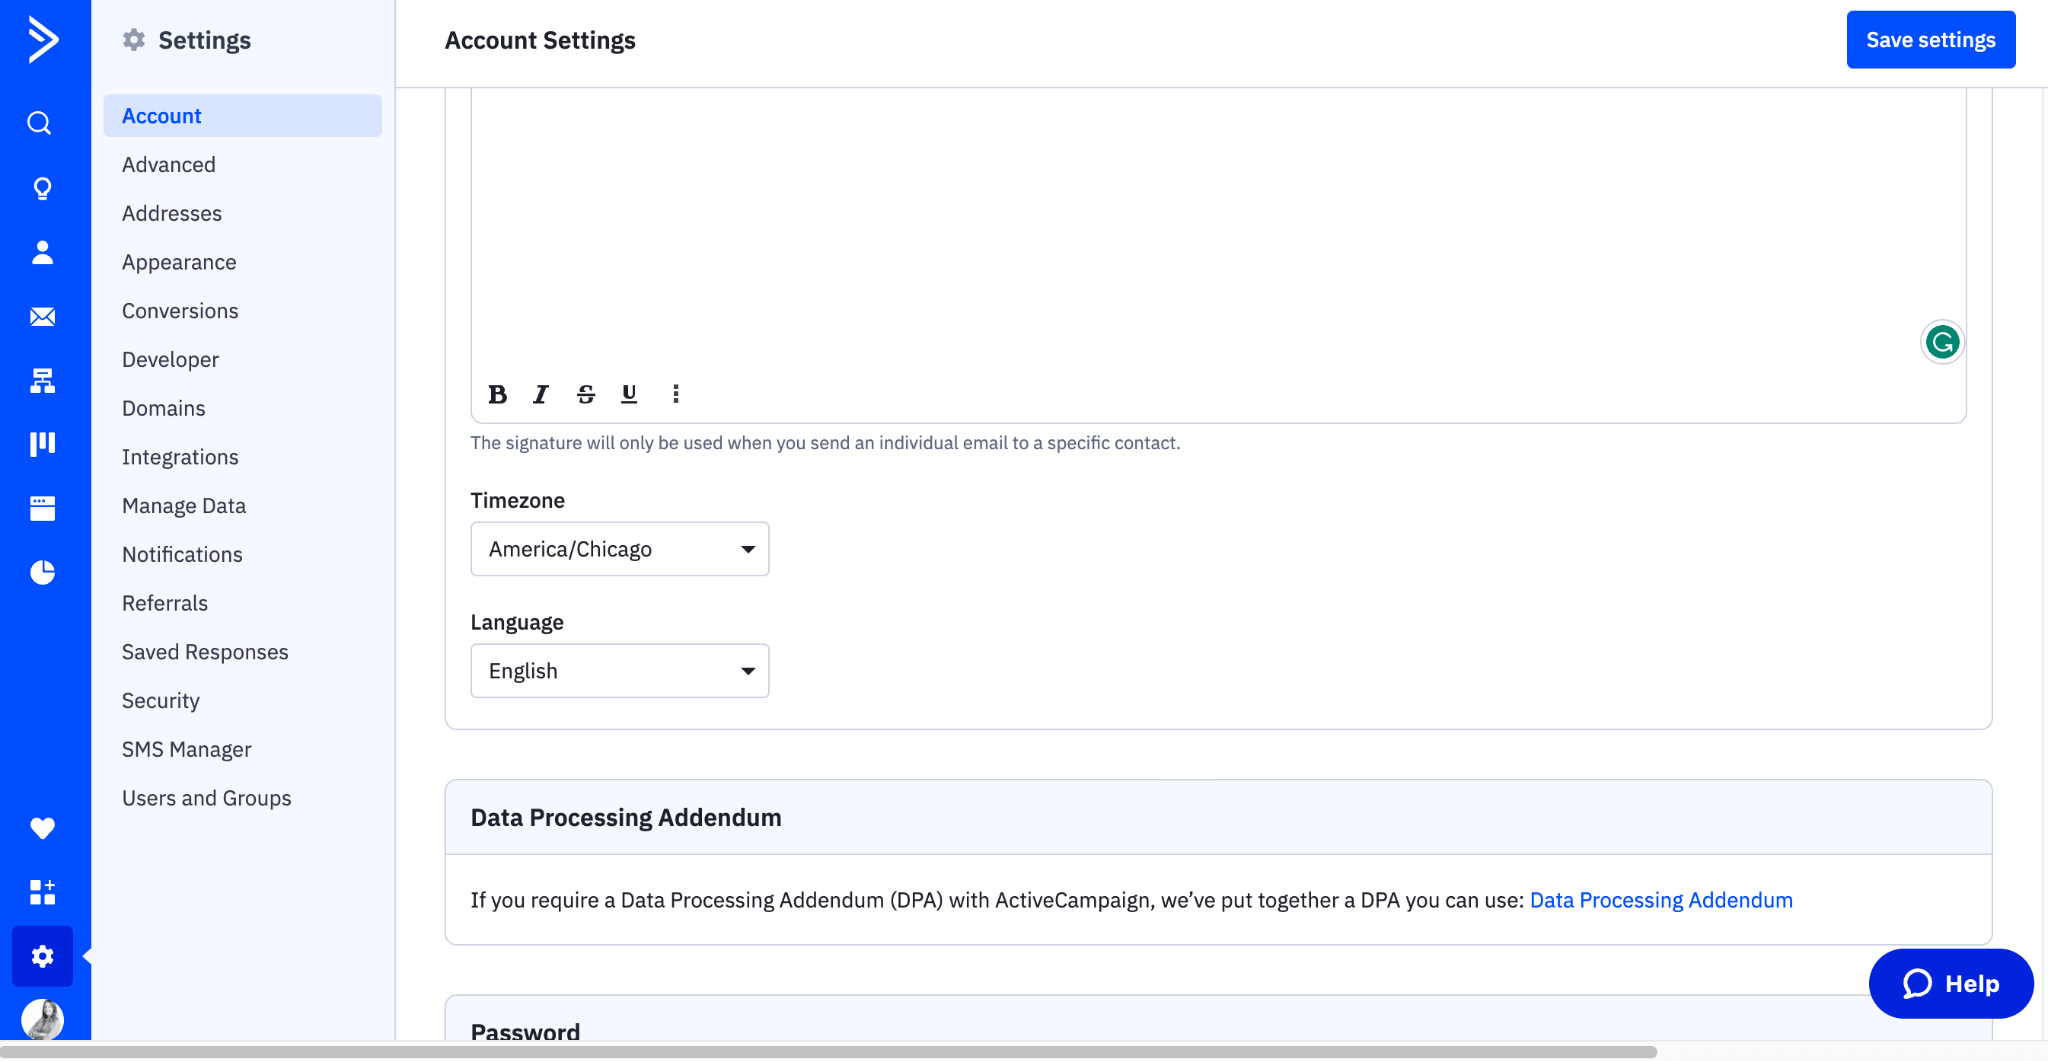
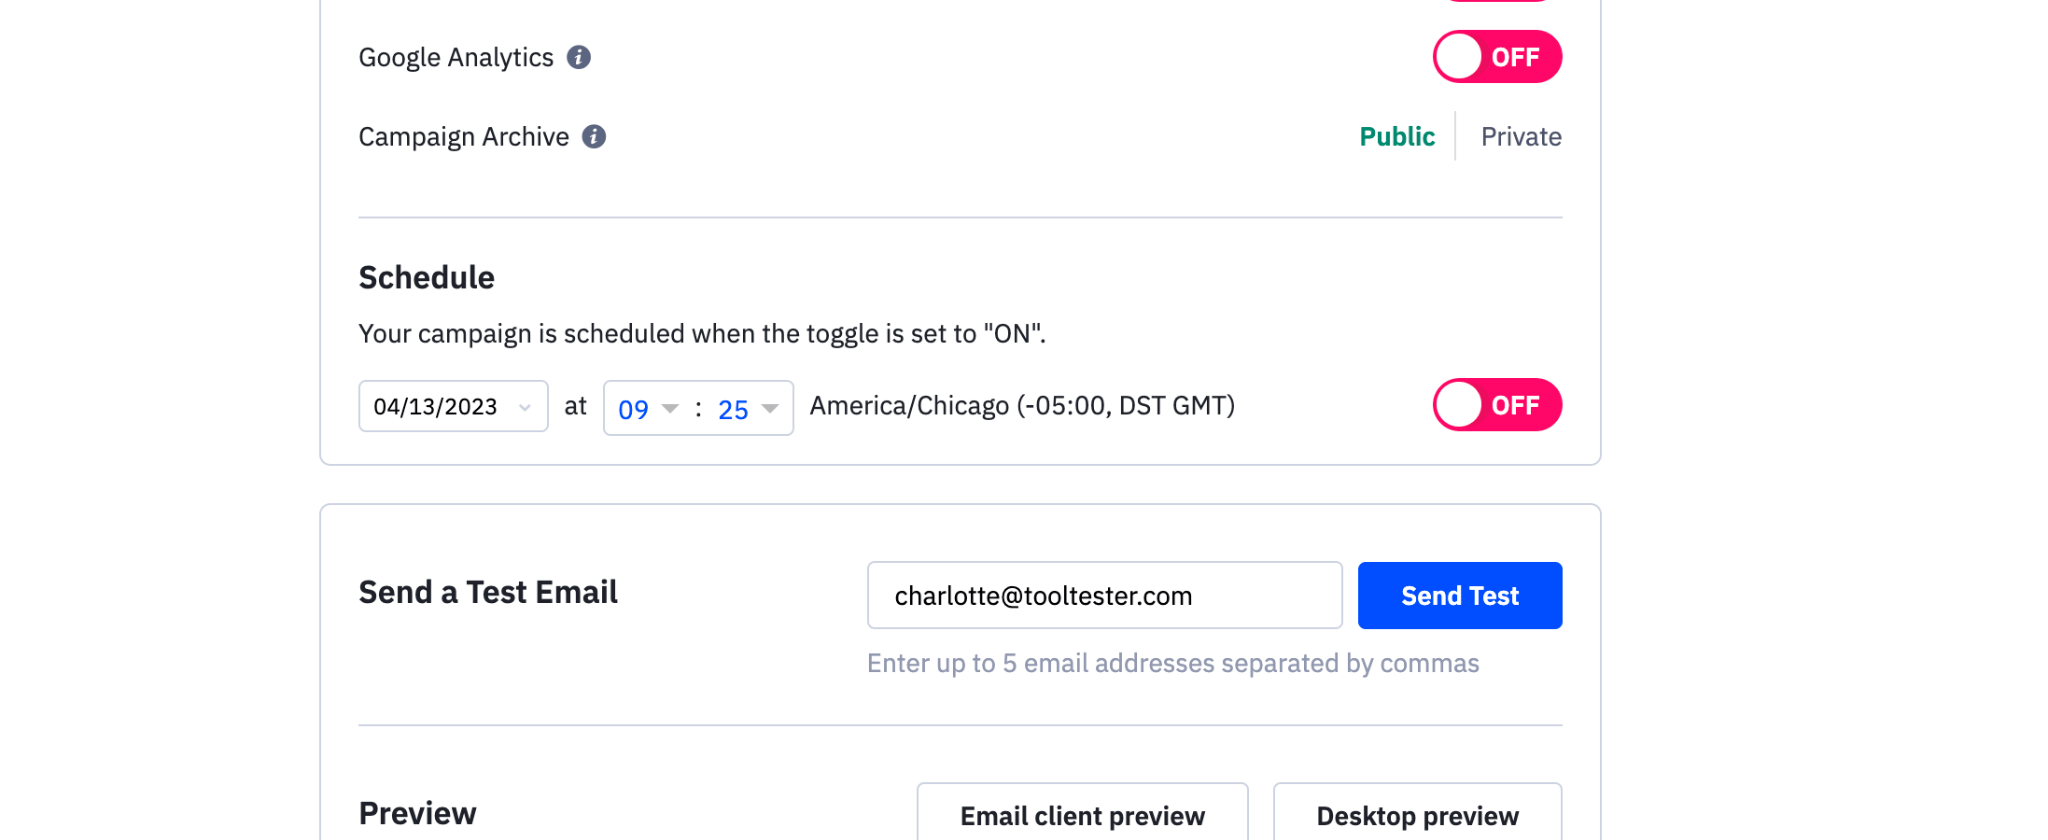
Within the Advanced Settings tab, you’ll find settings for Email Deliverability, Authentication, DKIM, Sender Policy Framework, Email Domain Verification, date format, date and time, and Google Analytics Tracking.
These settings are important to help you maximize the deliverability of your campaigns, and we recommend setting these up, although they are not strictly required as ActiveCampaign already authenticates all its traffic with SPF and DKIM. For more information on how to follow these steps, see ActiveCampaign's dedicated guide here. 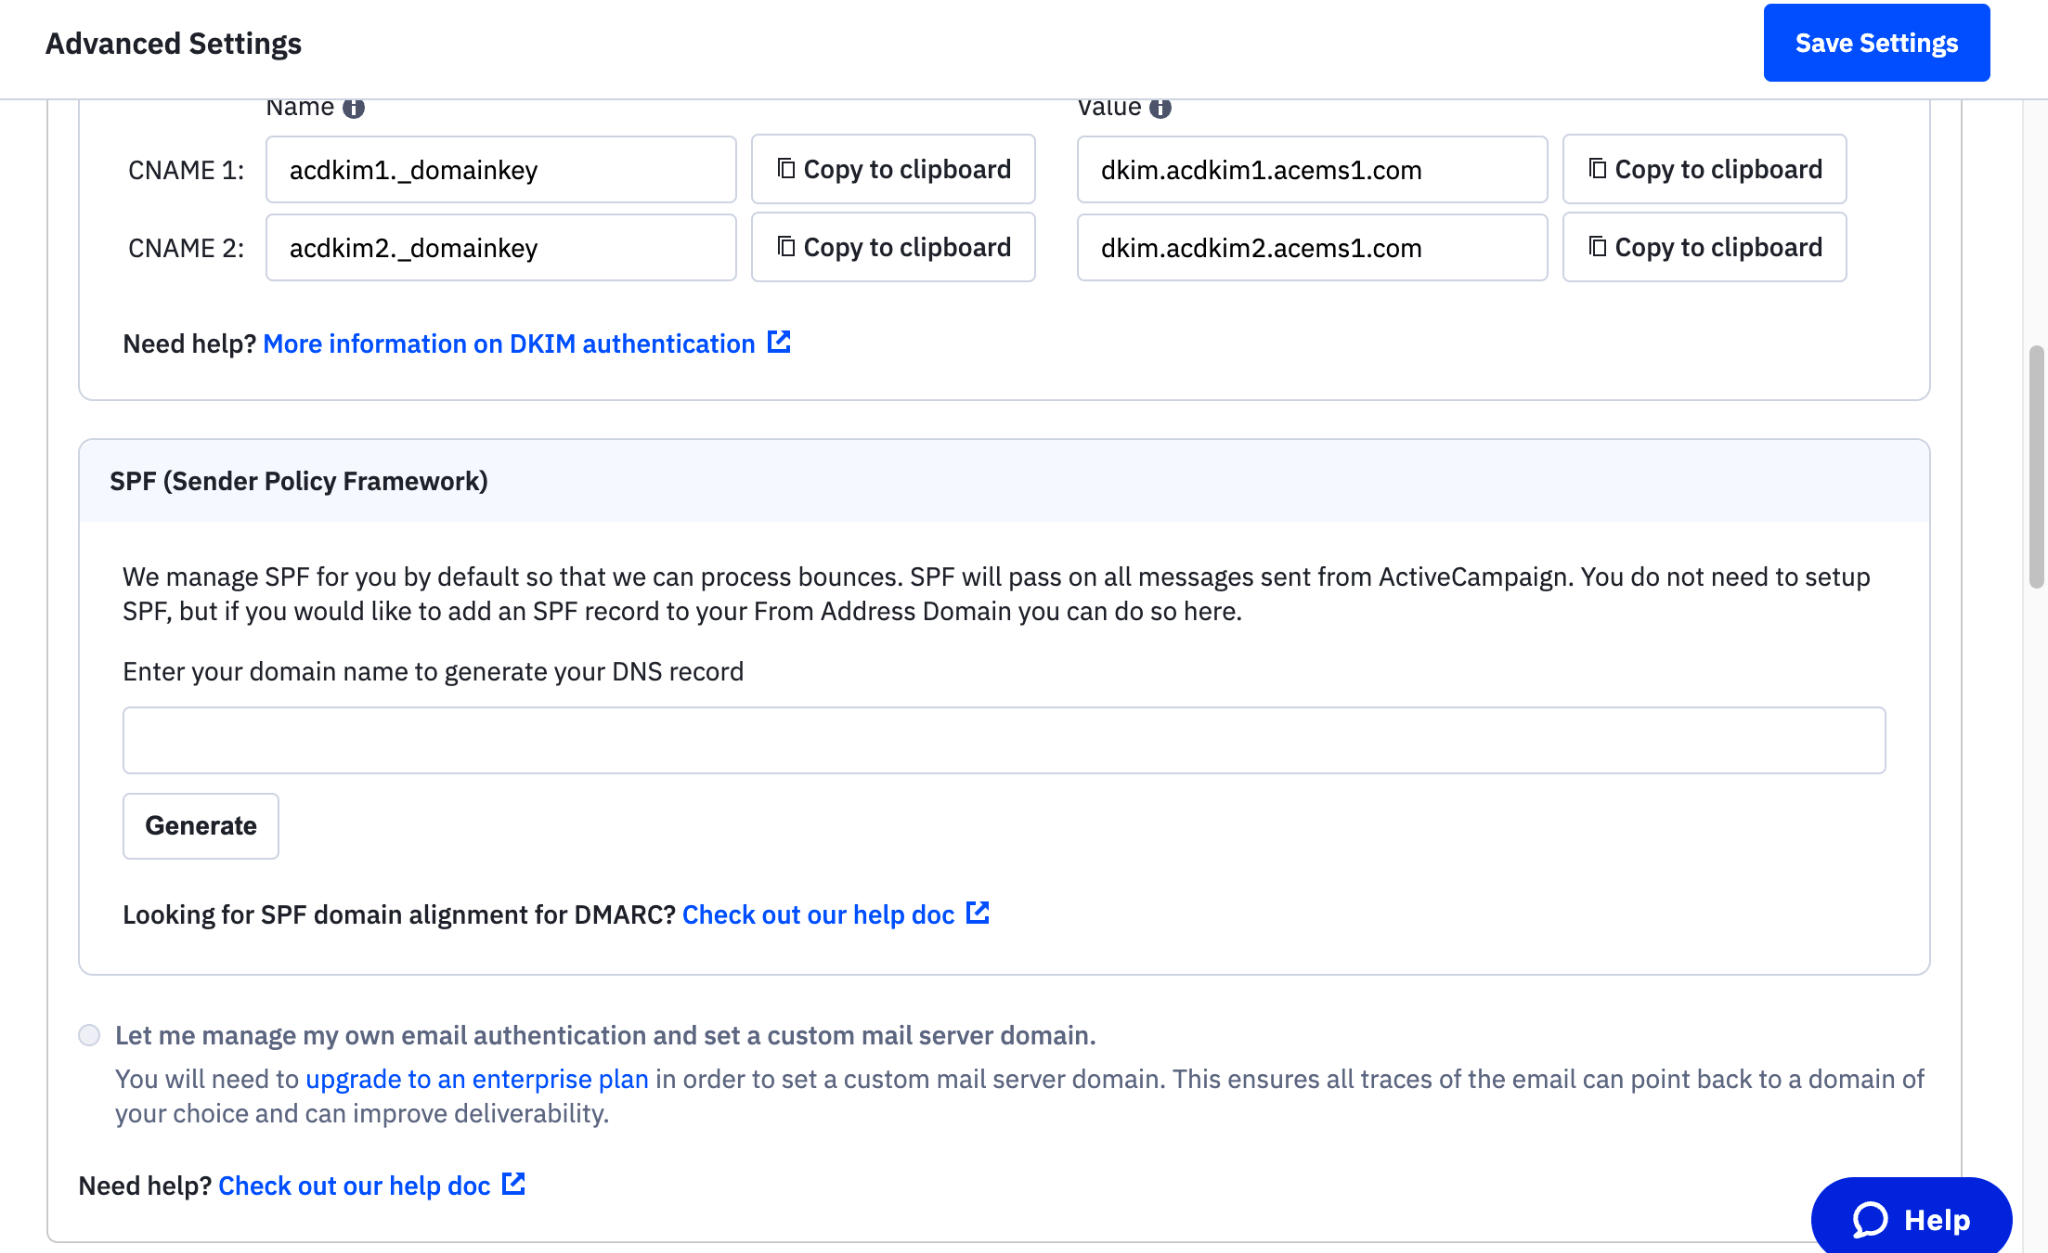
If you are interested in finding out more about these we have an email deliverability guide, where you can find information about DKIM, SPF, and more.
Step 3: Creating a list
Creating a list is an important step, as without a list you won't be able to send a campaign. It's also a great way to group and organize your users based on their interests, demographics, or other information.
- Staying within the Contacts tab, head to “Lists” and select the blue CTA “Add a list”
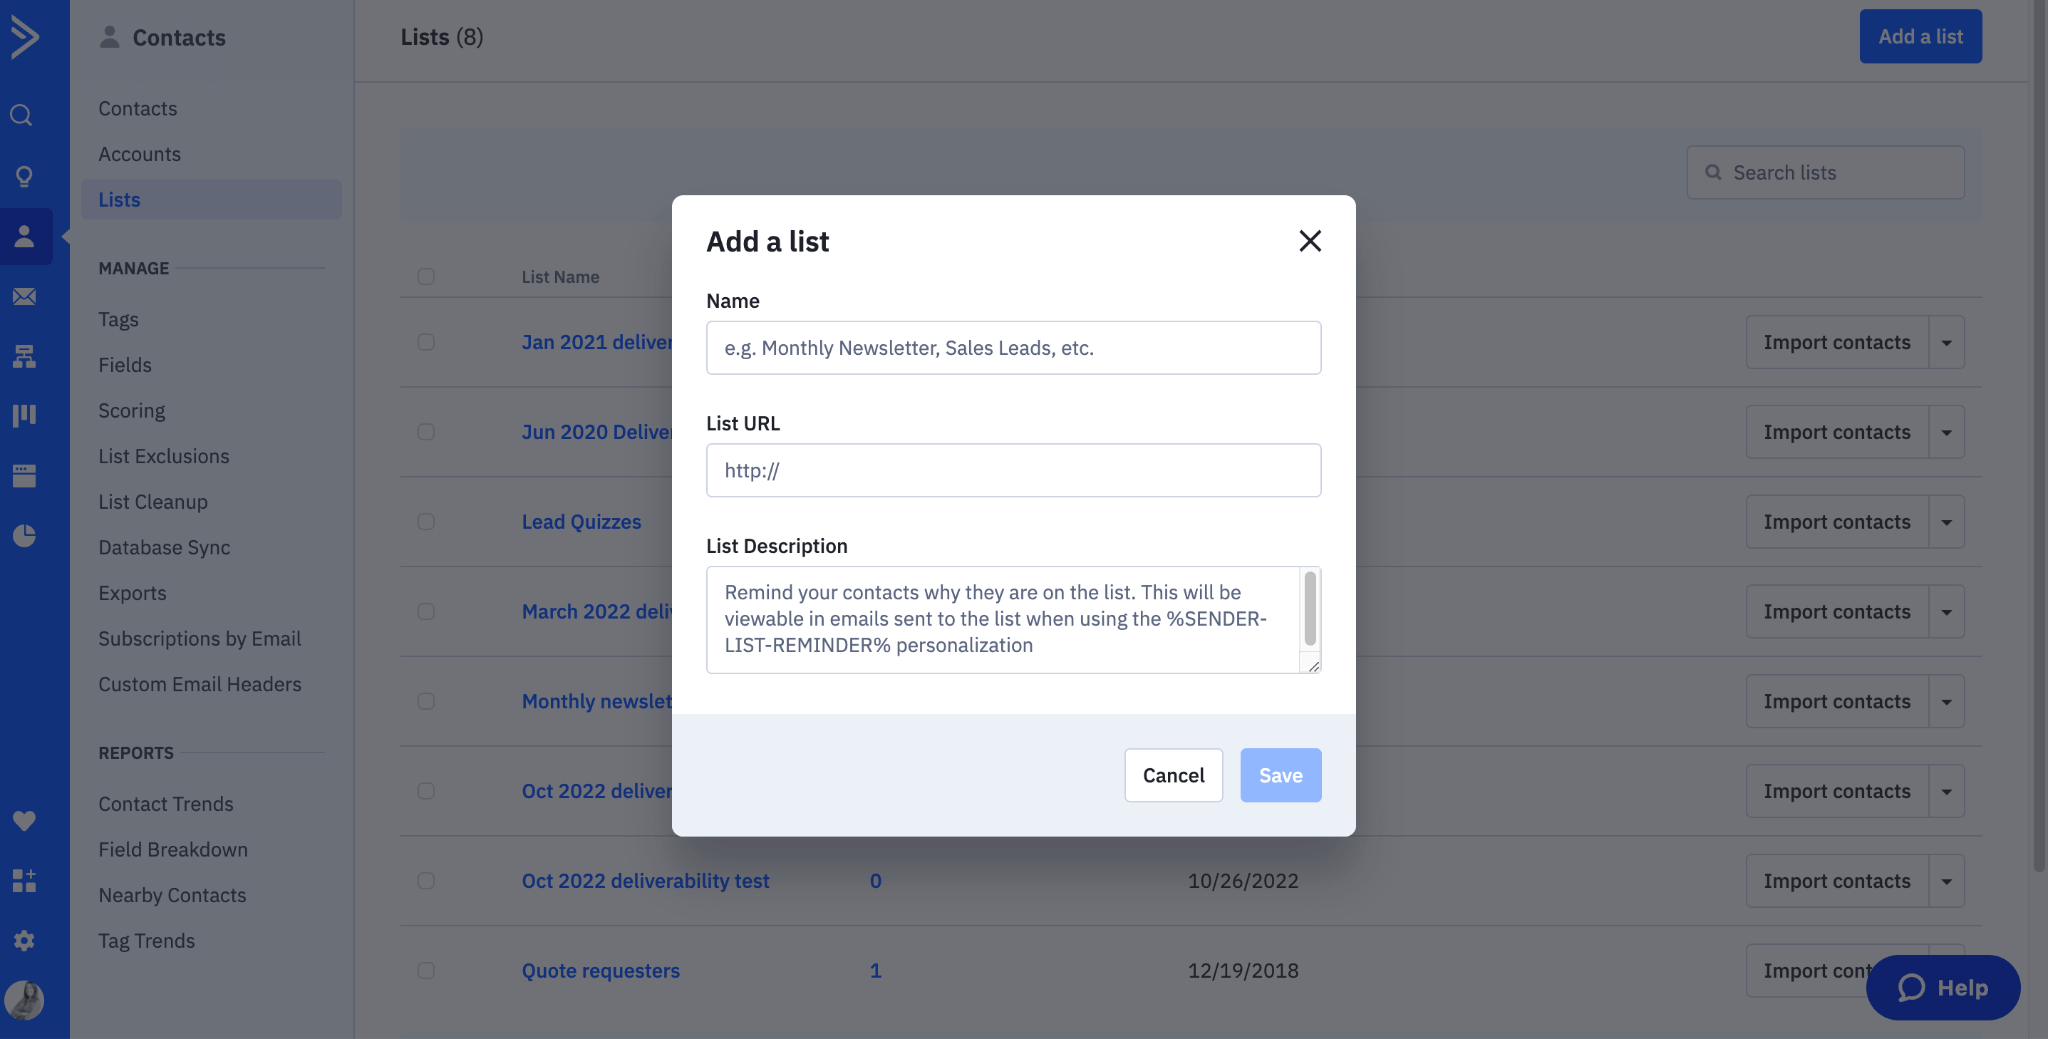
2. On the next screen, you’ll be asked to provide the following details:
- List name – We recommend keeping this short yet descriptive. It's also worth noting that your contacts will be able to see your list name when they subscribe to it – so keep it professional and be sure not to include any sensitive information.
- List URL – This seems confusing but it's actually your website and this needs to be added for compliance purposes.
- List Description – Use this field to remind any of your contacts how you got their details and why they are in this list. For example: “You are receiving this email as you have subscribed to our newsletter when placing an order on our site.”
3. Then simply click Save and your list is ready to go.
Step 4: Importing your contacts
Now that you’ve created your first list, it's time to import your contacts.
- First, click on the “Contacts” tab in the left-hand side navigation menu, and you’ll be asked if you’d like to migrate your account for free. This is an incredibly handy process for those of you who are transferring from your old email service provider to ActiveCampaign. We’ve provided a full tutorial on how to do this below.
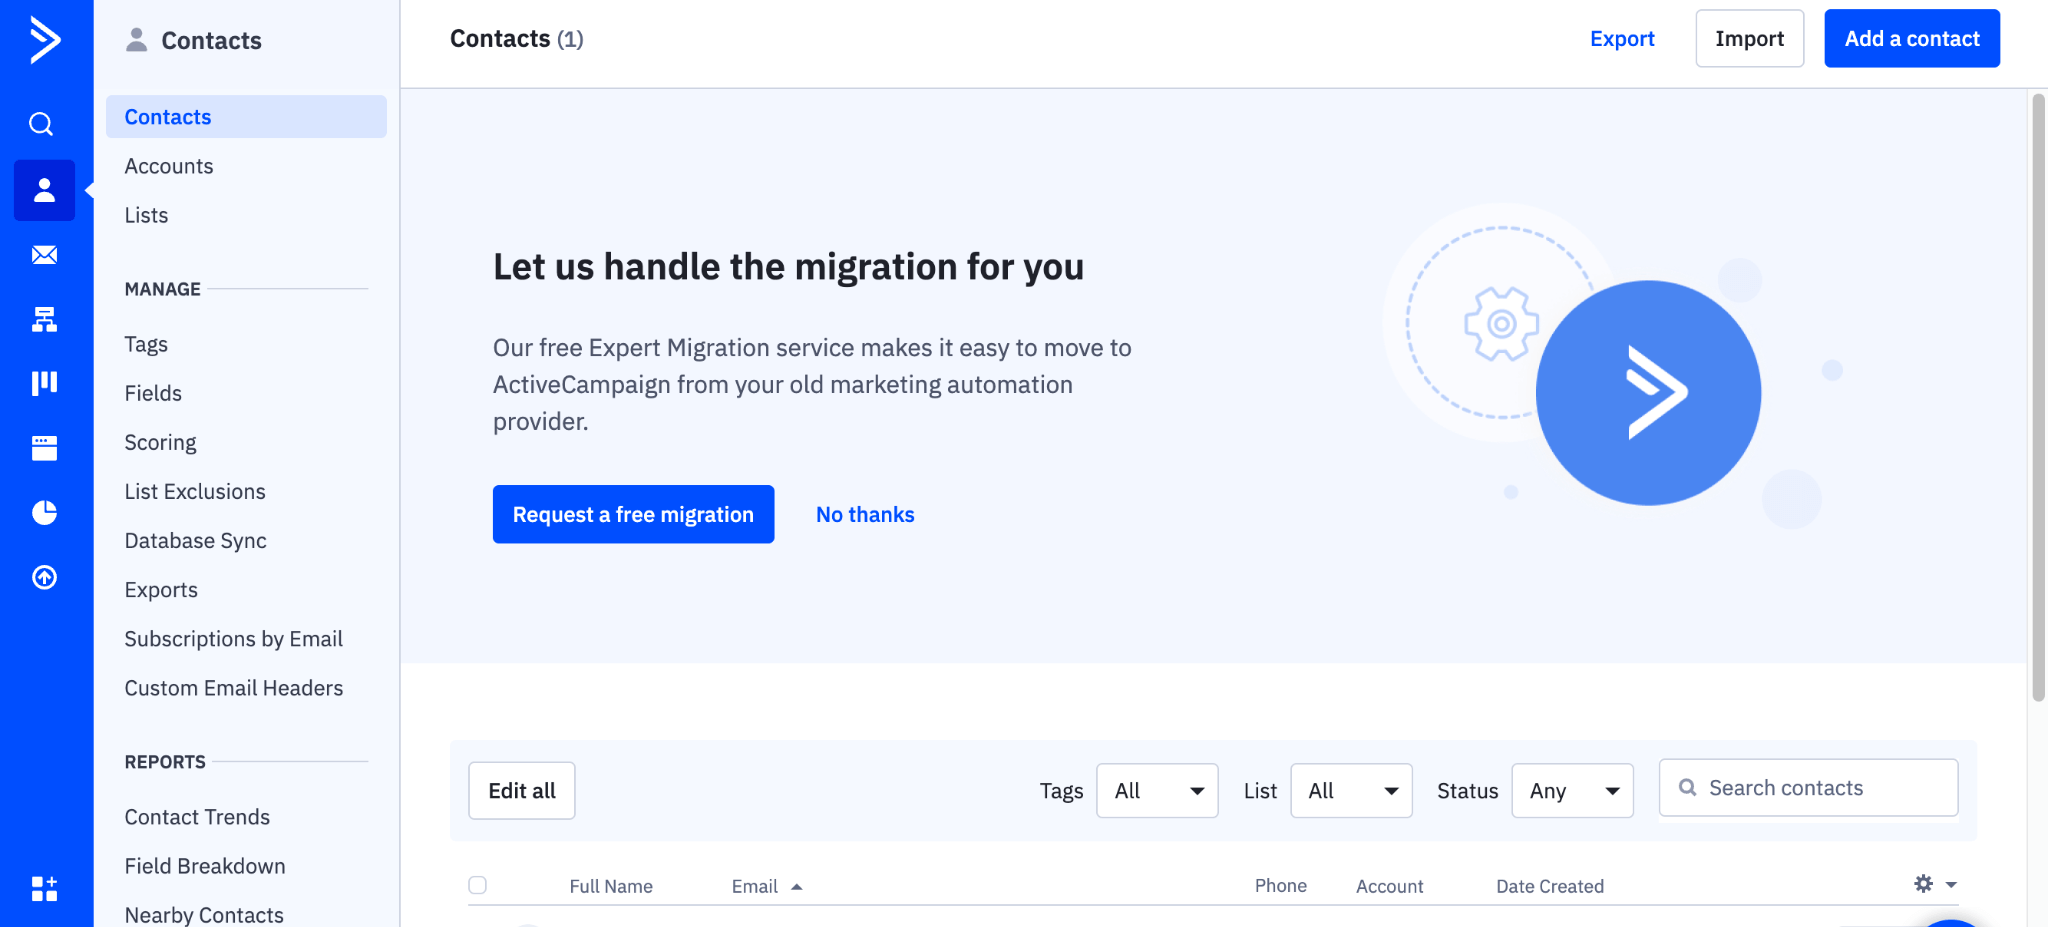
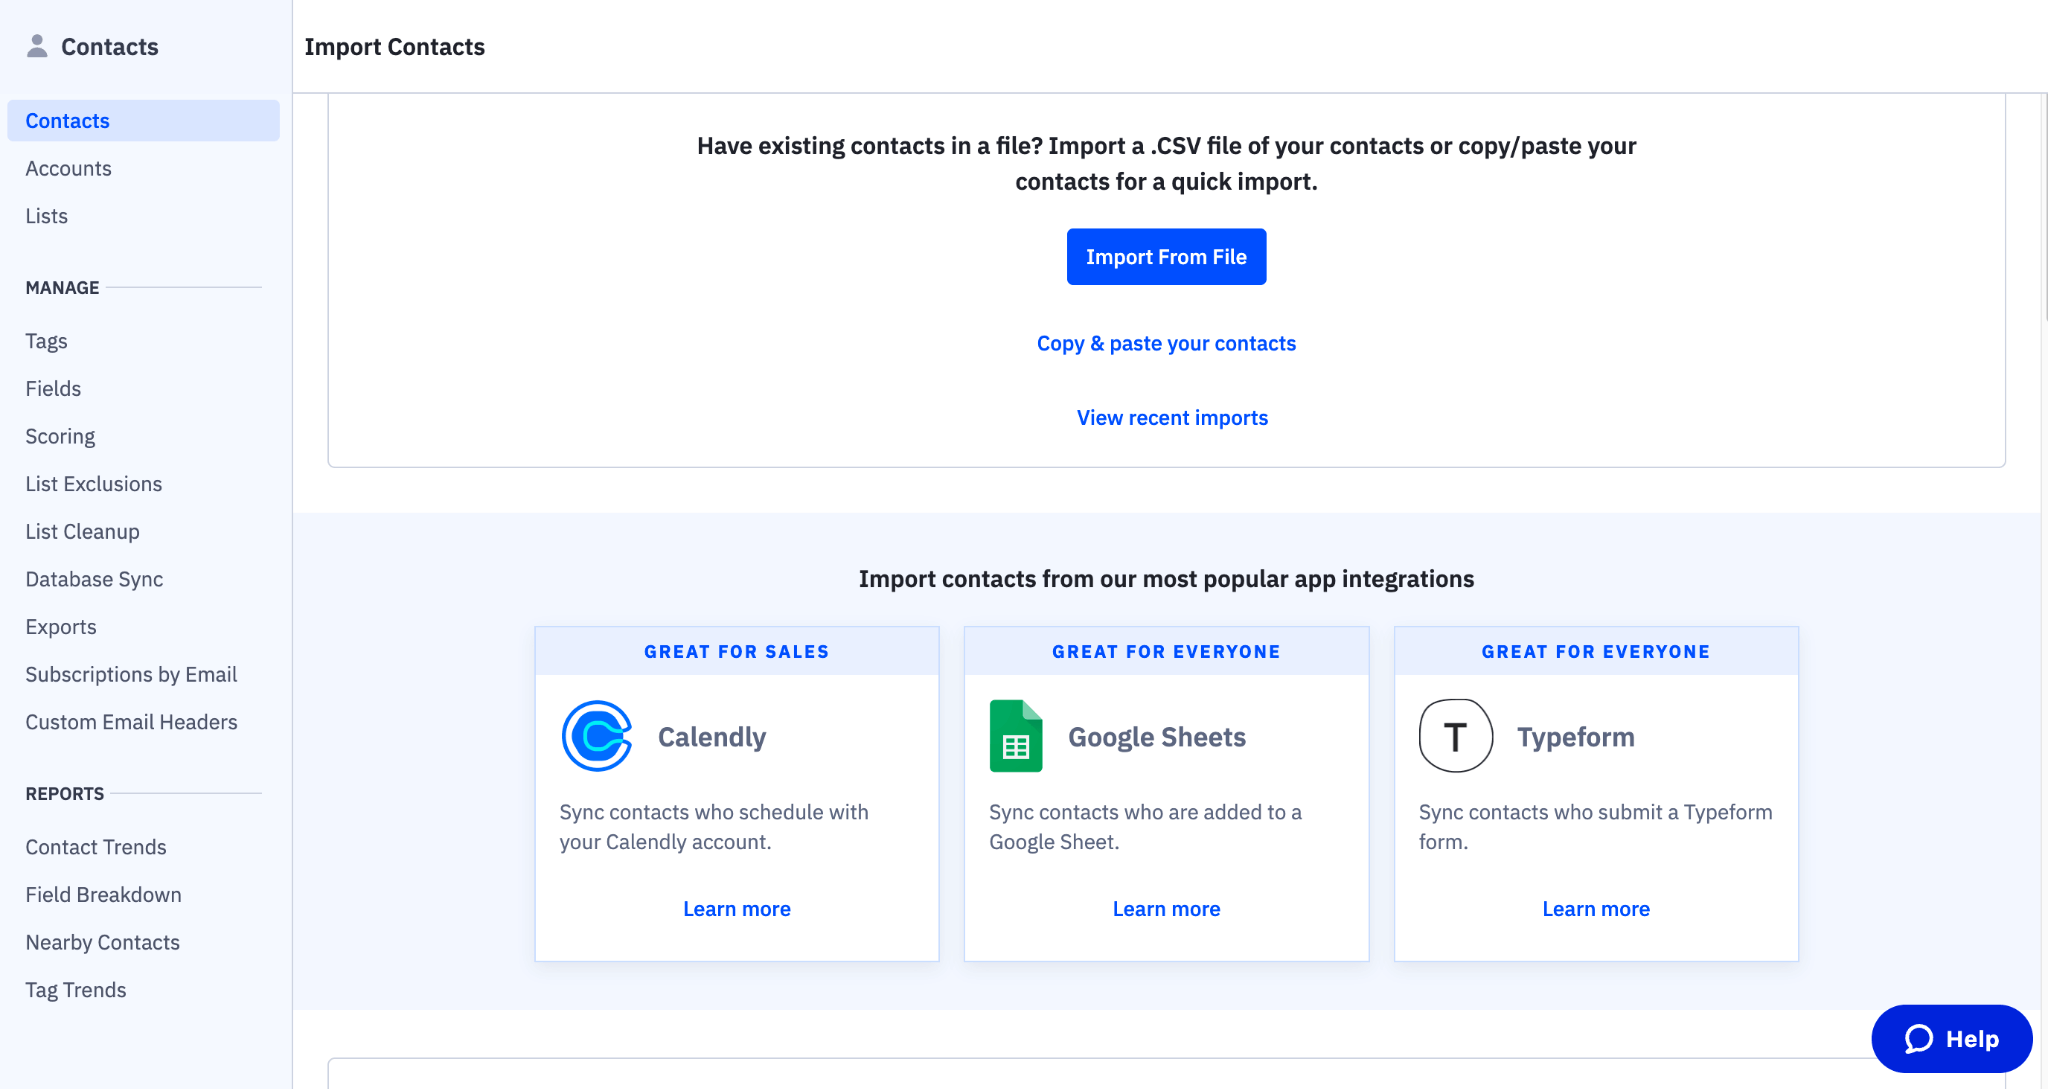
2. Now you are in the Contacts tab, you have two options – you can add an individual contact by clicking on “Add a contact” or alternatively for bulk uploading, click on the “Import” button in the top right-hand corner.
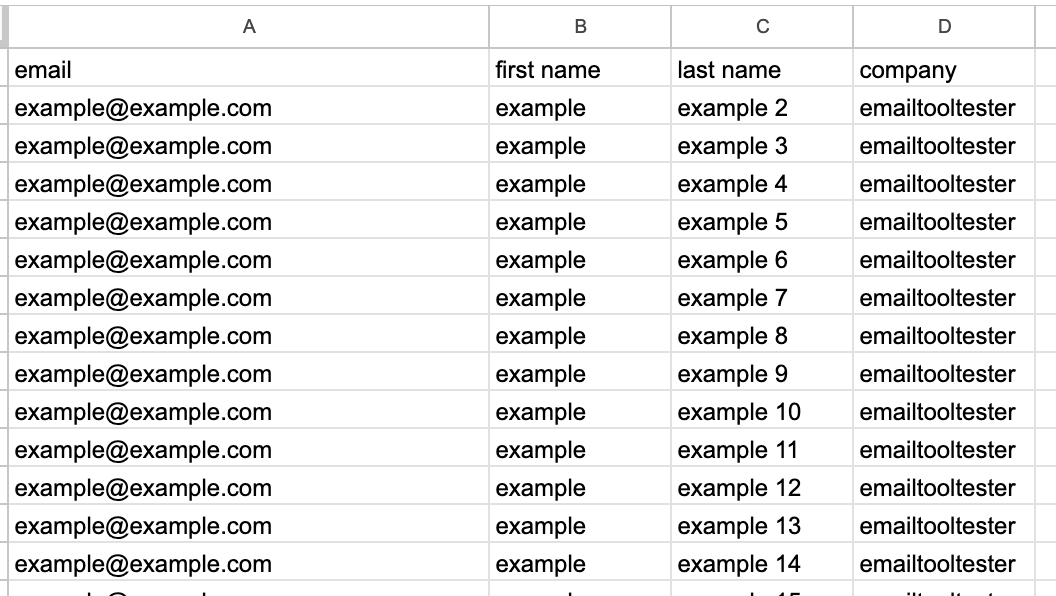
3. For bulk uploading, you can choose to import your contacts from a file, which needs to be in a CSV format. If you choose this format, make sure your CSV file includes the necessary fields, such as name, company, and email address.
4. Once your file is uploaded, you’ll be asked to map your fields. This is where you need to make sure your file data is properly mapped within the ActiveCampaign CRM.
5. For example, make sure that your email addresses are linked to the email address field, your first names are linked to the first name field, and so on. You can also choose to ignore some of the columns in case the data is irrelevant.
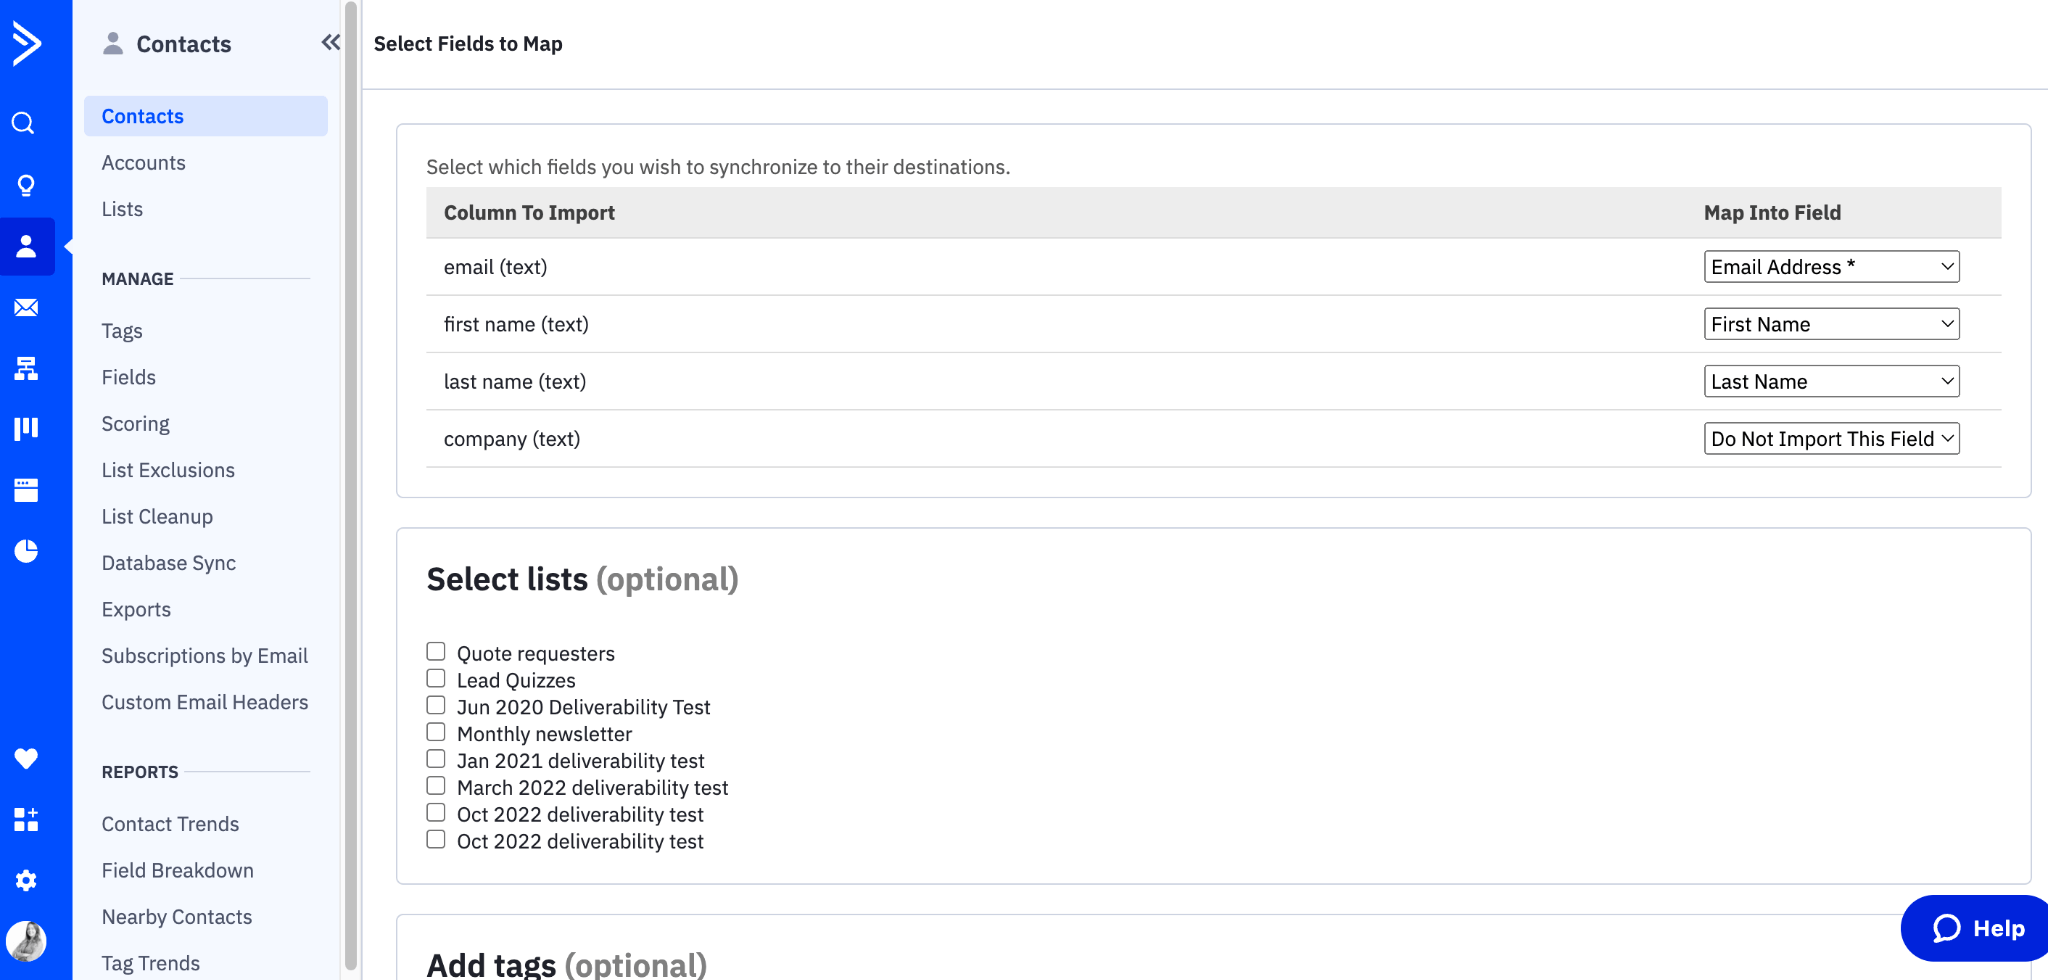
6. You can add a tag to this import to help you differentiate these contacts from the rest. It's optional.
7. And once you’ve mapped out your user data, select the list you wish to add them to and hit “Import Now”.
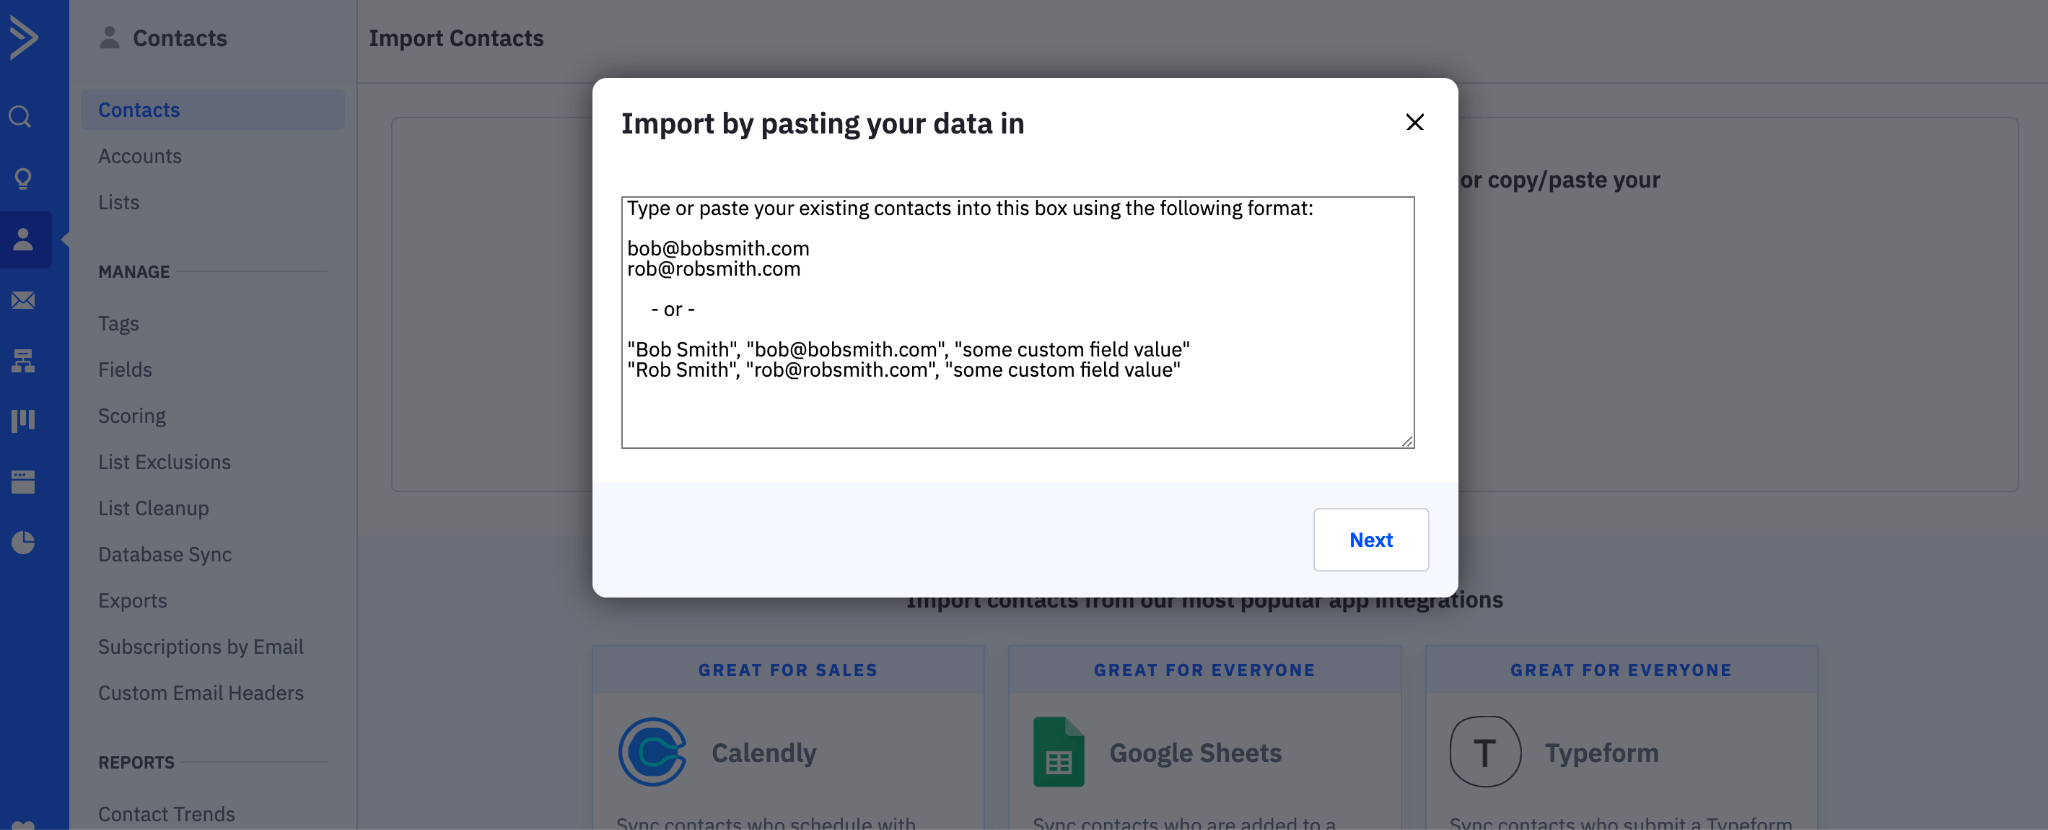
8. In case you don’t want to go through the file upload method, you can also copy and paste your contacts using the same format as the screenshot below. This method is easy if you are only interested in bulk uploading email addresses.
However, if you are looking to specify different user fields such as “name” and “company” this method will definitely take more time.
9. And lastly, you can also import your contacts directly from other apps such as Calendly, Google Sheets, and more.
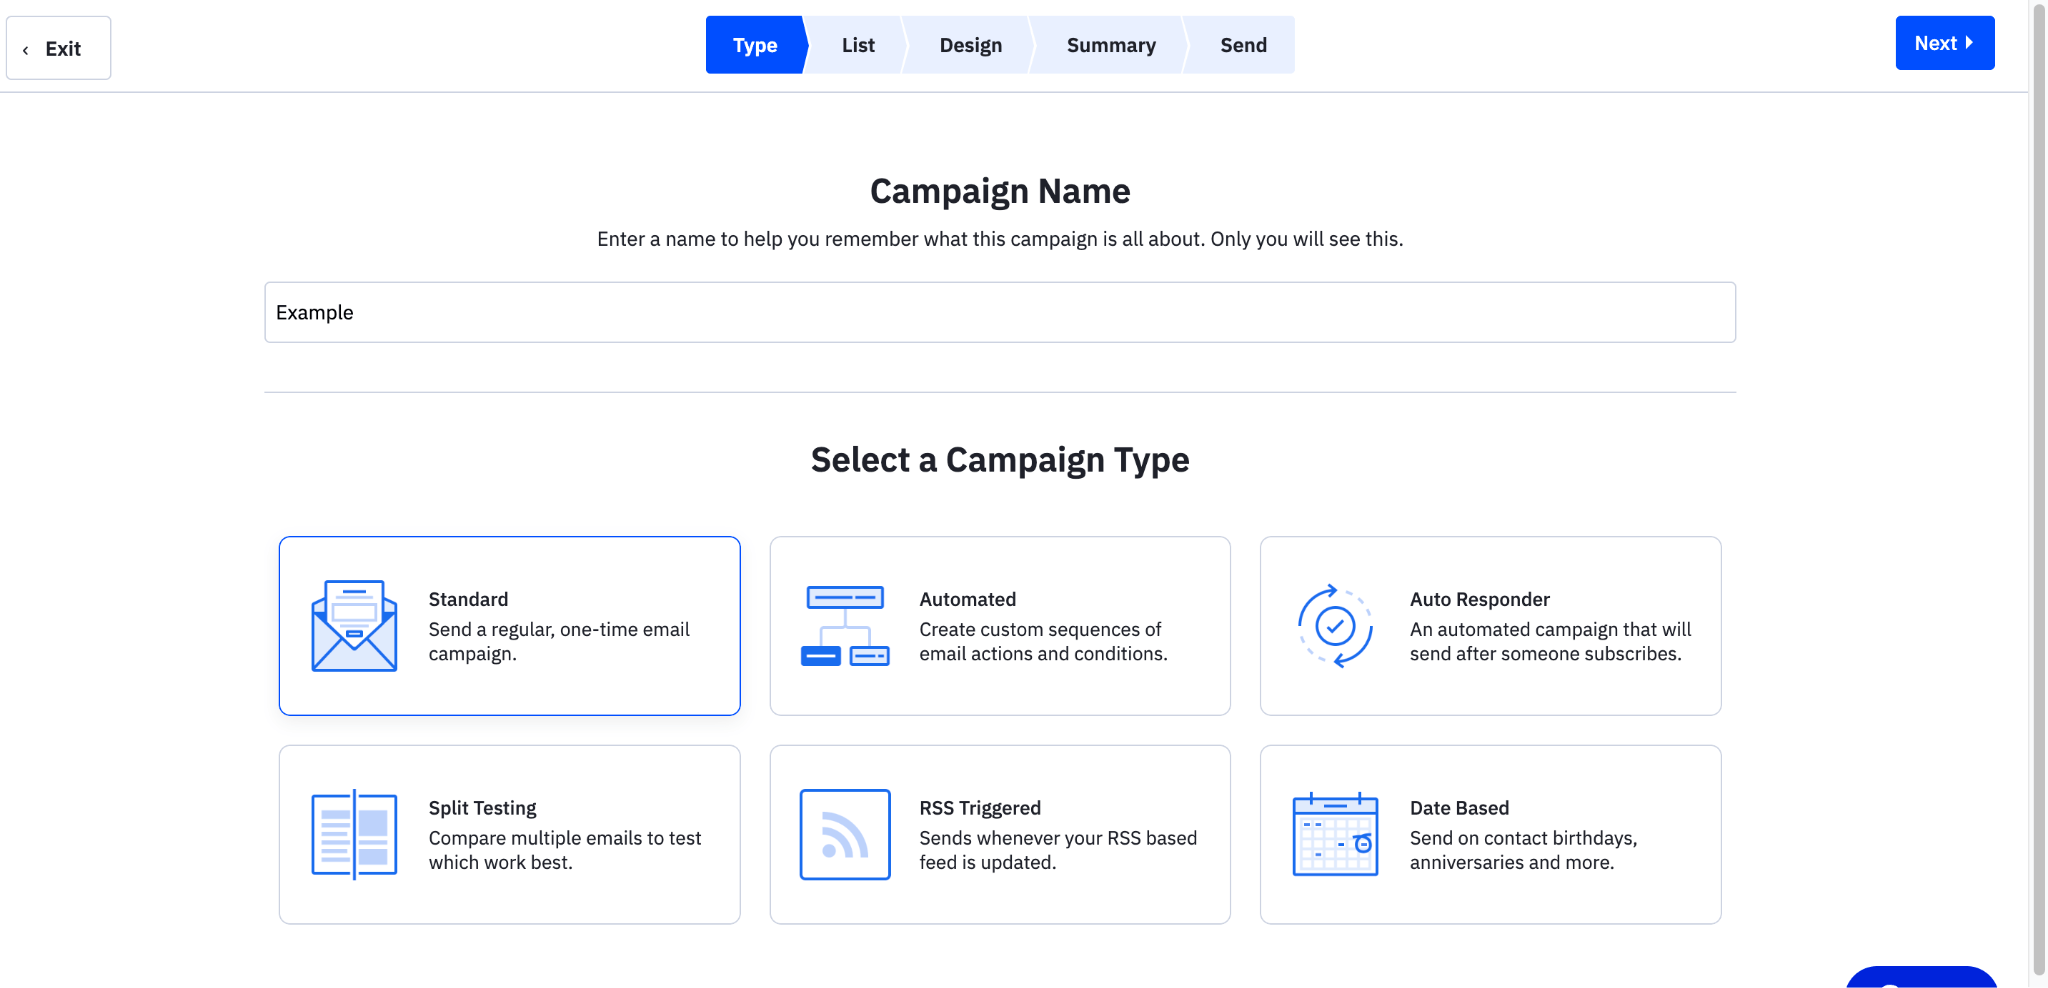
Step 5: Create your First Email Campaign
Now that your contacts have been uploaded to your desired list, it's time to create your first email campaign.
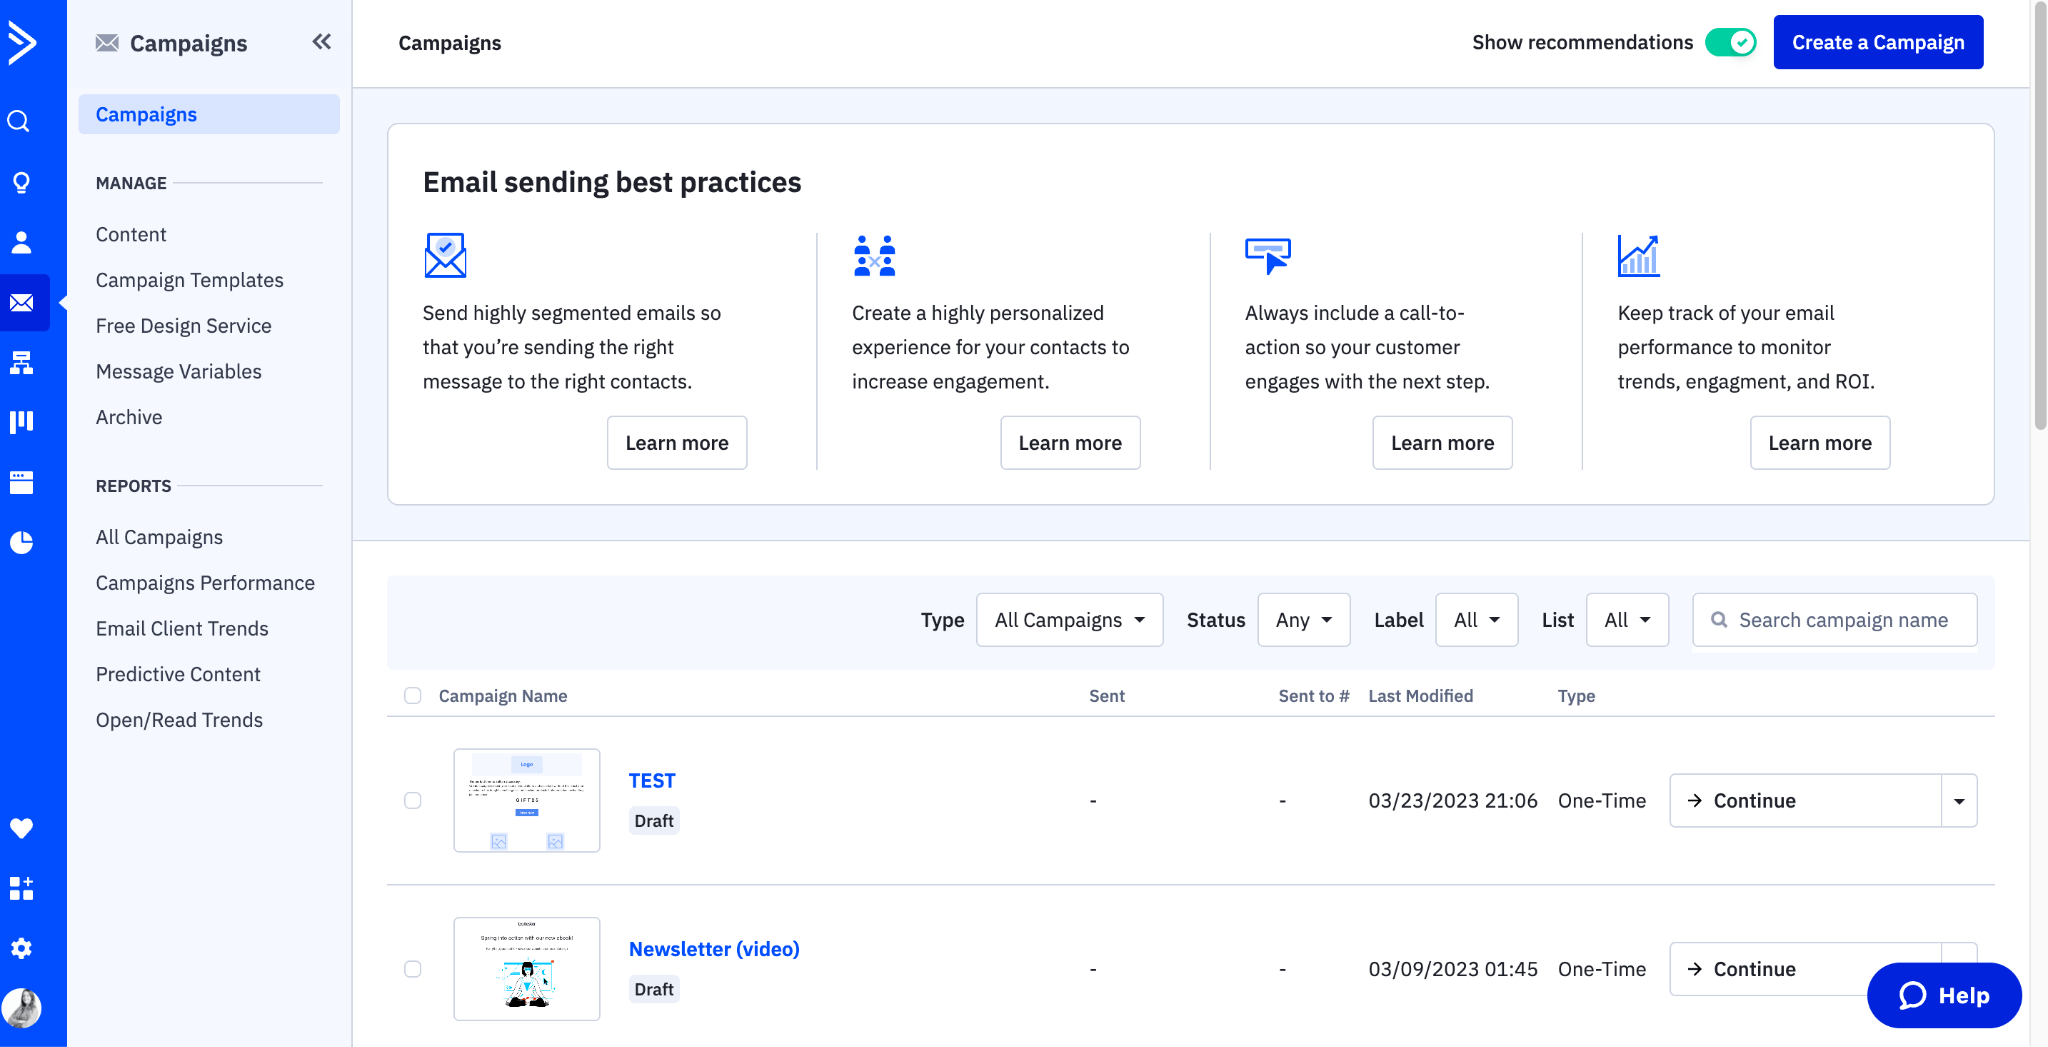
- Click on the “Campaigns” tab in the top navigation menu, and then click on the “Create a Campaign” button.
2. Next, choose the type of campaign you want to create. You can choose from the following Campaign types:
- Automated – Create custom sequences of email actions and conditions.
- Standard – Send a regular, one-time email campaign
- Auto Responder – An automated campaign that will send after someone subscribes
- Split Testing – Compare multiple emails to test which works best.
- RSS Triggered – Sends whenever your RSS-based feed is updated.
- Date Based – Send on contact's birthdays, anniversaries, and more.
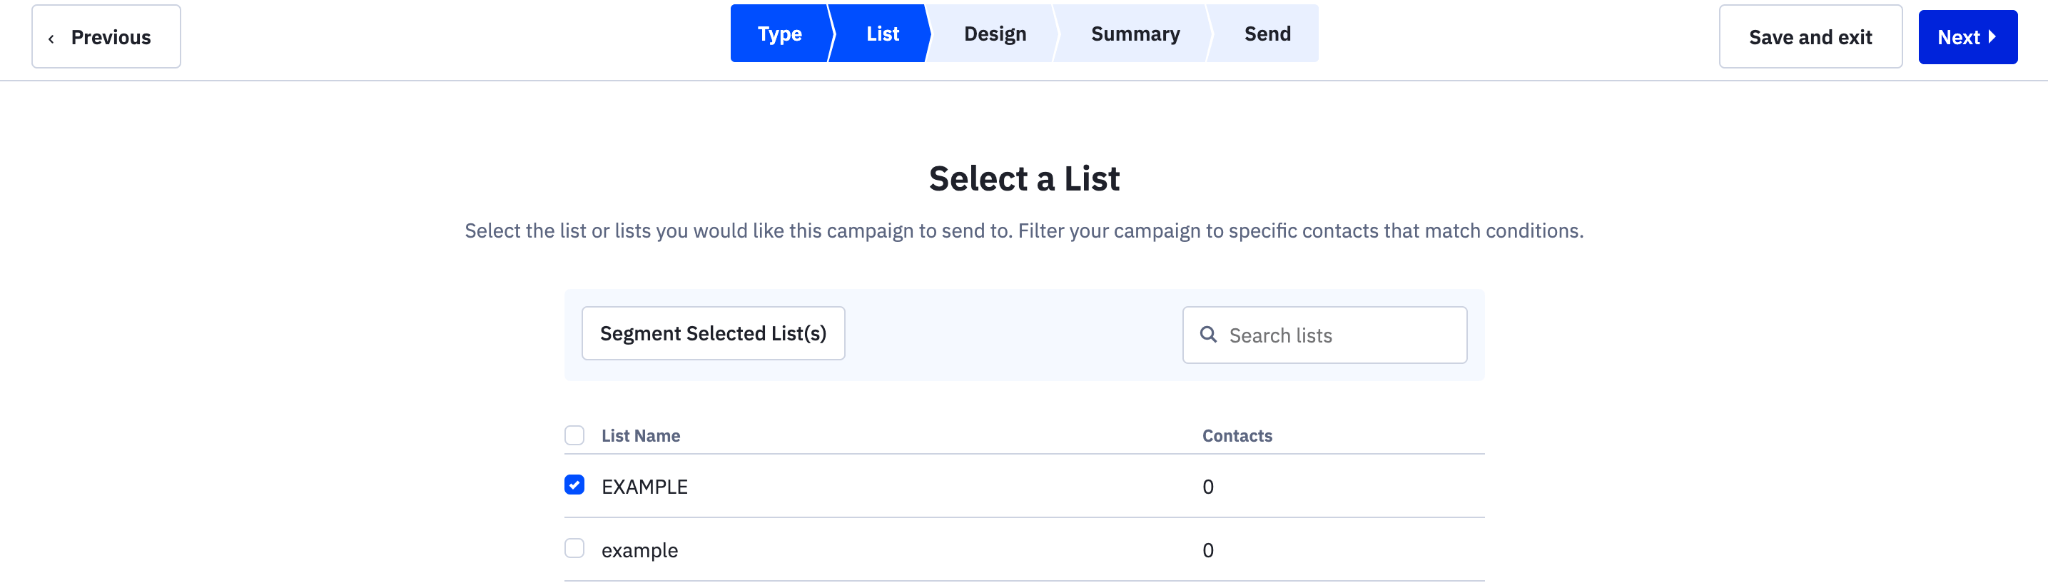
3. Next, you’ll be asked to select the email list to that you want to send that particular campaign to.
4. Then you'll be prompted to choose an email template type. This will depend on the email campaign you are sending, you can choose from the following options:
- Email Designer (their new and improved email template builder)
- Classic Designer (drag-and-drop email builder)
- Text only (text-based emails, without images)
- Custom HTML (upload your own HTML email template)
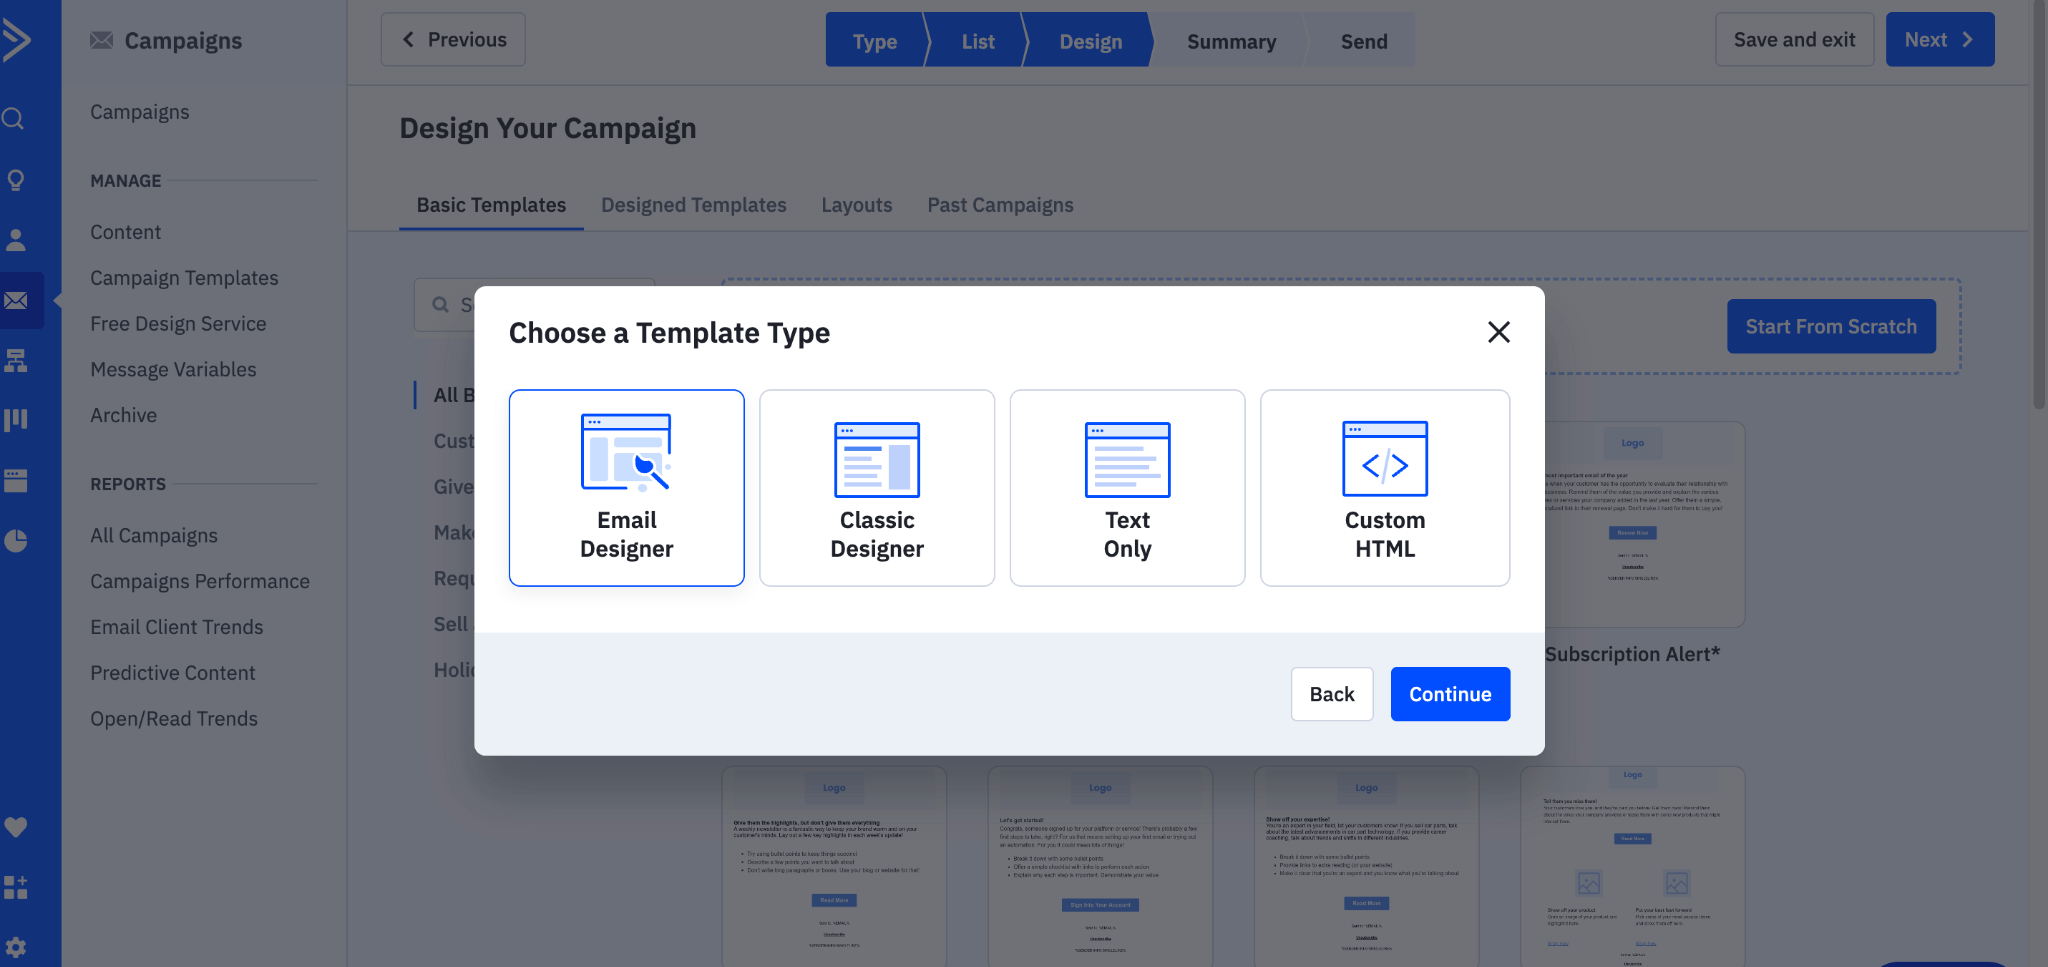
For this example, we’ll choose their newer Email Designer.
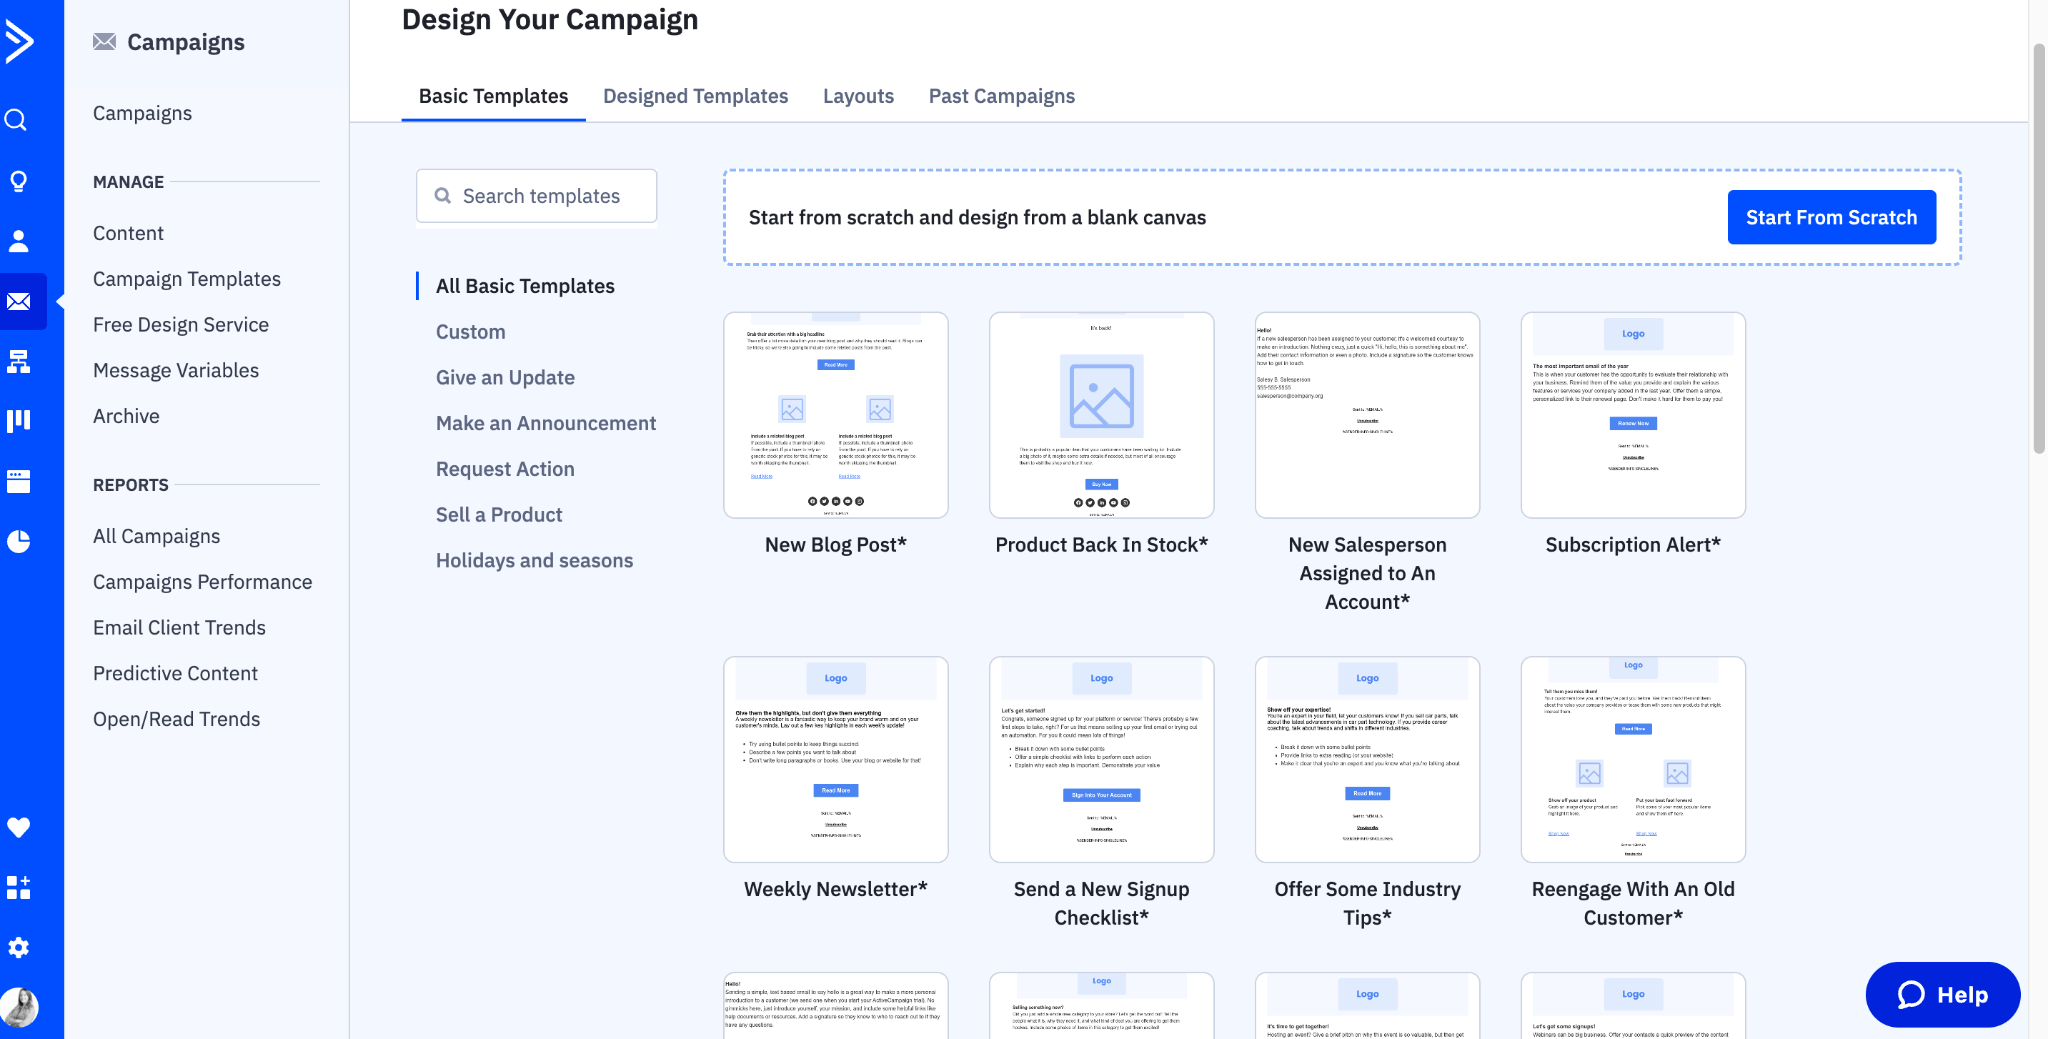
5. Here you’ll be asked to pick your desired ActiveCampaign template, and as you can see, there is a great selection of categories to choose from such as “Sell a product”, “Make an announcement” and more. Alternatively, you can “Start From Scratch”.
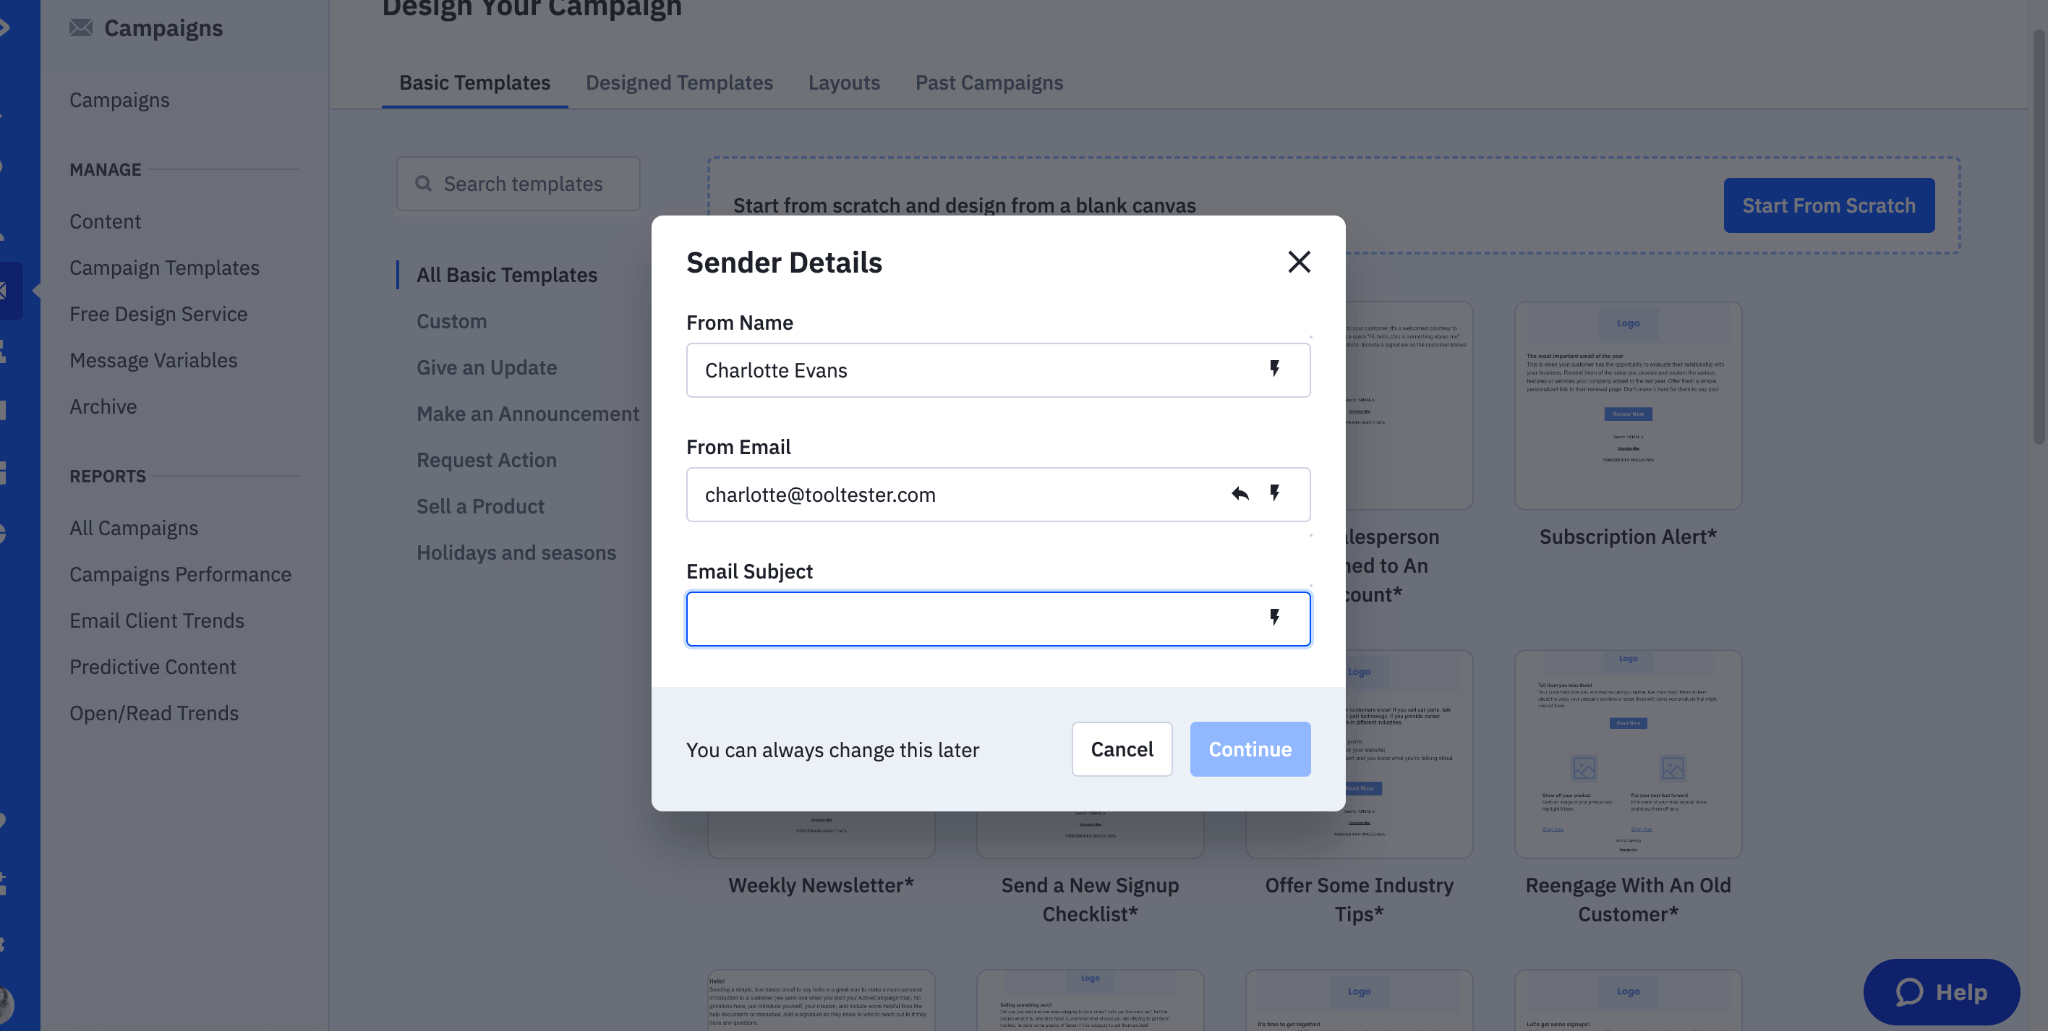
6. Once you've chosen your ActiveCampaign template, you’ll be asked for your sender details, which will be your “From Name”, “From Email” and your “Email subject”. Don’t worry if you are still unsure about these details, as you can edit this information later before sending it.
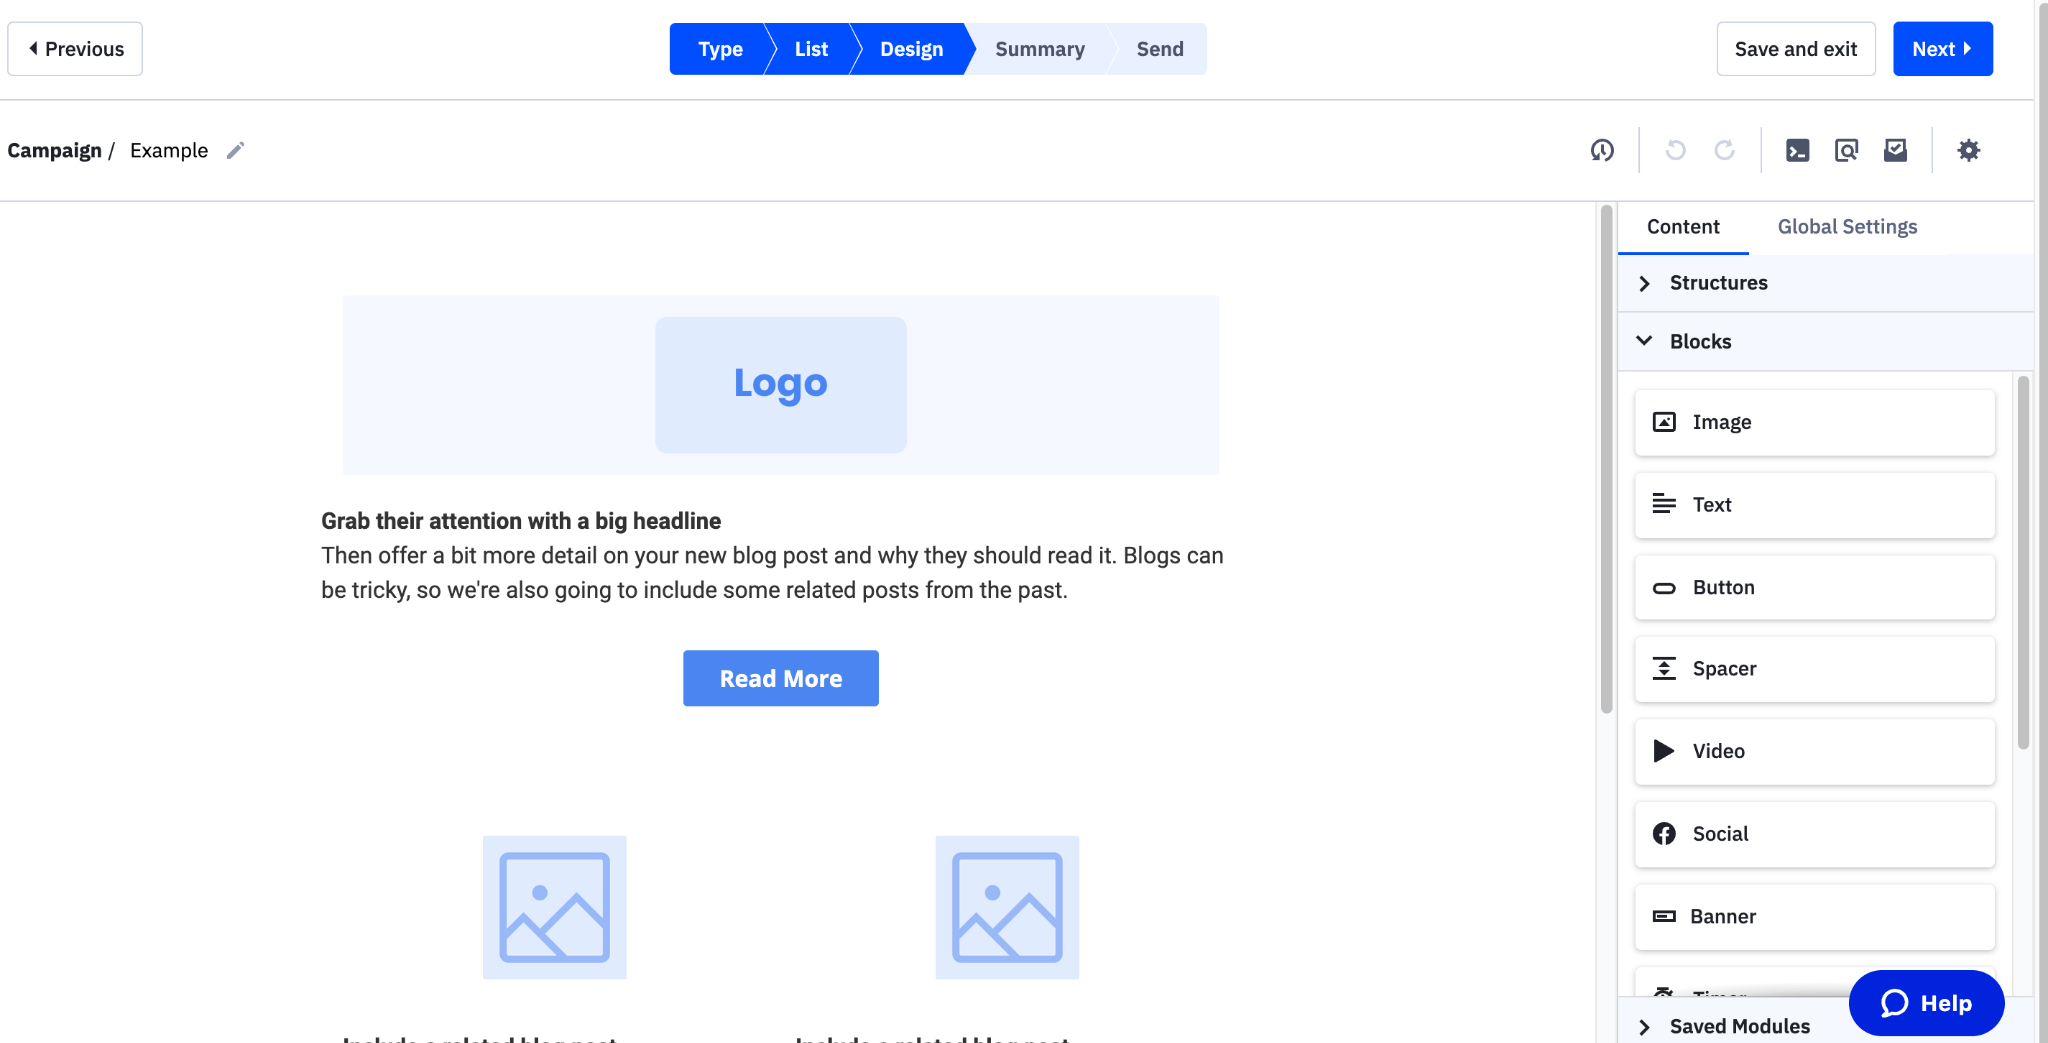
7. After you’ve entered the required fields, it's time to add your content. Use the drag-and-drop email editor to add images, text, and other elements to your email. Make sure your email is visually appealing and easy to read.
Tip: Need some inspiration on creating your first email newsletter? Check out our guide on how to create a newsletter.
Step 6: Preview and Send your Email Campaign
- Before sending your email campaign, make sure that you preview it to ensure everything looks good. You can preview your email by clicking on the “Preview” button in the editor.
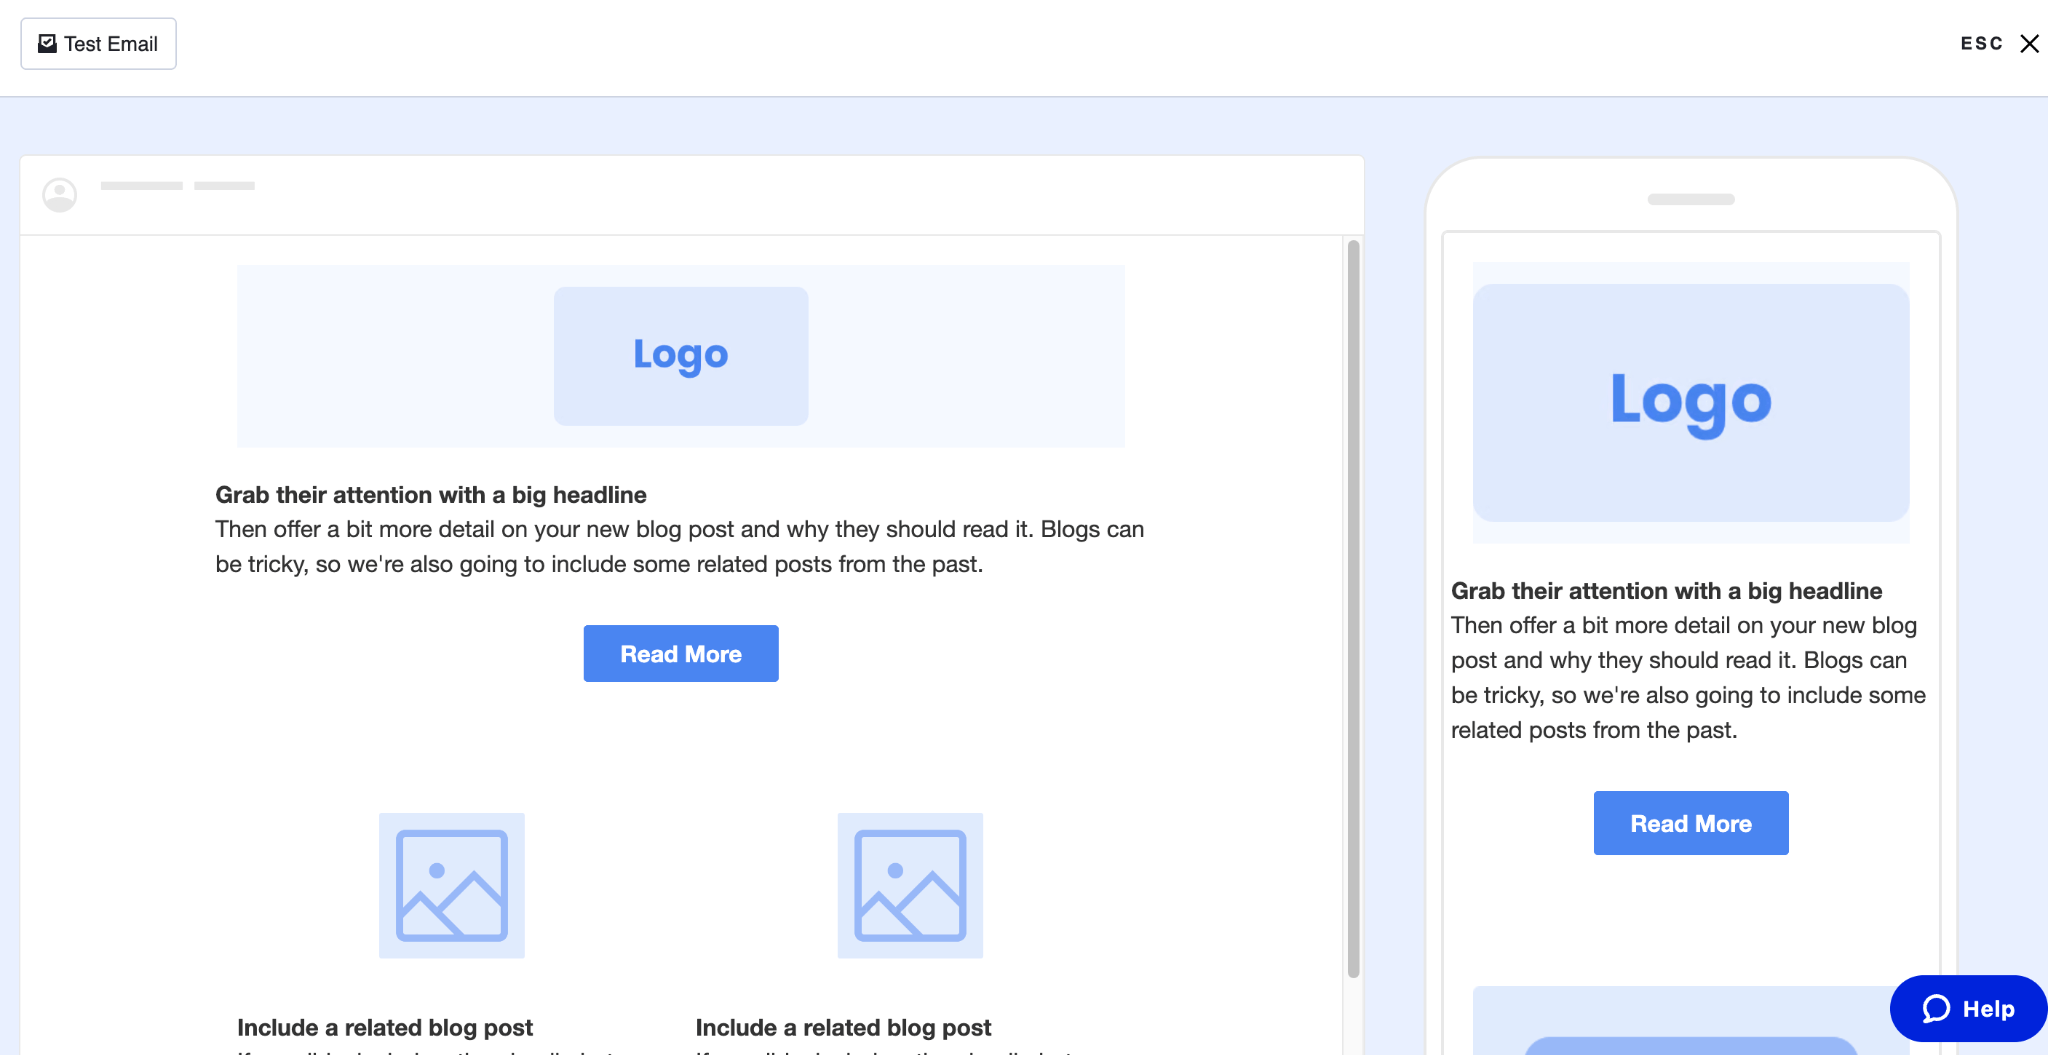
2. You’ll be able to see your campaign on the desktop version and mobile.
3. If you click on “Test Email” here you’ll be able to send an email preview to 5 different users to test how your campaign looks in different inboxes.
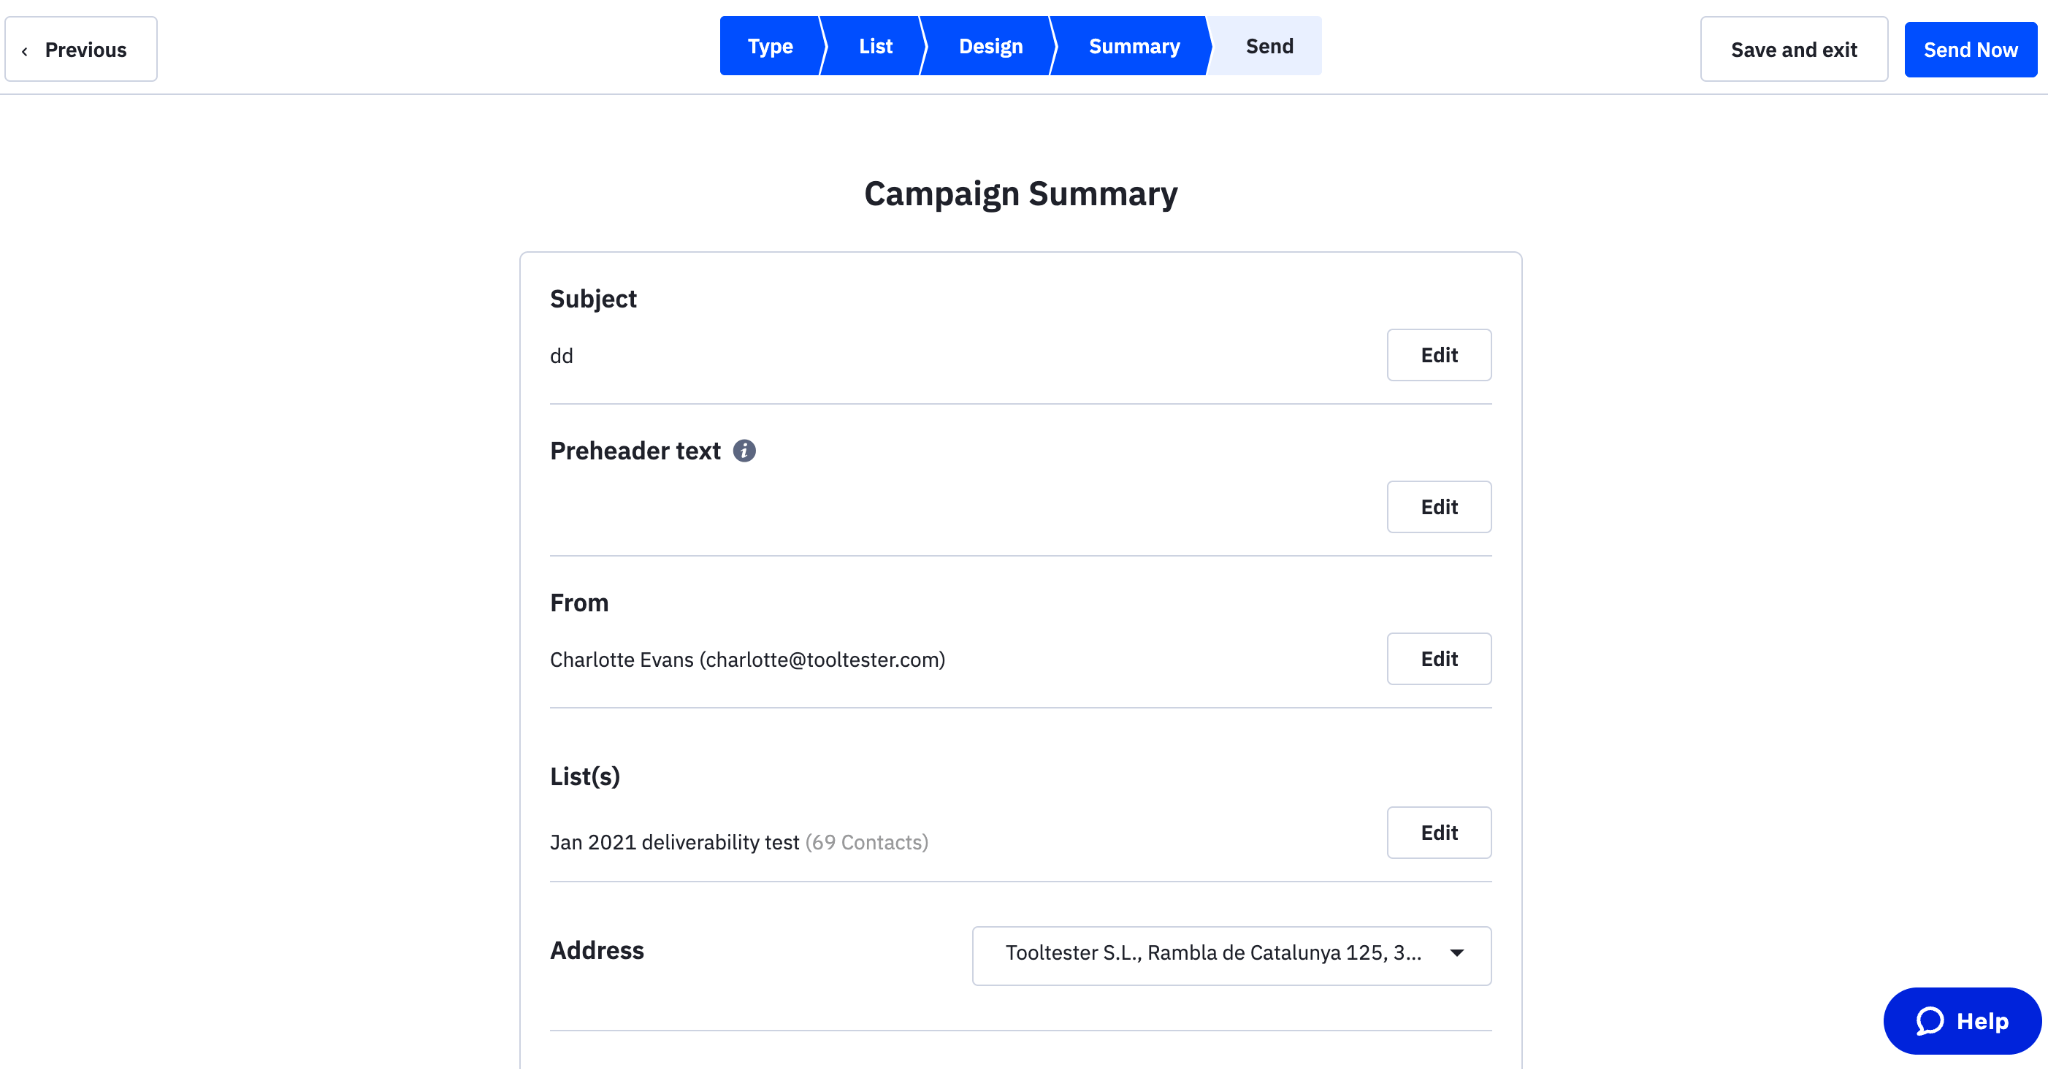
4. Once you're satisfied with your email, it's time to send it. Click on the “Next” button to review your Campaign Summary, and then click “Send Now” to send your email.
5. If you’d rather schedule your campaign for another date or time, you can do so by switching the button to “on” and selecting which day and time works best for you (and your customers).
Migrating to ActiveCampaign from Another Provider
As we mentioned earlier, you can get a free migration to ActiveCampaign if you’re coming over from another provider. Here are some instructions for companies migrating to ActiveCampaign from another provider:
Plan Your Migration:
1. The first step is to plan your migration. Make a list of all the data you need to transfer, such as subscriber lists, CRM data, automation workflows, email templates, and so on. You can check your migration options here.
Set Up Your ActiveCampaign Account:
2. Next, set up your ActiveCampaign account. Create a new account, and set up the necessary settings such as language, time zone, accounts, etc.
Export Your Data from Your Previous Provider:
3. Export your data from your previous email marketing provider. Most providers have an export feature that lets you download your email list, subscriber data, automation workflows, and other data in a CSV or Excel format. You can also export HTML email templates and other campaign assets, although it’s always a good idea to preview and send a few test emails in ActiveCampaign first, in case of any compatibility issues.
Import Your Data into ActiveCampaign:
4. Import your data into ActiveCampaign. Use the contact import feature to upload your CSV or Excel files containing your email list, subscriber data, and other campaign assets. Make sure that the data is correctly mapped to the appropriate fields in ActiveCampaign.
Set Up Automation Workflows:
5. If relevant, recreate your automation workflows in ActiveCampaign. Review your previous workflows, and create new ones using the automation builder. Make sure that your workflows are functioning correctly and test them before going live.
Update Your Signup Forms and Landing Pages:
6. Update your signup forms and landing pages to reflect your new email marketing provider. Ensure that they match your branding, and are optimized for conversions.
Notify Your Subscribers:
7. Notify your subscribers that you are migrating to a new email marketing provider. Send them an email announcement informing them of the change and provide them with the necessary information to update their preferences or unsubscribe if they wish.
ActiveCampaign Automation Tutorials
Once you've set up your account and are familiar with creating and sending email campaigns, you're ready to move onto more advanced email marketing. ActiveCampaign has tons of pro features, including automation workflows.
To help you set up a simple welcome email autoresponder, we've put together the following video tutorial:
If you want to set up more advanced automations, this complete tutorial will walk you through setting up automated workflows using a number of triggers. It also covers abandoned cart notifications, for those with an online store:
Final thoughts: ActiveCampaign
Although our full ActiveCampaign tutorial should have helped you to get set up with ease, the great thing about ActiveCampaign is that they offer a lot of support to their customers. Not just through their live chat and contact forms, but also through great learning resources for both the absolute beginner to the more experienced email marketing professional.
Interested in finding out more? Check out our full ActiveCampaign review.
> Signup for a free trial of ActiveCampaign here.
The authors
Learn more about us

We keep our content up to date
17 Apr 2026 - Added ActiveCampaign autoresponder tutorial video
29 Oct 2024 - Added ActiveCampaign automation tutorial section and video
19 July 2023 - Added ActiveCampaign video tutorial
Our Methodology
This article has been written and researched following our EmailTooltester methodology.
Our Methodology