Email authentication is a process of verifying the identity of an email sender. This helps to ensure that the email is coming from a trusted source, and not from a spammer or phisher. It is one of the most important steps on any email marketer's checklist.
This will help improve your email deliverability, as the likelihood of your emails and newsletters going to spam increases if you aren't using any authentication methods.
From February 2024, email authentication has also been a requirement if you're sending to Gmail and Yahoo Mail customers.
There are several methods of email authentication, which we are going to discuss now.
Why is email authentication even a thing?
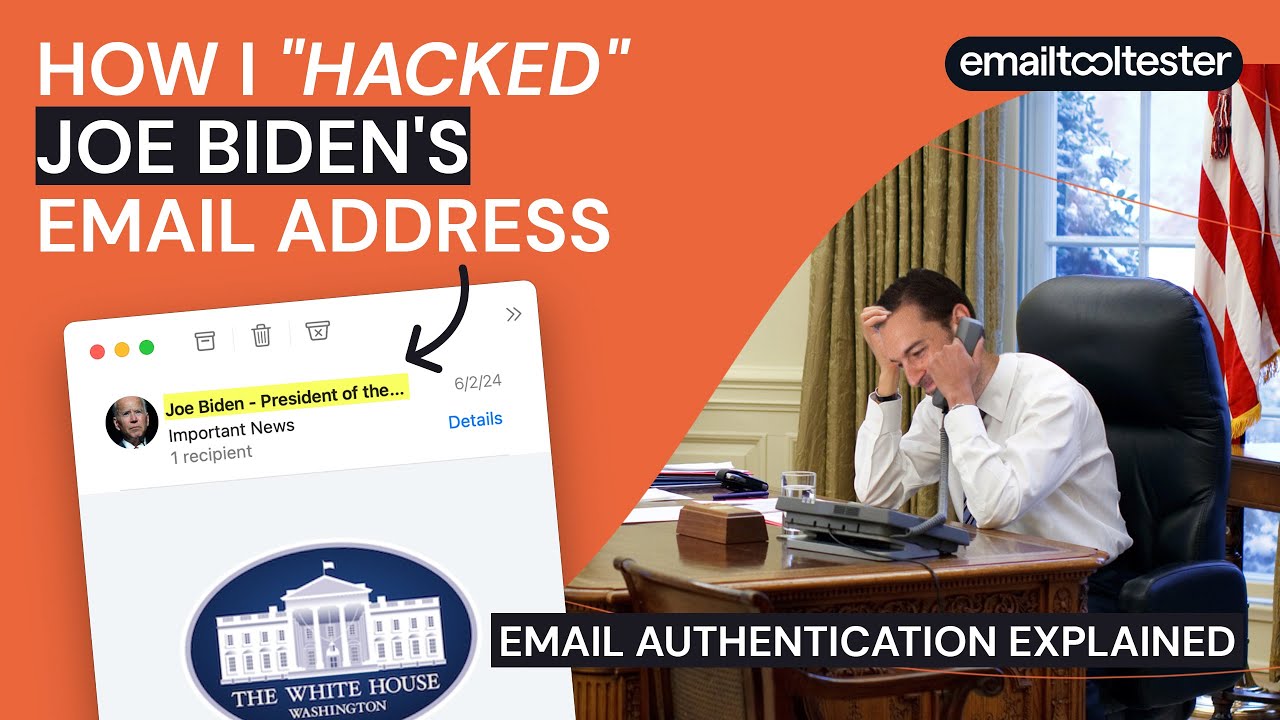
The main issue with email is that it's an open protocol that allows spammers to use email addresses they don't own. You may wonder how they do that.
Or how I once managed to send an email with the sender address [email protected]? Only as a test for myself, of course.
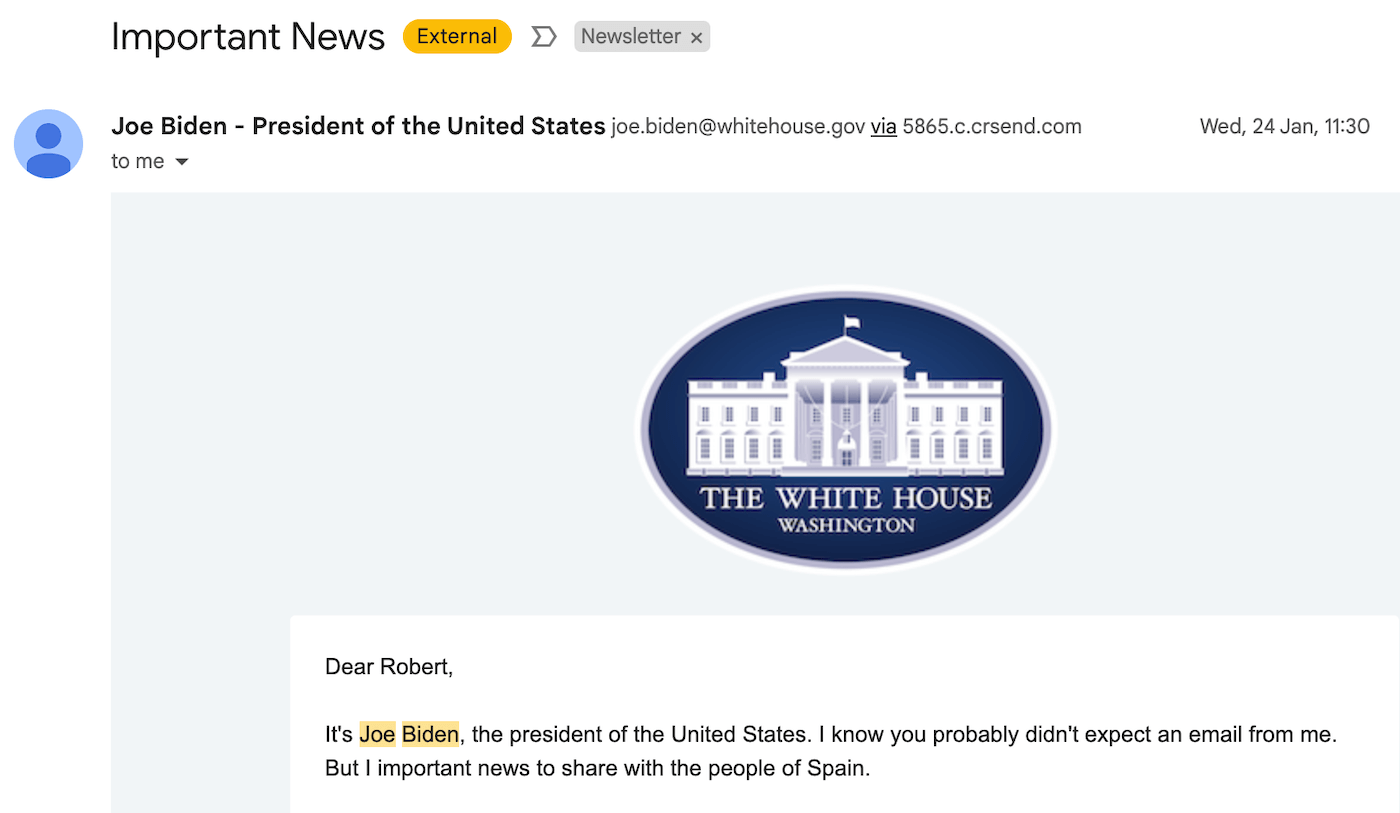
Learn all about this experiment, the homework the White House has to do, and how email authentication works in this video:
Because if you sign up for an account with a legitimate email marketing service, one of the first things they ask you to do is confirm your email address.
This way, Mailchimp, GetResponse, etc. will know that you are a legitimate sender (well, maybe not in every case, but at least you are able to access emails under your company's domain name). Sometimes they will also ask you to confirm domain ownership by adding a record to your domain's DNS.
DNS stands for Domain Name System. It is a system that converts human-readable domain names (e.g. www.google.com) into computer-readable IP addresses. Without it, web browsing and sending email would be very difficult. DNS servers are like the phone books of the Internet, they keep a directory of domain names and translate them to IP addresses when requested.
Every owner of a domain name has access to their domain's DNS via the domain registrar's account (e.g. Namecheap, GoDaddy). Once you are logged in, you will be able to edit your DNS records. Common DNS records include A records, which map a domain name to an IP address, and MX records, which map a domain name to an email server.
But there are other ways than using legitimate ESPs to send emails – dark places where they won't ask you to confirm your email address as long as you flash the cash (or Bitcoin).
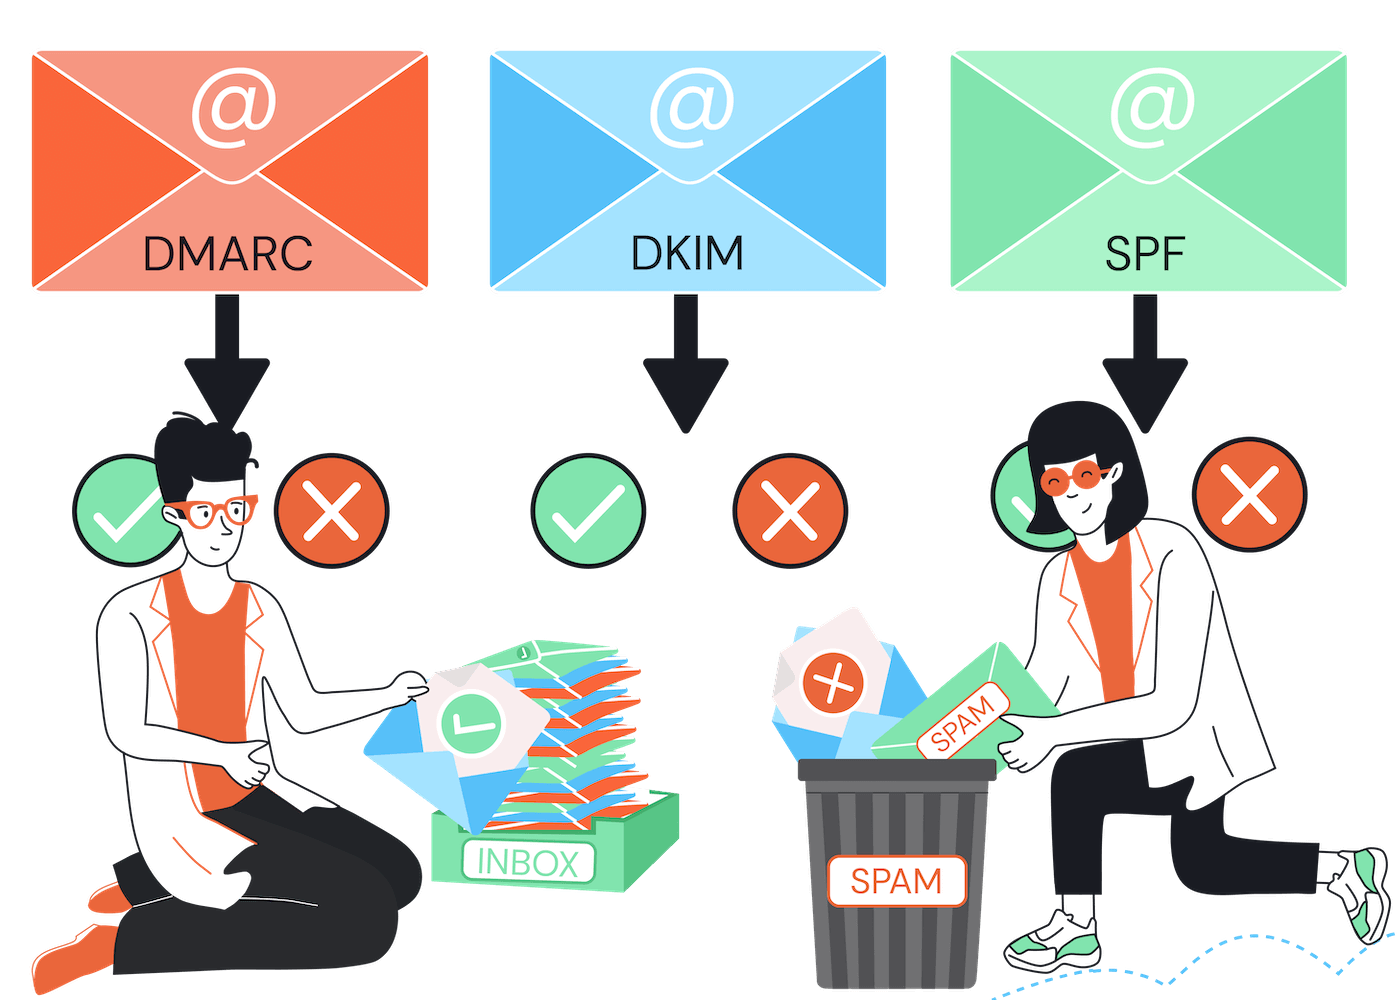
Unfortunately, it's still good business to send out phishing scams and other malicious emails. To stop this from happening, the following four authentication methods got created.

The most important email authentication methods
These are the most common methods:
- SPF (Sender Policy Framework)
- DKIM (DomainKeys Identified Mail)
- DMARC (Domain-based Message Authentication, Reporting & Conformance)
- BIMI (Brand Indicators for Message Identification)
Let's take a closer look at each of them.
1. Sender Policy Framework (SPF)
The most basic form of email authentication is Sender Policy Framework (SPF). SPF allows you to specify which email servers are allowed to send emails on behalf of your domain.
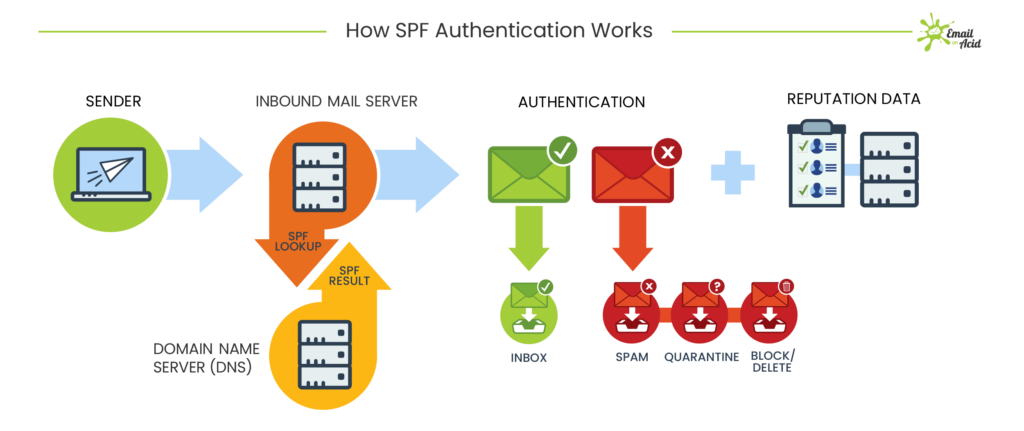
How SPF Authentication works – by EmailOnAcid
To set up SPF authentication, you will need to add a TXT record to your DNS settings. This TXT record contains a list of server names or IP addresses that are authorized to send emails for your domain.
If an email comes from a mail server that is not on this list, it will fail the SPF check and is more likely to be stopped by the spam filters. For that reason, it's very important to add all the different services you are using. In our case, we are sending emails via Google Workspace and Mailchimp (which uses mcsv.net), for example.
Here is a sample SPF record:
"v=spf1 mx a include:_spf.google.com include:servers.mcsv.net ~all"
For example, this record allows the google.com mail server to send email on our behalf. We are using this SPF record because we are Google Workspace customers. By setting it up for our tooltester.com domain name, we tell mailbox providers like Outlook and AOL that it's fine for Google servers to handle email for our Tooltester email addresses.
And because we are also sending emails via Mailchimp, we have another “include” record, indicating that servers.mcsv.net is also allowed to send on our behalf.
SPF authentication is not the most secure way to prevent your domain from being spoofed because anyone can look into your SPF records, and try to use the allowed servers (Google in our case). In this particular case, though, Google would not allow anyone else to set up the tooltester.com domain name in their Google Workspace account.
2. DomainKeys Identified Mail (DKIM)
This is a more advanced form of email authentication that uses cryptographic signatures to verify the authenticity of an email.
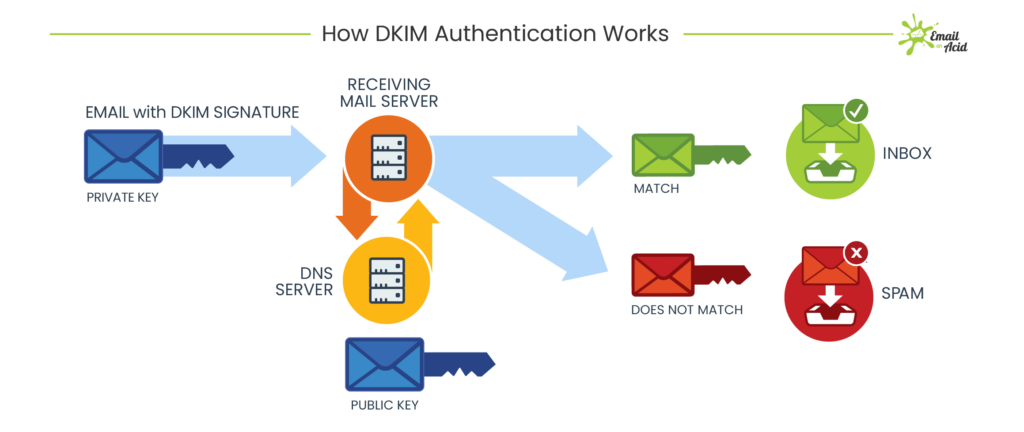
How DKIM works – by EmailOnAcid
When you set up a DKIM signature, you will need to generate a public and private key pair. The private key is used to sign each outgoing email, and the public key is published in your DNS records.
When an email arrives at its destination, the receiving server can use the public key to verify that the signature on the email matches the private key and that the email has not been tampered with.
If the signature does not match, or if the message has indeed been tampered with, DKIM will fail and the email is more likely to be marked as spam.
Here is a sample DKIM record from MailerLite, which we use to send out the results of our deliverability tests:
k=rsa; p=MIGfMA0GCSqGSIb3DQEBAQUAA4GNADCBiQKBgQDhXpjoxP3ANucOq4awUl53QXp7QSrbI2xOzSTigQ68XUi6kKifXkhL/a0GkSQ9HQm+PmvlkIC4wAyI9Cf6RW8bim80jSAeQJbGYAPyTAbxxTqu+h2deO8ffLfX2jRqAs73Jpgn3XyQSCIClUyTJQR9e0/BIwvnHQlSKJA1PcgwIDAQAB
Adding this record to our tooltester.com DNS will allow MailerLite to send emails on our behalf. Basically, DKIM authentication is very similar to SPF but more secure due to the fact that there is a private key involved.
3. Domain-based Message Authentication, Reporting & Conformance (DMARC)
This is the most advanced and secure form of email authentication. DMARC builds on SPF and DKIM, and adds a few more features.
With DMARC, you can specify what to do if an email fails either the SPF or DKIM checks. You can choose to have the email rejected or delivered to the spam folder. There is also a “none” policy which just means that the email will be delivered normally, but the DMARC record will still collect data about failed authentication attempts.
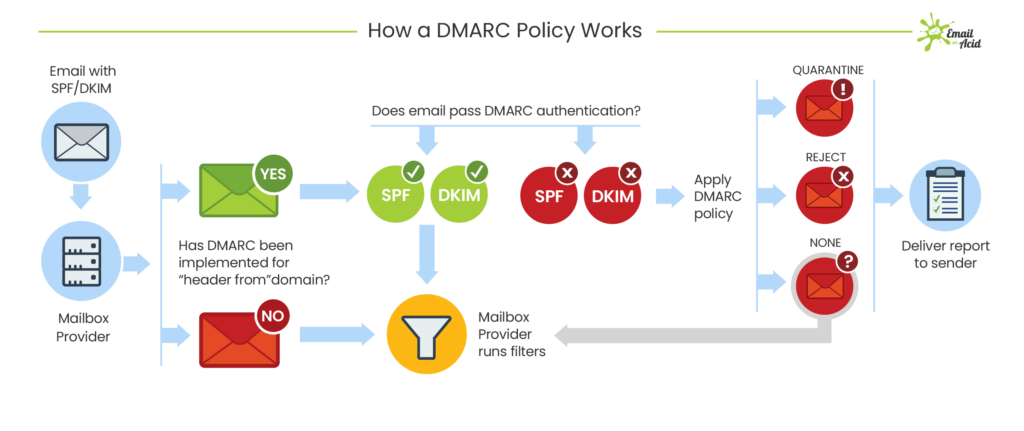
DMARC authentication process – by EmailOnAcid
DMARC also allows you to set up email forwarding so that you can get reports about failed authentication attempts. These reports can be very helpful in troubleshooting why your emails are not being delivered.
Here is a sample DMARC record:
v=DMARC1; p=quarantine; rua=mailto:[email protected]
This DMARC record is set to the “quarantine” policy, which means that emails that fail the SPF or DKIM checks will be delivered to the spam folder. The “rua” tag specifies where to send DMARC reports.
A concrete example:
If a spammer is trying to send emails using a @tooltester.com email address, they will fail SPF and DKIM verification. The DMARC record indicates that such emails should go to the spam folder of the recipient.
Brand Indicators for Message Identification (BIMI)
This is a new standard that is not yet widely adopted, but it shows promise. So far Gmail, Yahoo, Apple and Fastmail support it. BIMI allows you to insert your brand logo into the headers of your emails so that recipients can see at a glance that the email is from you.
It's partly security, partly marketing. The idea is that if people see your logo in their email client, they will be more likely to trust the email and less likely to mark it as spam.
To set up BIMI, you need to generate a validator certificate and publish it in your DNS records. You also need to have a verified sending domain and a published DMARC record.
Example of a BIMI record:
bimi._domainkey.tooltester.com IN TXT "v=BIMI1; l=https://www.tooltester.com/images/logo.png;"
This record specifies the location of the brand logo that will be used for BIMI.
Once BIMI is set up, your logo will appear next to your email in the recipient's inbox:
Find more information on how to set up a BIMI record here.
How to quickly check whether an email passes SPF, DKIM and DMARC
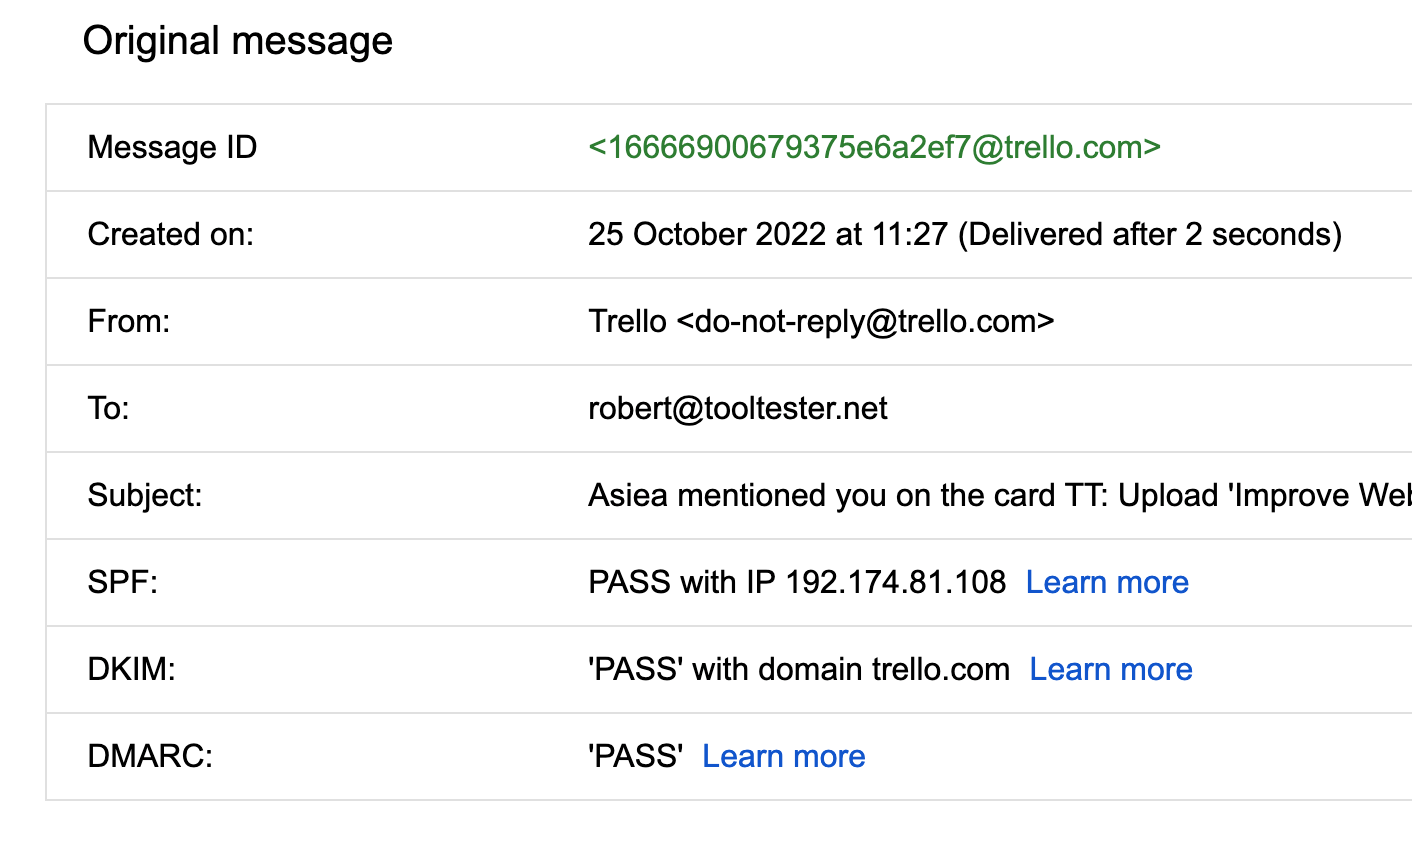
The easiest way to check whether an email passes SPF is to open the email in Gmail, click the three dots, and then select “Show original”. You'll then see an analysis for SPF, DKIM and DMARC as part of the email header:
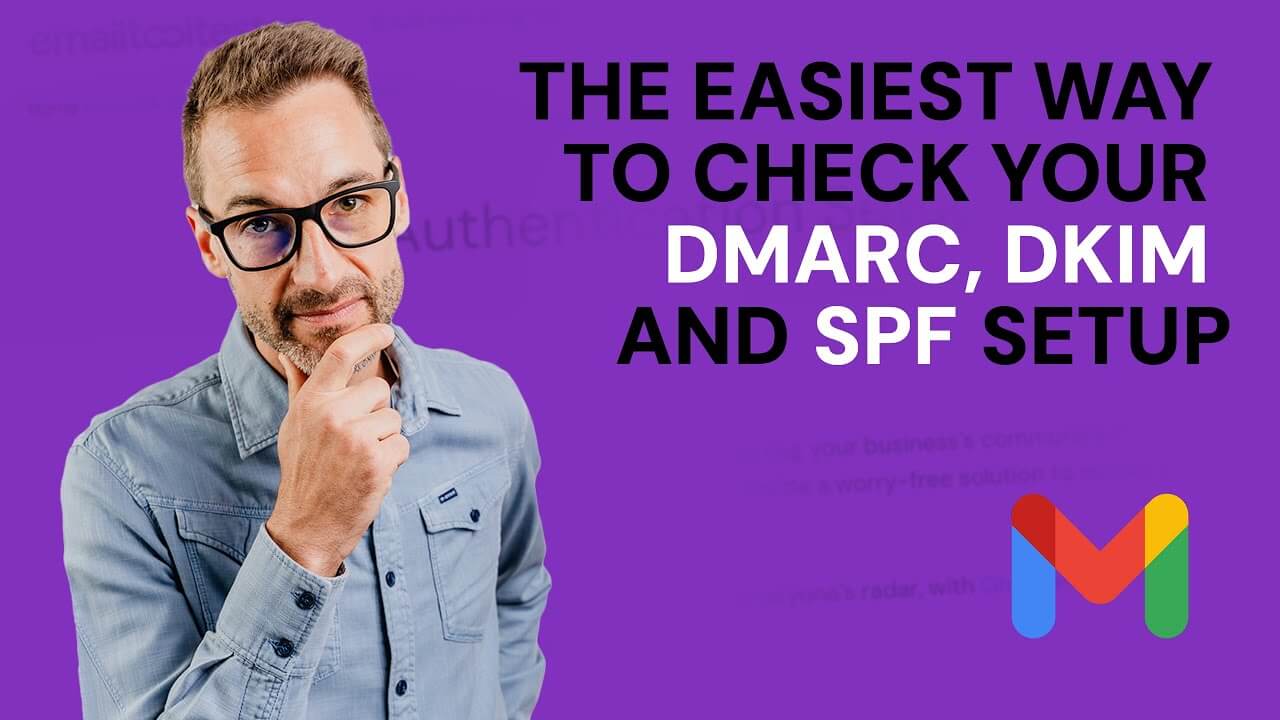
Learn how to check if your emails are correctly authenticated in this short video:
For a more detailed step-by-step guide, refer to our email authentication check guide.
How to Set Up Email Authentication
Setting up any of the email authentication methods requires you having access to your domain's DNS records. Any owner of a domain name has access through their domain registrar's web interface (e.g. Namecheap, GoDaddy, etc.).
The basic setup process is straightforward:
1) Once you have the authentication record (SPF, DKIM, etc.) from your email service provider, you access the backend of your web hosting provider.
See Namecheap's example here. It's under Advanced DNS:
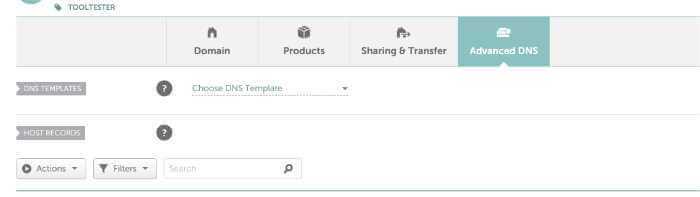
Then you go ahead and add a new record. In this case, it's a TXT Record for our SPF signature:

If you are unsure what to do, it's always best to ask your customer support. Most web hosting companies offer live chat support and are very helpful from my experience.
Remember: you can also book our Email Authentication Setup Service, where we will set up SPF, DKIM and DMARC for you on a video call.
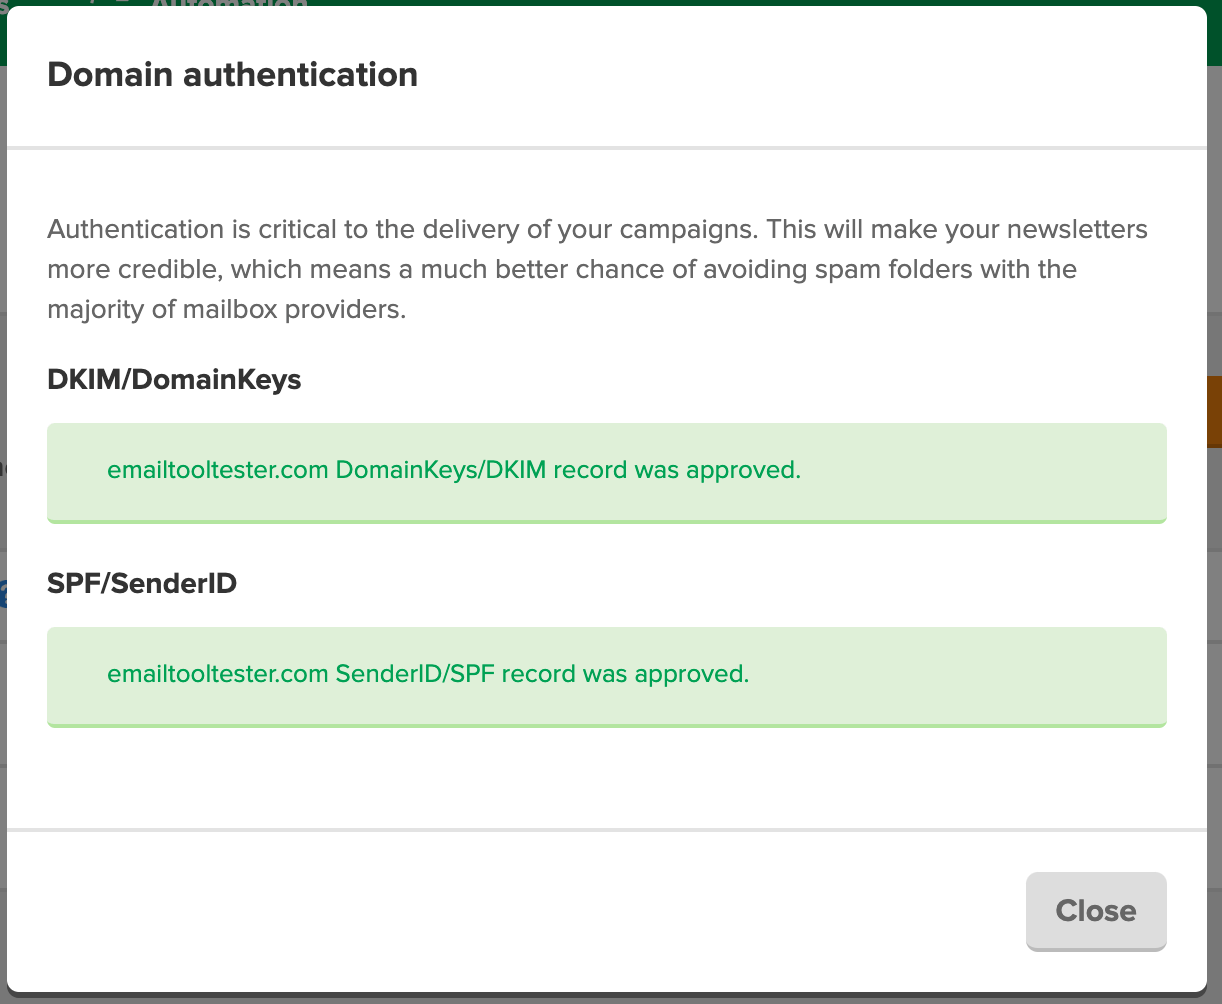
How do I know if the authentication was successful?
If you are using an email marketing service such as Mailerlite, they will check it for you, as you can see in the screenshot:
Additional Tips to get your emails verified and delivered
Monitor your email deliverability
Use tools like Glockapps or InboxAlly to monitor your email deliverability. These will give you a comprehensive report and show you whether your emails are getting delivered, bounced or marked as spam. See this sample report from Glockapps:
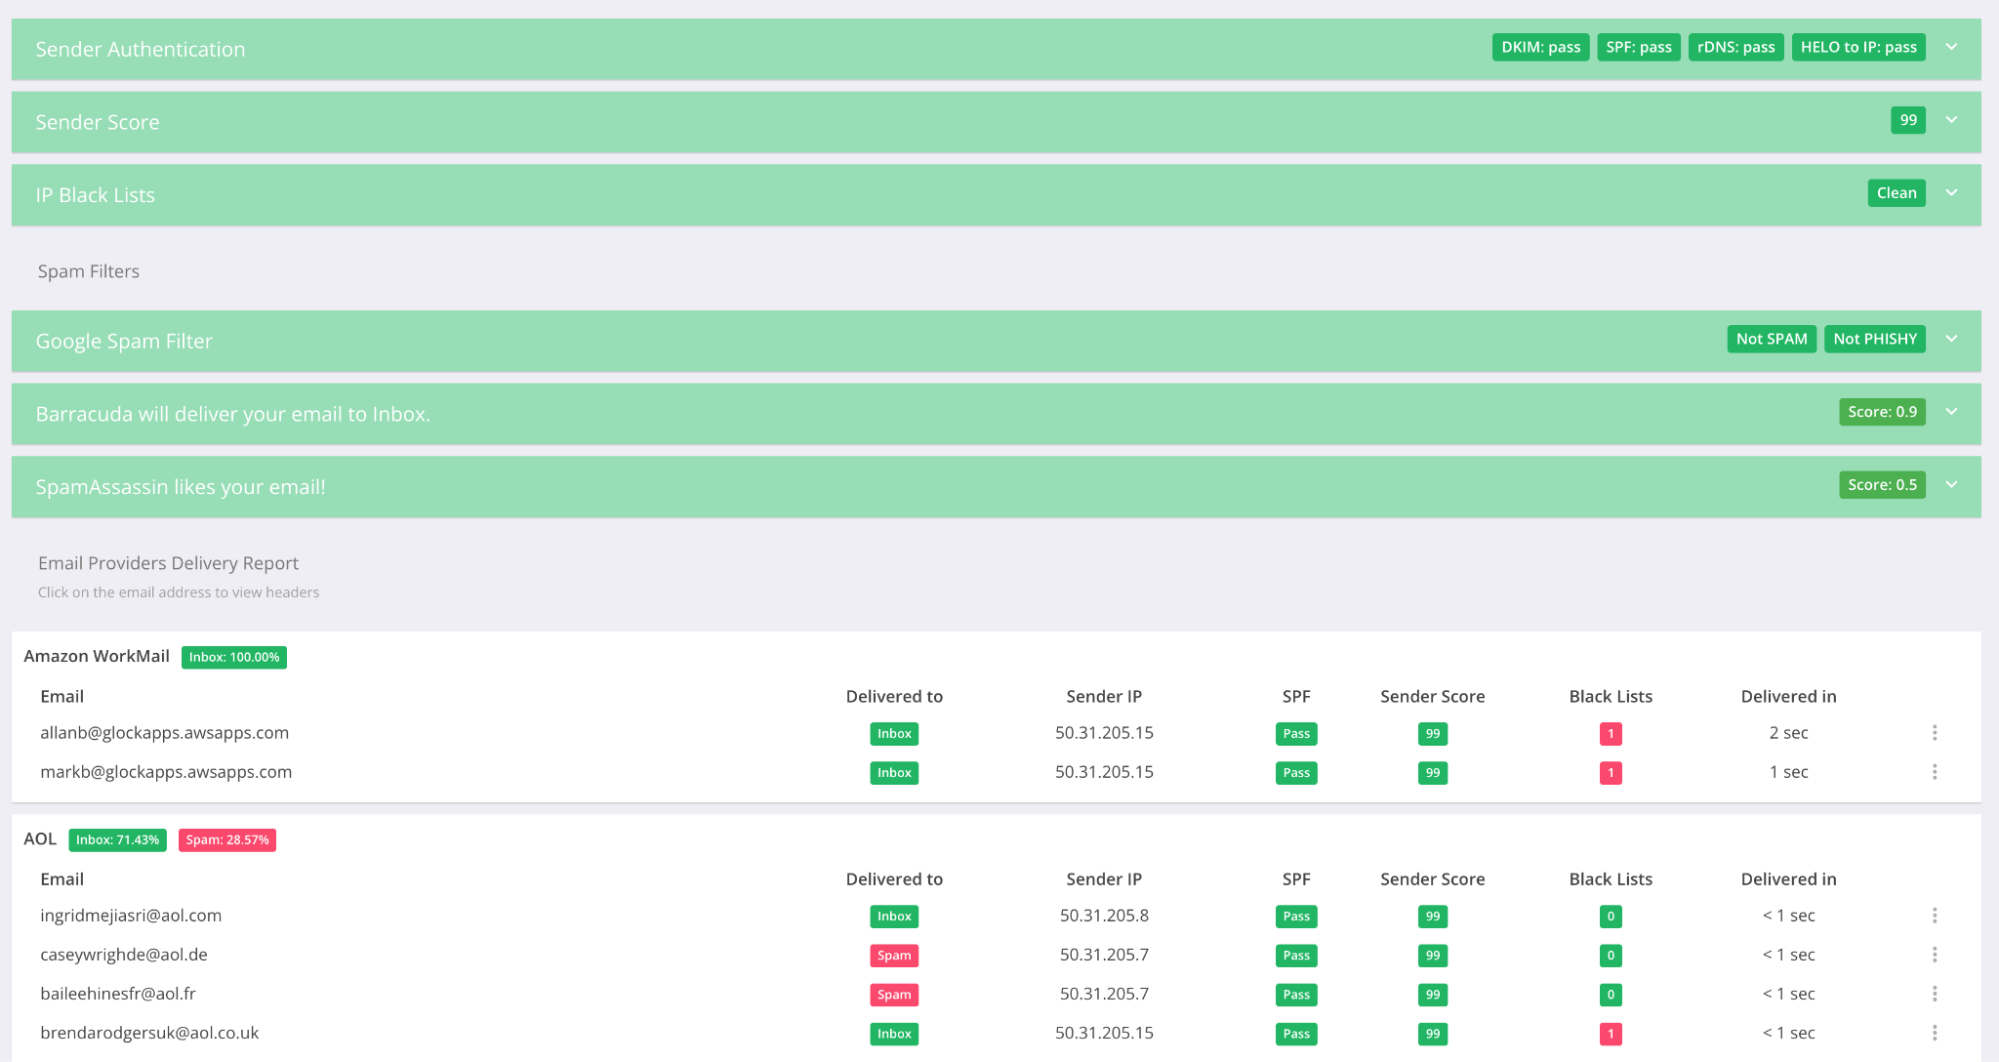
Both Glockapps and InboxAlly will also show you whether your emails are passing SPF, DKIM and DMARC. This is very helpful for troubleshooting why some of your emails are not being delivered. The interesting thing about InboxAlly is that it also helps you simulate engagement with your emails, such as opens, clicks and replies. This can help you fix deliverability issue due to poor performance in the past.
If you are looking for a free tool to run a basic test, you can also check out Mailtester.
Set up Google Postmaster Tools
This tool offers a health check for your emails in the Gmail universe – the most used email provider worldwide. It doesn't require complex setup but offers valuable insights for anyone who is sending a high volume of marketing emails.
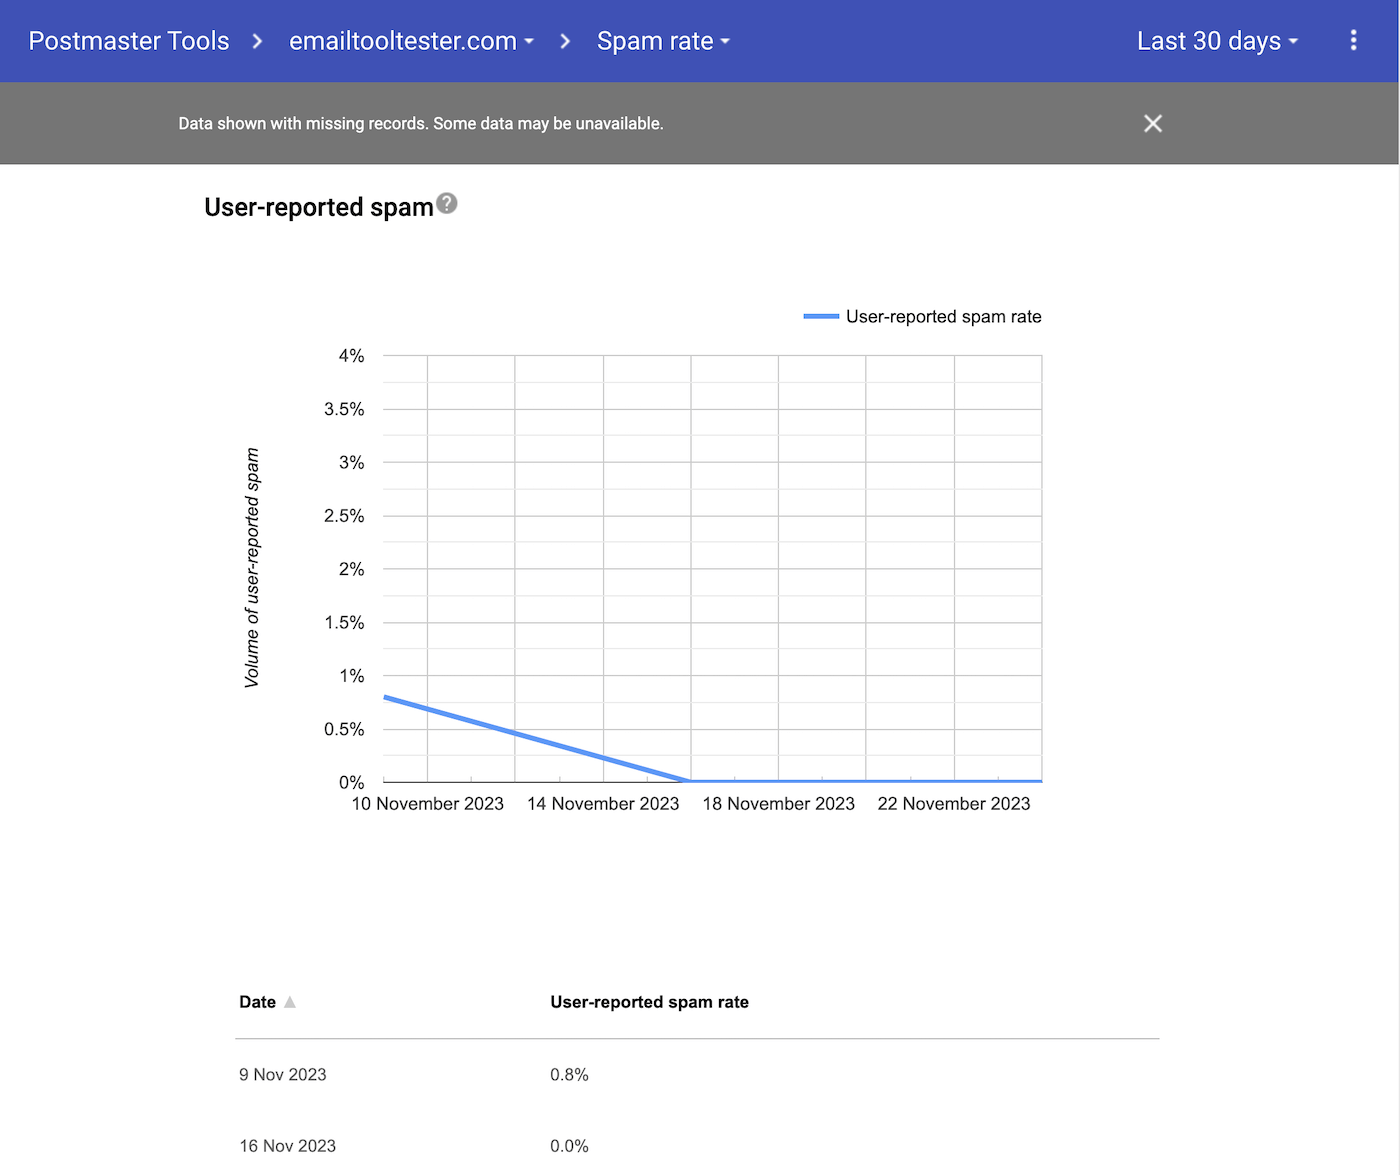
Screenshot from our Google Postmaster Tools account – our spam rate is something we need to work on
Postmaster Tools essentially lets you peek into Gmail's perspective of your emails. It tracks things like how Gmail views your domain's reputation or how often your emails are marked as spam. This info is gold for identifying issues that might be causing your emails to land in the spam folder instead of the inbox.
Setting up Google Postmaster Tools requires adding a TXT record to your domain name settings, similar to setting up DKIM.
Use a consistent mail sender address
When sending emails, don't swap around your sending domain or email addresses. Use the same email address, so the mailbox provider will learn that your recipients like to receive email from that email address. Also, you can ask your recipients to add your sender email address to their contacts.
Send relevant and targeted content
Needless to say, the more relevant and targeted your email's content is, the less likely it is to get flagged as spam (ideally it's the opposite: people will flag you as a safe message should you ever get caught by a spam filter). Use double opt-in to make sure that people who sign up actually want to hear from you.
Start a conversation with your messages
Are you also sometimes annoyed by [email protected] email addresses?
I get that it can be annoying if people start responding to your newsletter just by hitting the “reply” button. The good thing, though, is that email providers (Gmail, Outlook, etc.) see this as a positive indication that people actually want to receive your emails.
Practice email list hygiene
Email lists that are not well-maintained are more likely to get flagged as spam or not delivered at all. This means you need an email list management strategy that includes regularly removing bounced emails, unsubscribes and people who never engage with your emails.
There are also plenty of email cleaning services (e.g. BriteVerify, QuickEmailVerification, MailerCheck) that can help you with this.
And lastly, don't forget the basics
Avoid using spammy words in your email subject lines, don't buy email lists and don't send emails too often. If you need more contacts, check out our complete guide to how to collect emails for email marketing the right way.
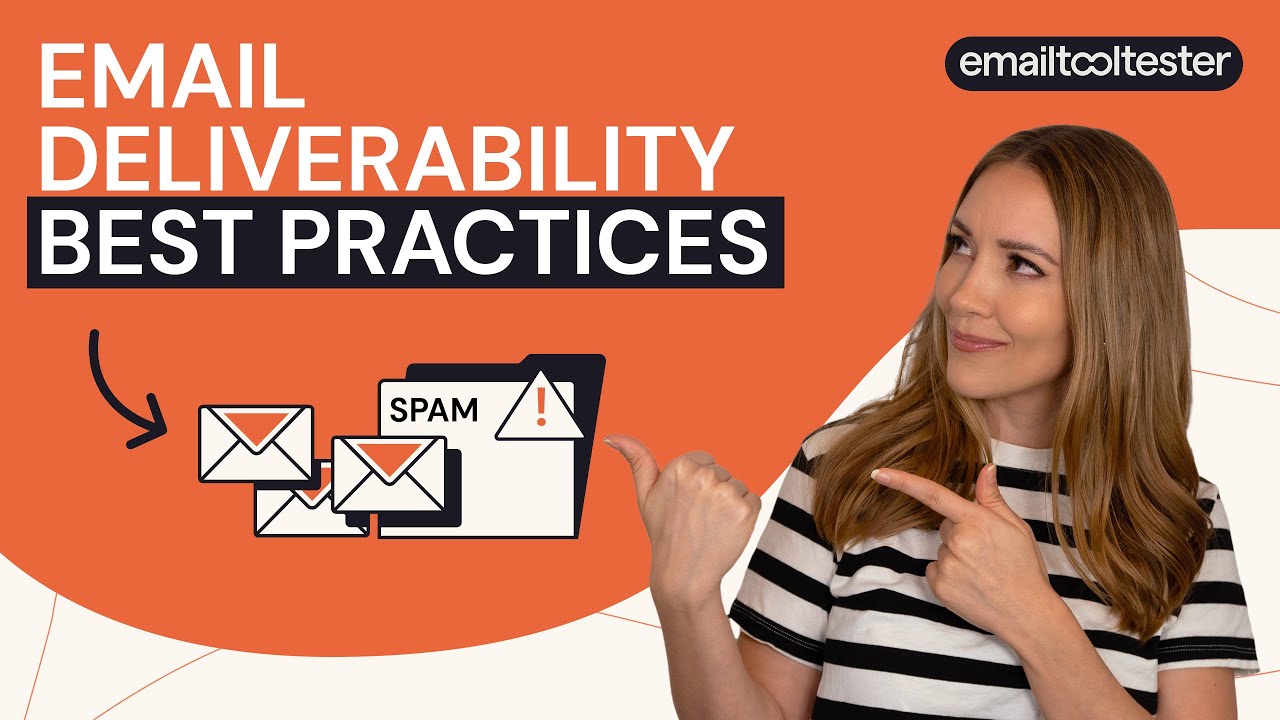
If you’d prefer to learn by watching, follow our Email Deliverability Best Practices video:
Wrapping Up on Email Authentication
Email authentication is a crucial aspect of email security that ensures the legitimacy of email messages and protects against phishing and spoofing attacks.
Email authentication does not guarantee that your email marketing strategy will be a success, but it's an important part of the puzzle. In combination with other email deliverability best practices, you can make sure that your emails have a much higher chance of reaching the inbox and don't become another spam statistic!
It involves various protocols and techniques, such as SPF, DMARC and DKIM to verify the authenticity of the sender's address and the integrity of the message. When an email is sent, the email server and client work together to implement these protocols, which include adding digital signatures and encryption to the messages.
It's also a good idea to go the next step and set up BIMI as well, as it can help improve your deliverability by showing recipients a branded logo in the inbox.
These verification measures help protect recipients by ensuring that the email messages they receive are from verified domains and not from malicious actors attempting to spoof legitimate senders. Implementing robust email authentication protocols can significantly reduce the risk of unauthorized actions and improve overall email security.
Not setting this up properly from the start would be a big mistake, so make sure you prioritize email authentication.
And Finally, Test Your Knowledge With Our Quiz
Do you have any questions about email authentication or deliverability in general? Let me know in the comments!

Email Marketing Ebook: Beginner's Guide
Sign up to receive your free copy and avoid common mistakes!
The authors
Learn more about us

We keep our content up to date
15 Jan 2026 - Quick check video added
22 Apr 2025 - General update
28 Feb 2024 - Video added
24 Jan 2024 - Small updates and corrections
01 Dec 2023 - Information about Google Postmaster Tools added
22 Aug 2023 - YouTube Video Added
02 June 2023 - Illustrations added
Our Methodology
This article has been written and researched following our EmailTooltester methodology.
Our Methodology