
I have to admit: when I first heard that Microsoft was adding a “Newsletter” feature to Outlook, I was a little skeptical.
Outlook has always been the go-to tool for company emails, calendar invites, and meeting reminders – not exactly the place you’d expect to start a newsletter. But with more and more people wanting to share updates, thought pieces, and internal news without leaving the Microsoft 365 ecosystem, it actually makes sense.
Now, Outlook offers a way to publish newsletters directly from your inbox. You can share regular updates with your team and organization, without needing to open another app or learn a new tool.
It’s a clever addition for anyone already living in Outlook all day. But after testing it myself, I quickly realized it’s not designed for every type of newsletter. It works great for company updates and small internal audiences, but if your goal is to grow an external mailing list or send polished marketing campaigns, you’ll hit its limits fast.
In this guide:
- I’ll show you how to create a newsletter in Outlook,
- Explain where it works well (and where it doesn’t), and
- Share why email marketing tools like Brevo are still the better choice for businesses that want to build and engage an audience.
Let’s get started!
What the Outlook Newsletter feature actually is
When I first tried Outlook’s new newsletter feature, I realized it’s less of a marketing tool and more of a built-in publishing option for Microsoft 365 users.
It’s designed to help you share updates right inside your company or community – kind of like a simplified version of Substack or LinkedIn Newsletters, but living inside Outlook.
Here’s how it works in practice:
- You can create posts directly in Outlook and choose to share them as newsletters.
- People in your organization (or anyone you invite) can subscribe to receive those updates by email.
- Each new post automatically lands in subscribers’ inboxes.
It’s an easy way to keep your coworkers or members in the loop – perfect for things like company announcements, weekly project roundups, or HR updates.
But it’s important to know what it’s not. Outlook Newsletters don’t include:
- Advanced email analytics (no list of openers, or click tracking)
- Automation or scheduling tools
- Signup forms or audience segmentation
- Legal compliance features like automatic unsubscribe links
So while it’s a convenient solution for quick internal communication, it’s not meant to replace dedicated newsletter platforms like Brevo or MailerLite – especially if you plan to send newsletters to customers, leads, or a public audience.
But if all you want to do is send simple internal updates, let me take you through exactly what you need to do to send your first newsletter in Outlook.
How to create a newsletter in Outlook: Step by step tutorial
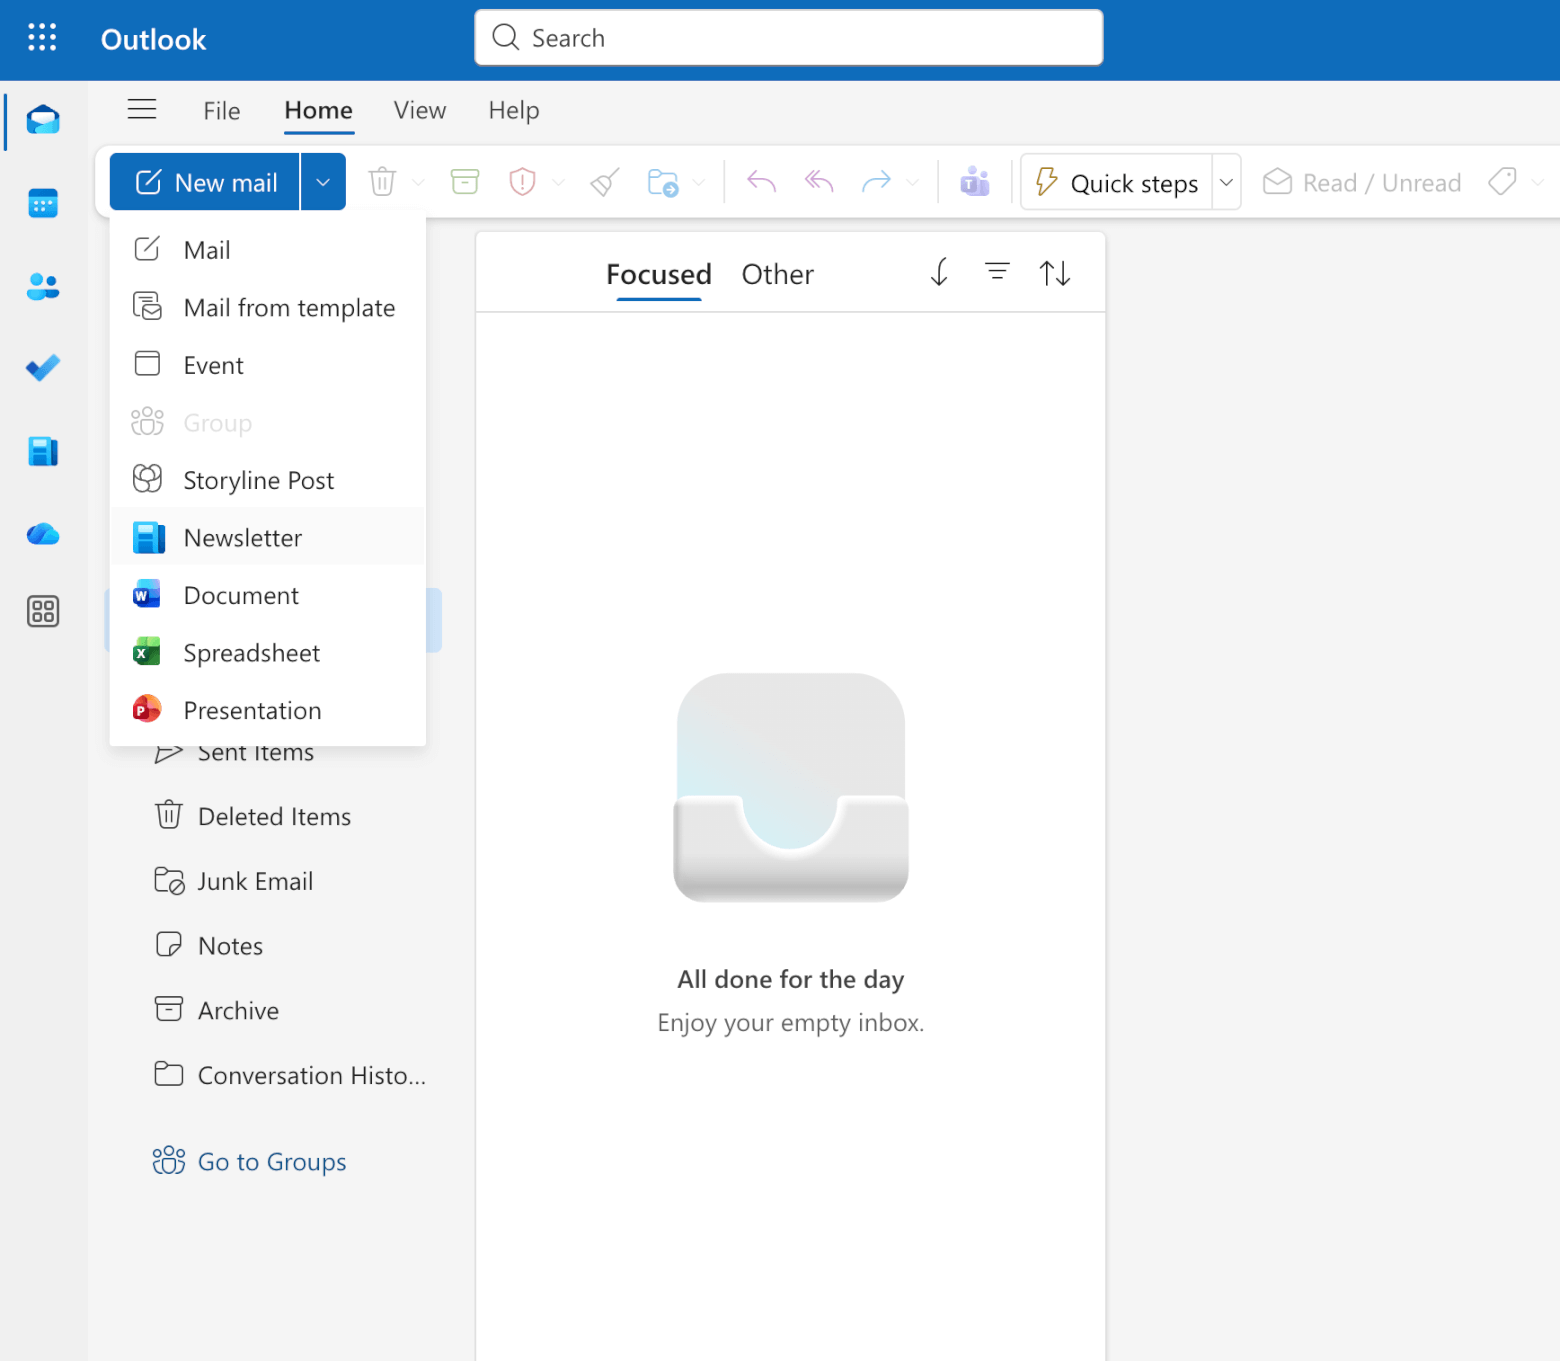
1. Open up your Outlook or log into Outlook online.
2. Click the dropdown next to “New mail” and select “Newsletter”.
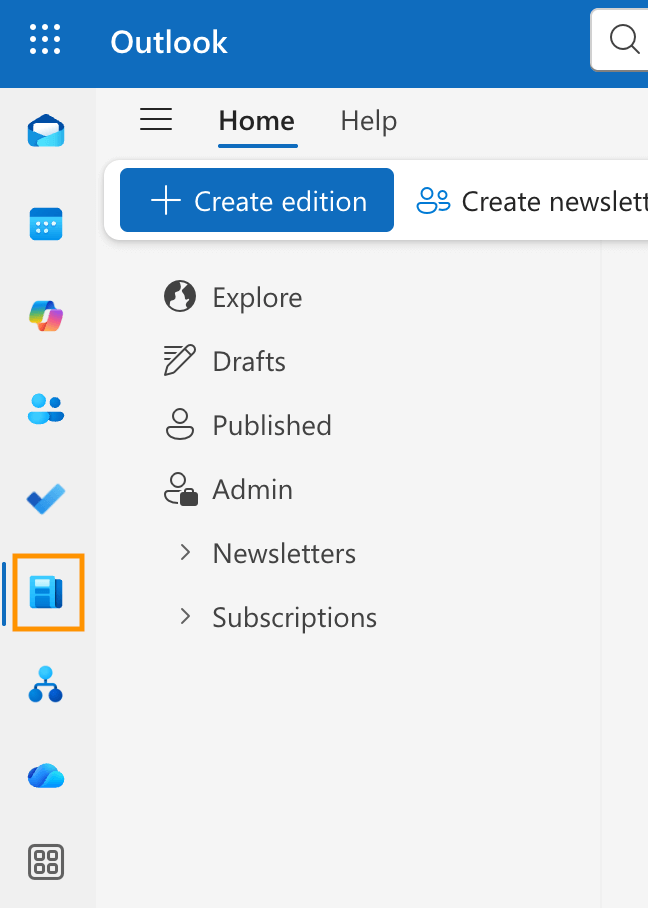
Note: You can also access the Newsletters section any time by clicking on the newsletter icon in the left menu:
3. You’ll be taken to the “Newsletter” tab, where you’ll have the option to “Create edition” or “Create newsletter”. If you’re starting a brand new newsletter, select “Create newsletter”. 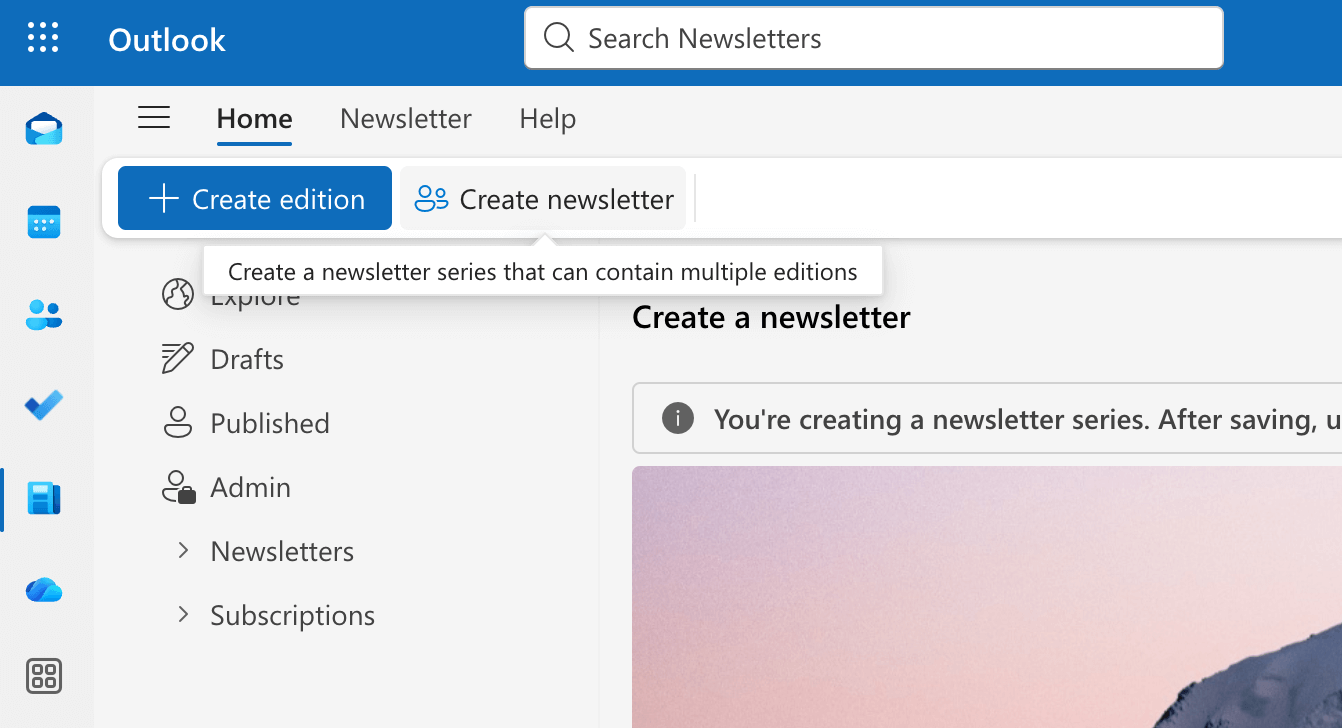
4. In this step, you’ll be setting up your newsletter series, and adding the details associated with that newsletter. You’ll be asked to:
- Upload a cover image (optional) + alt text (the text the reader will see if your image doesn’t load)
- Add a logo (optional)
- Add a title for your newsletter (this will appear on your profile and all your newsletter editions, although you can customize it for each edition)
- Add a brief description (optional)
- Assign an owner for the newsletter (you will need a minimum of 2 owners)
- Set the visibility from one of the following options:
- Private (only visible to invited users)
- Unlisted (only visible to users with a link)
- My organization
- Decide whether or not to let users subscribe to your newsletter (note: you won’t be able to enable subscriptions if your visibility is set to “Private”)
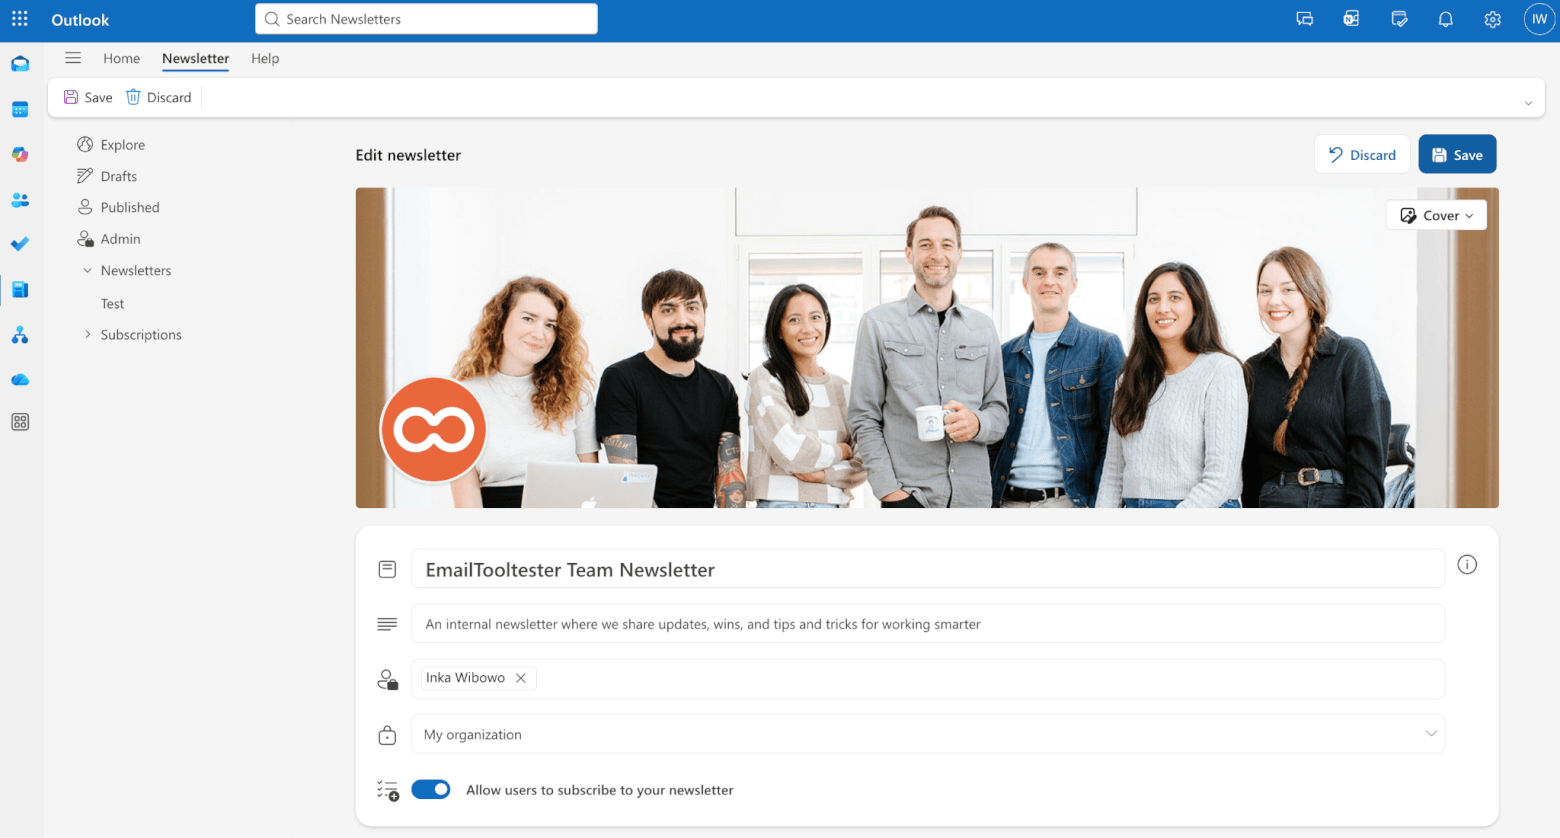
5. Click “Save”.
6. Click “Create edition” to create the first edition of your newsletter.
7. Choose from one of the following templates/layouts – Blank, Creator, Basic, Modern, or Stack-:
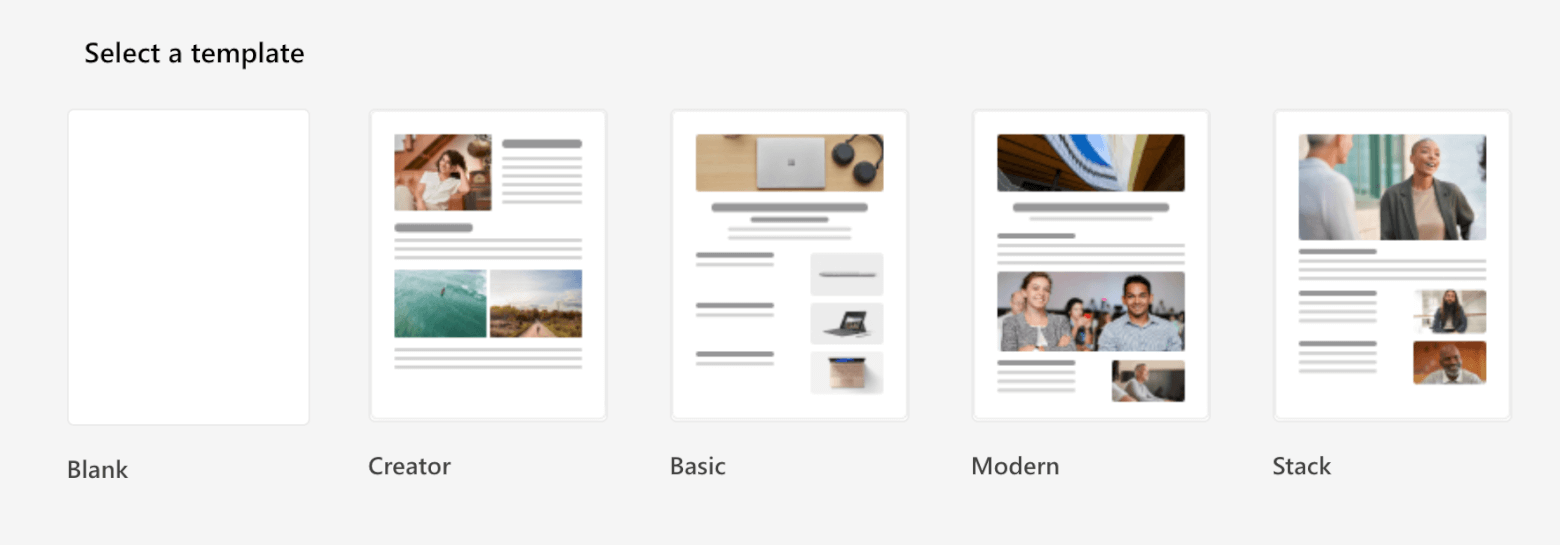
Choosing “Blank” will enable you to start with a clean slate, and add in layouts/components as you like. However, you can still do the same with the other templates. To help us get started quickly, we’ll choose “Creator”.
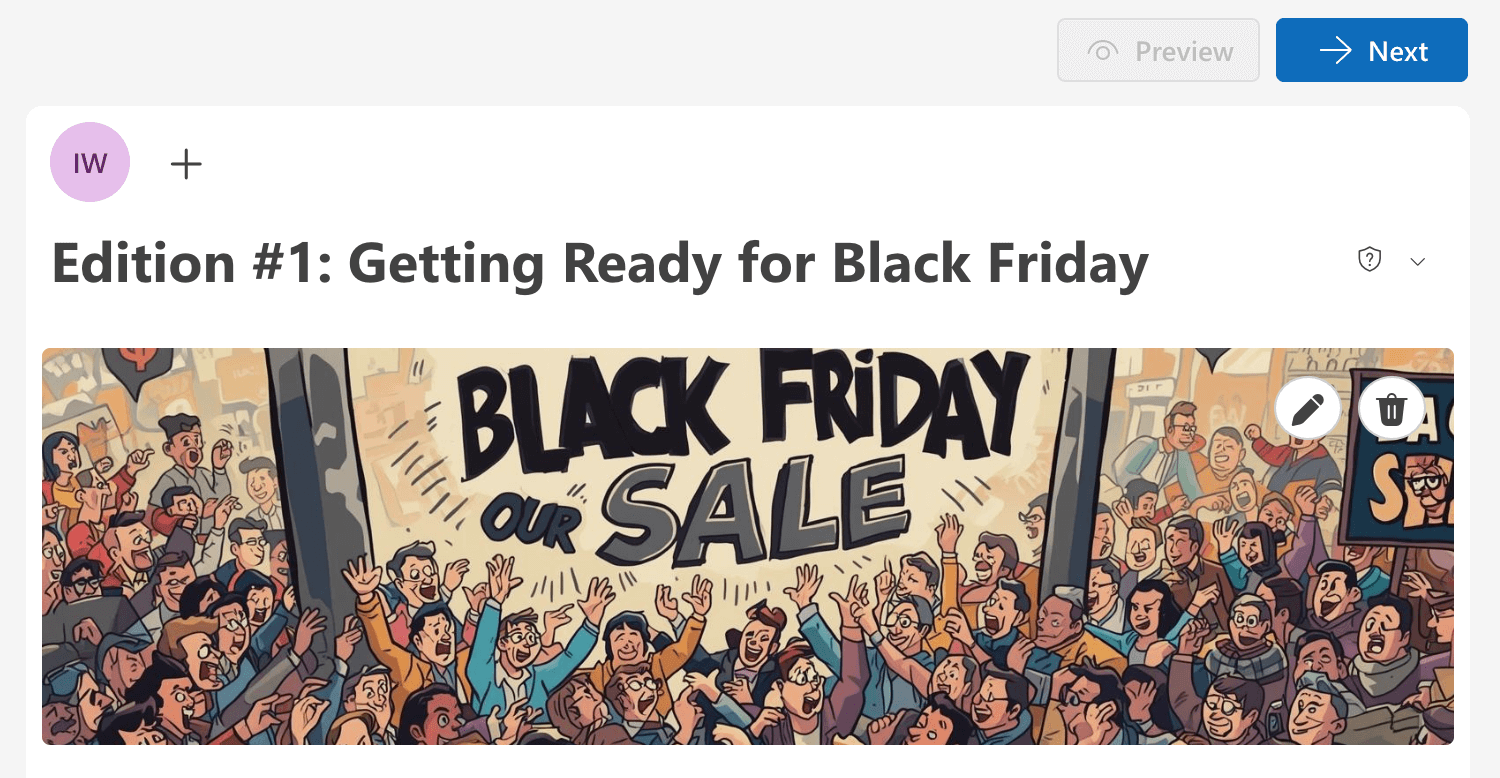
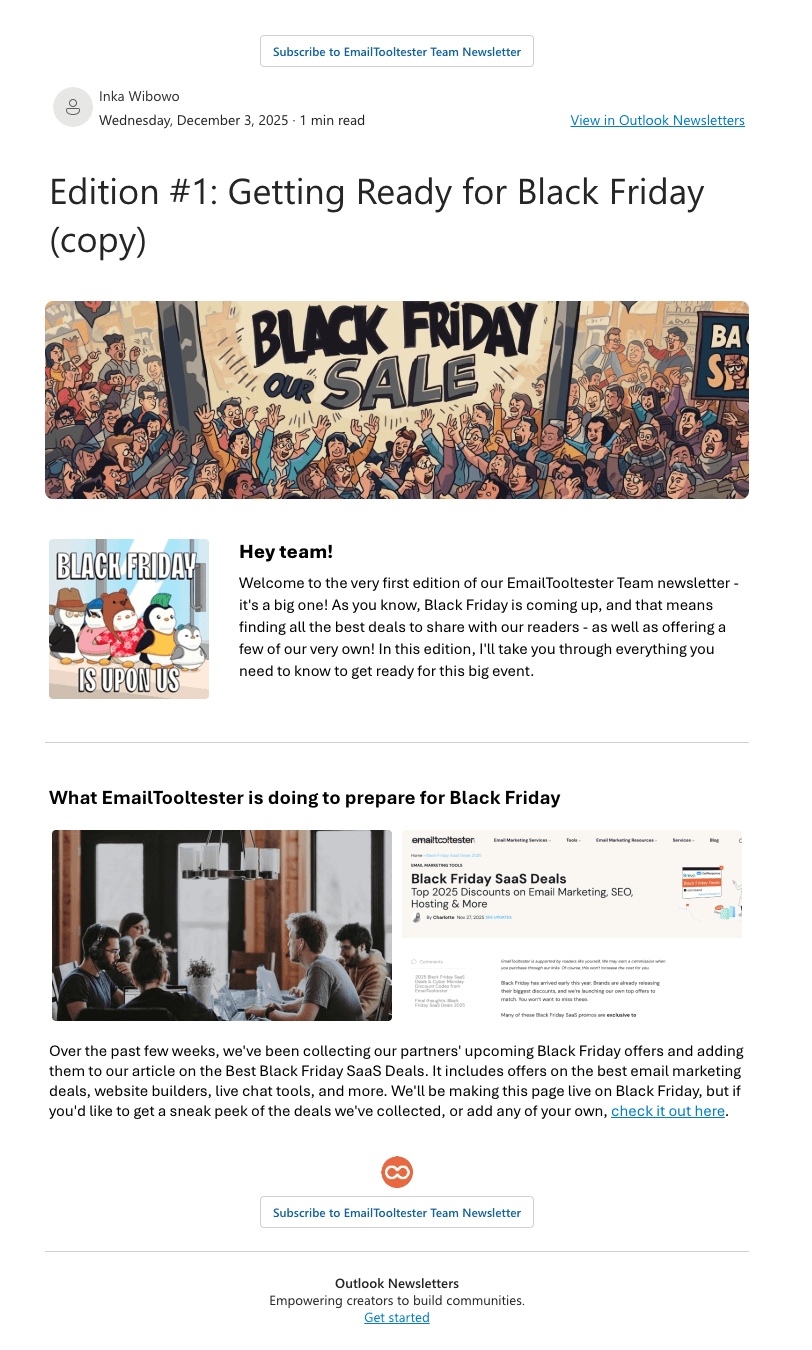
8. Add a title for your edition, and edit the cover photo if you’d like (simply click on the pen icon):
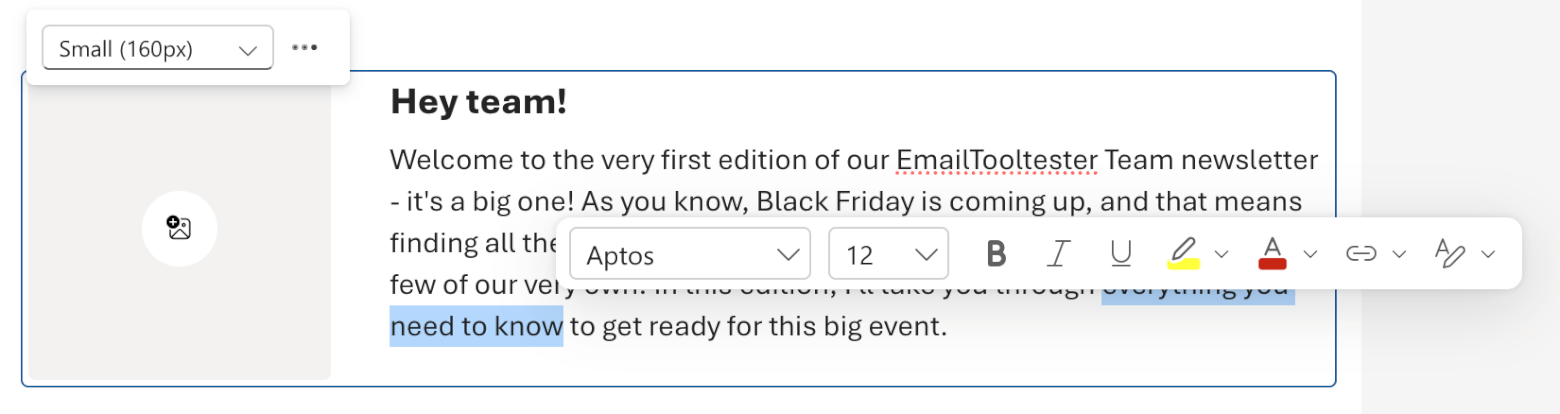
9. Click within the text blocks to start typing in your text. Highlight a selection of the text to add formatting, styles, and links:
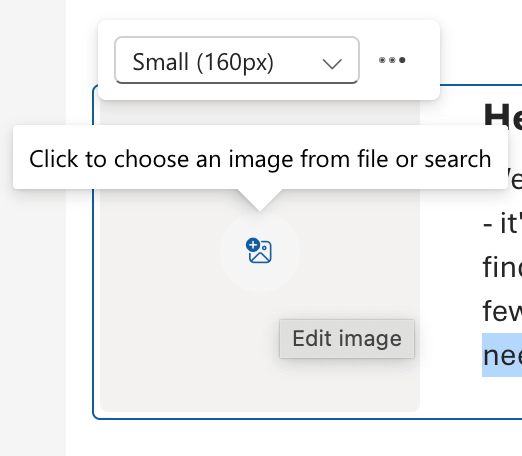
10. To add images wherever there is a placeholder, click the image icon and upload your image. It’s also possible to change the size (small, medium or large) by selecting a different option in the dropdown:
11. Add your images and text to the rest of the template by following the last two steps.
12. Outlook’s newsletter editor is fairly flexible – it lets you:
- Add “jump to section” links at the top of your newsletter (the first icon in the top right of each section)
- Change the order of sections (you can do this by clicking the arrow buttons at the top of each section)
- Delete entire sections by clicking the trash icon at the top of the section
- Add a contributor who can edit and publish the edition (although note that real-time collaboration, like you’d get in Google Docs, isn’t available)
- Add new sections (Click “Add sections”, then “Add component” to choose from a variety of text and image layouts)
- Add tables (you can do this by going to the top menu, clicking “Insert”, then selecting “Table”)
- Restore deleted sections – this can be done by clicking the “Deleted sections” dropdown visible below the header image
Continue making these changes to the content of your newsletter, until you are happy with the final product.
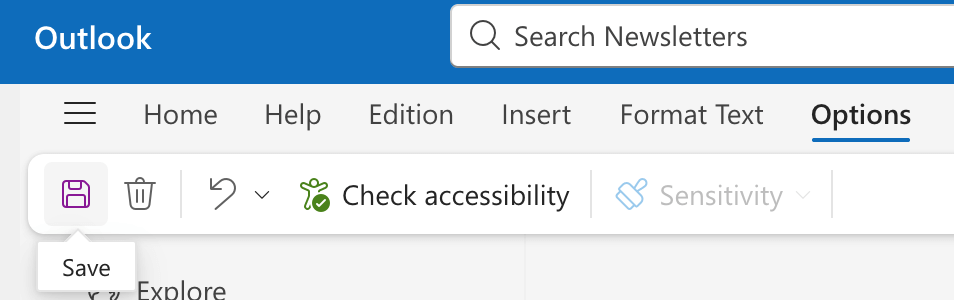
13. Although Outlook does support auto-saving (at times), it’s a good idea to make sure to save your work periodically. You can do this by clicking “Options”, then clicking the “Save” icon:
You’ll be asked to:
- Confirm the name of your newsletter edition (this will automatically be taken from your title)
- Select whether you want to save it as an “Edition” or “Template”
- Select which newsletter series to save it to (if you have multiple, e.g. different newsletters for different teams)
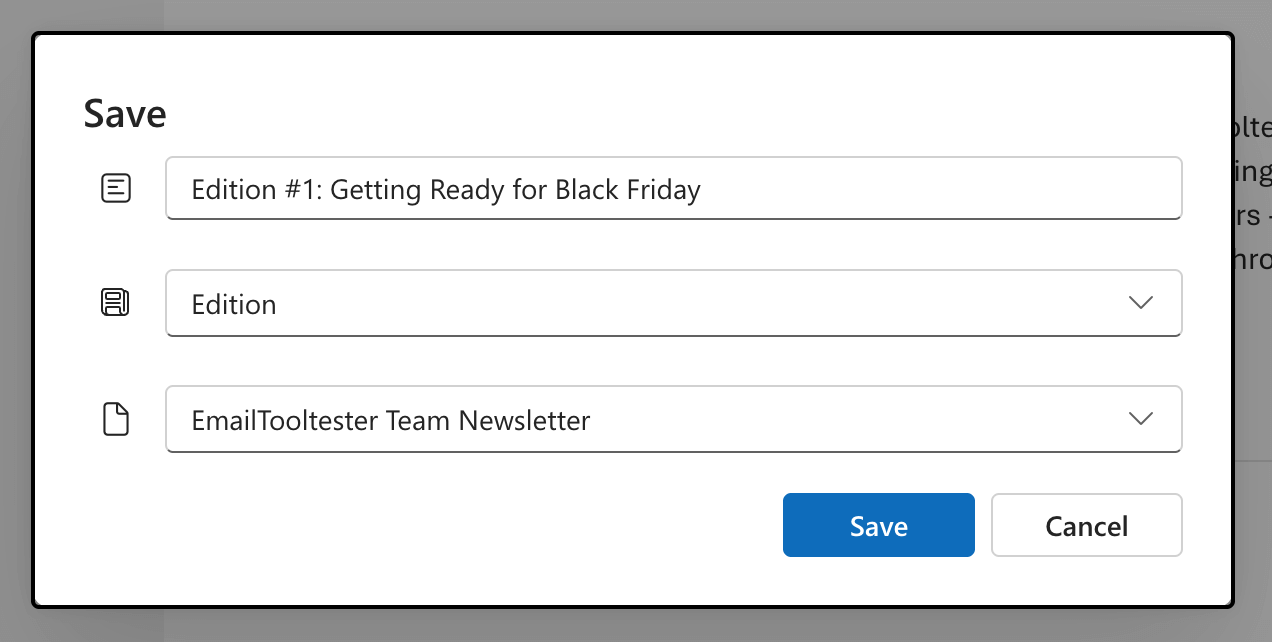
Click “Save”. Note that it’s also possible to undo and re-do changes from the “Options” menu.
14. Click on the “Preview” button to see how the newsletter will display to readers. You can also click the “Send preview” button to email a copy to yourself.
15. Once you’re happy with your newsletter, click “Next” to send it. In the next screen, you’ll be asked to:
- Specify the sender (here, you can also ask another team member to send it)
- Add a custom email address for replies, in case you want to receive replies at another mailbox
- Add your recipients. It’s a good idea to include them in the “BCC” field so recipients can’t see who else it has been sent to. All your subscribers will automatically be added in here by default under the “Subscribers” group, but you can delete this if you wish. Note: It's not possible to send newsletters to recipients outside your organization. If you add them in, they will automatically be removed when the edition is sent.
- Set the visibility of your edition to “Private”, “Unlisted”, or “My organization” (you can make this more restrictive than the visibility set on the parent newsletter series).
- Edit the subject line (the edition title will be entered by default)
- Select a different thumbnail (this will display on the newsletter’s “Explore” page, where you browse other newsletters and editions published within your organization)
- Choose whether to display other editions in the newsletter footer (you can toggle this on or off)
- Allow comments and reactions on this edition (you can toggle this on or off)
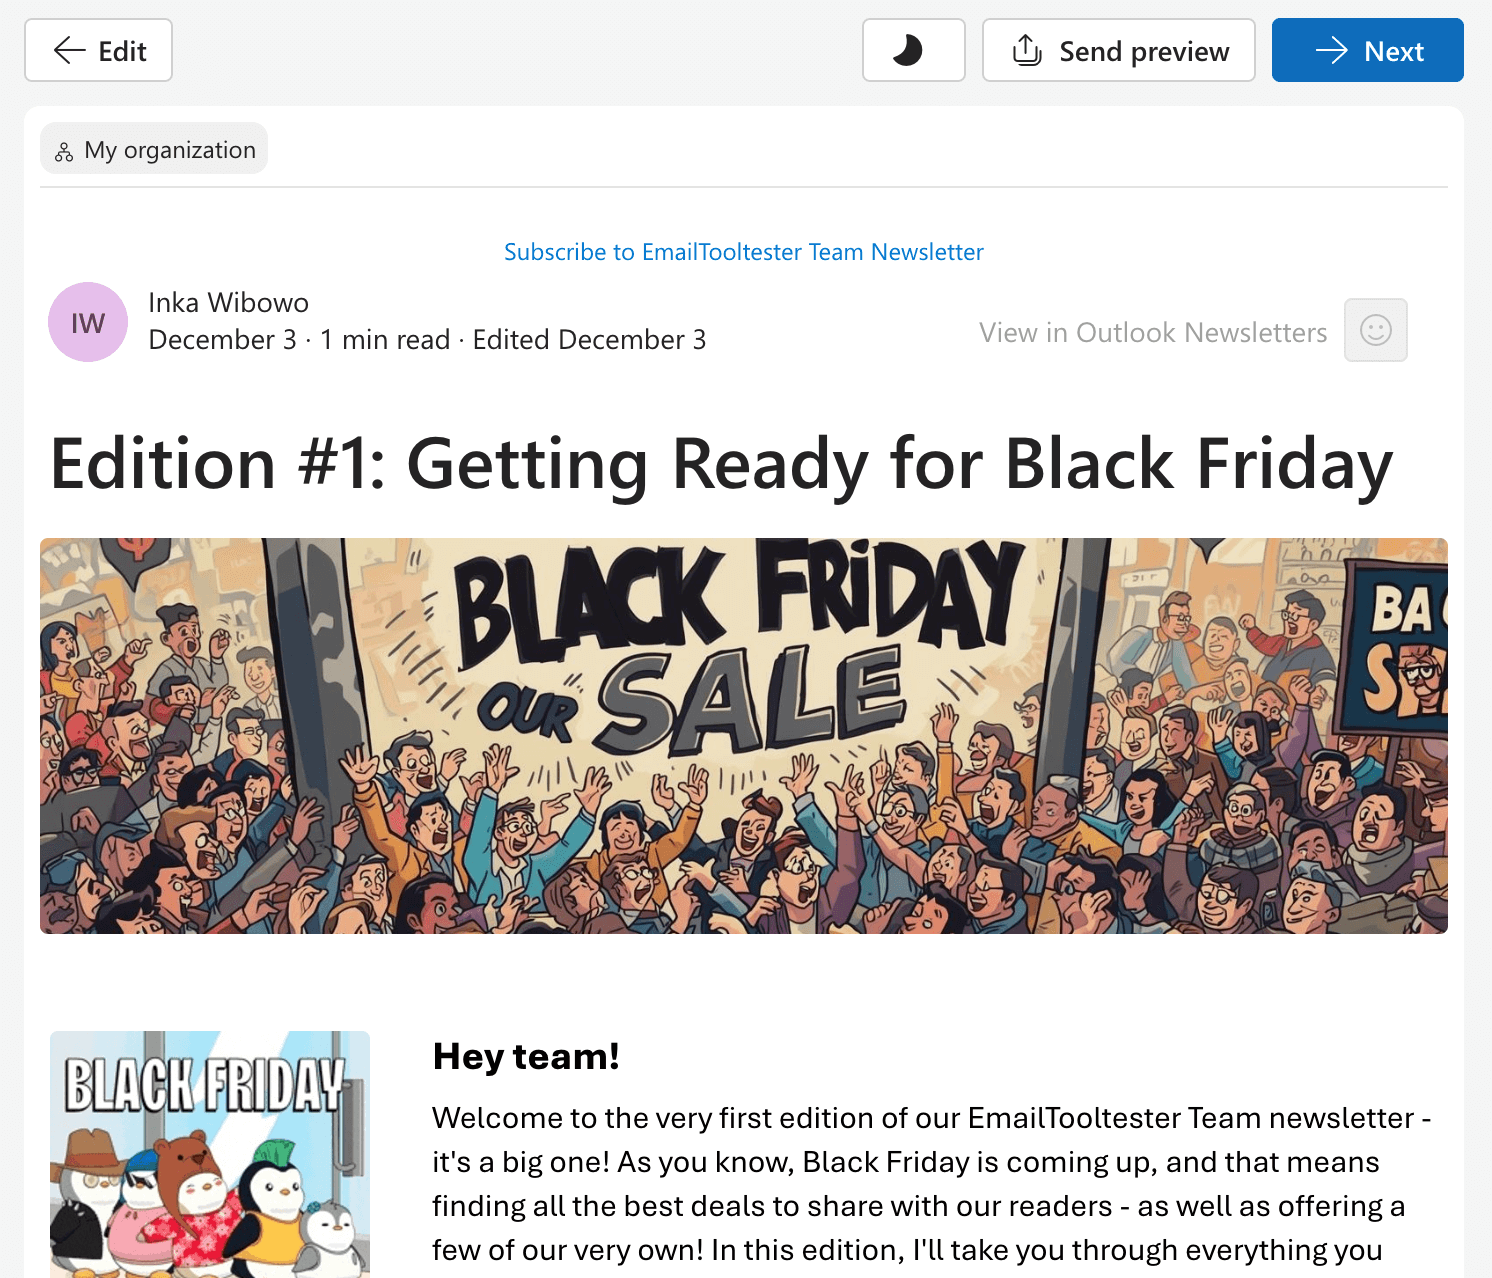
16. Once done, hit “Send”. And that’s it – you’ve sent your first Outlook newsletter! 🥳
The final product
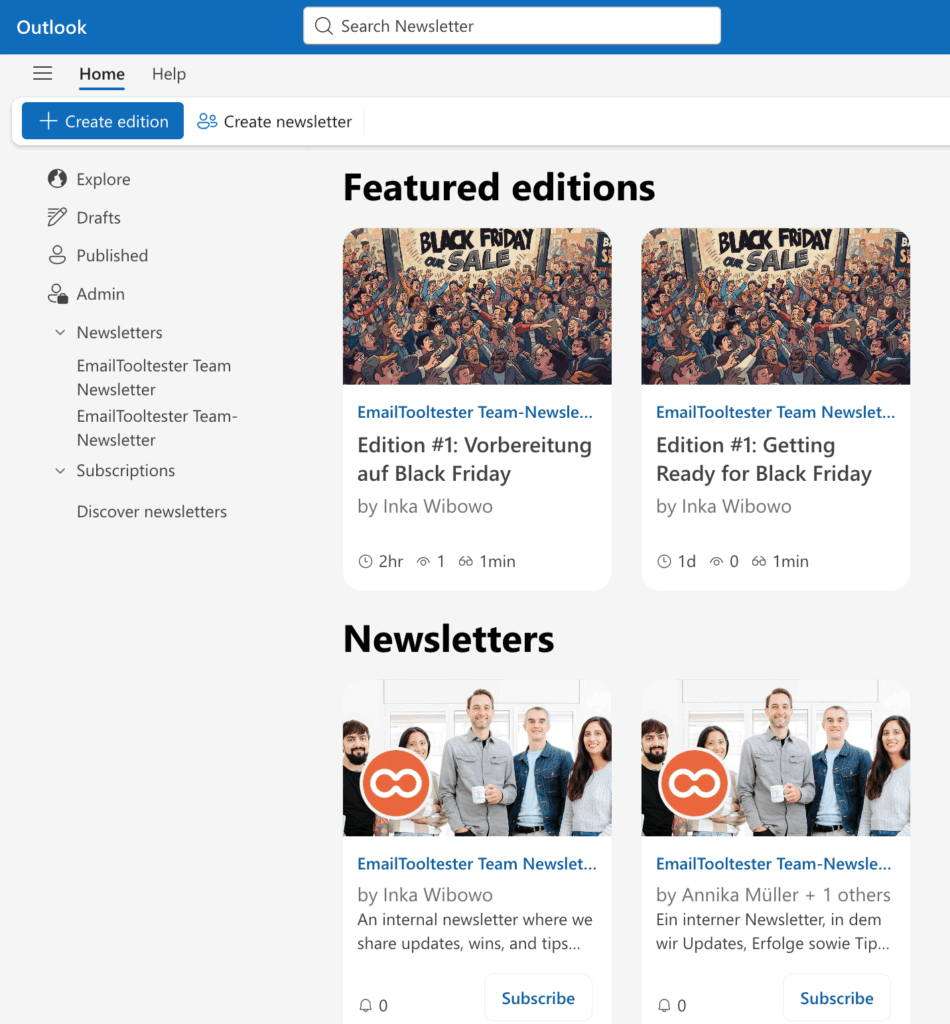
If you want to go back and view past newsletter editions, simply go to “Explore” under the “Newsletter” menu:
What are the limitations of Outlook Newsletters?
Outlook is great for day to day communication, but once you try to treat it like a newsletter tool, you’ll quickly run into limits. Here are the biggest ones to be aware of.
You can’t send editions to people outside your organization
At the moment, Outlook newsletter editions only support internal recipients. Anyone outside your company domain is automatically removed when you hit send. Internal contacts still receive the newsletter, but this restriction makes it impossible to run a public facing newsletter or reach customers, partners, or subscribers.
I suspect this limitation exists because it offers Outlook a simple way to reduce the risk of spam and deliverability issues caused by its users.
No subscriber management or segmentation
Outlook doesn’t give you tools to manage subscribers, create segments, or tag contacts based on interests or behavior. You’re basically sending to static distribution lists. This makes it impossible to personalize content or target specific groups (e.g. creating different newsletters for different teams or regions), something ESPs handle very well.
Very limited styling and branding options
Outlook offers a few basic templates, but you can’t customize them much. There’s no way to apply your brand colors, add your fonts, adjust spacing, or create a polished newsletter layout. The result is a simple email that often feels more like a memo than a branded publication. Dedicated email marketing platforms like Brevo give you far more freedom to create something that looks professional and consistent.
Few components and layouts to build with
The Outlook editor only includes simple text and image blocks. You can’t add call to action buttons, multi column layouts, HTML sections, or rich media elements. If you’re trying to guide readers through a flow, promote something, or make the newsletter visually dynamic, you’ll quickly feel boxed in.
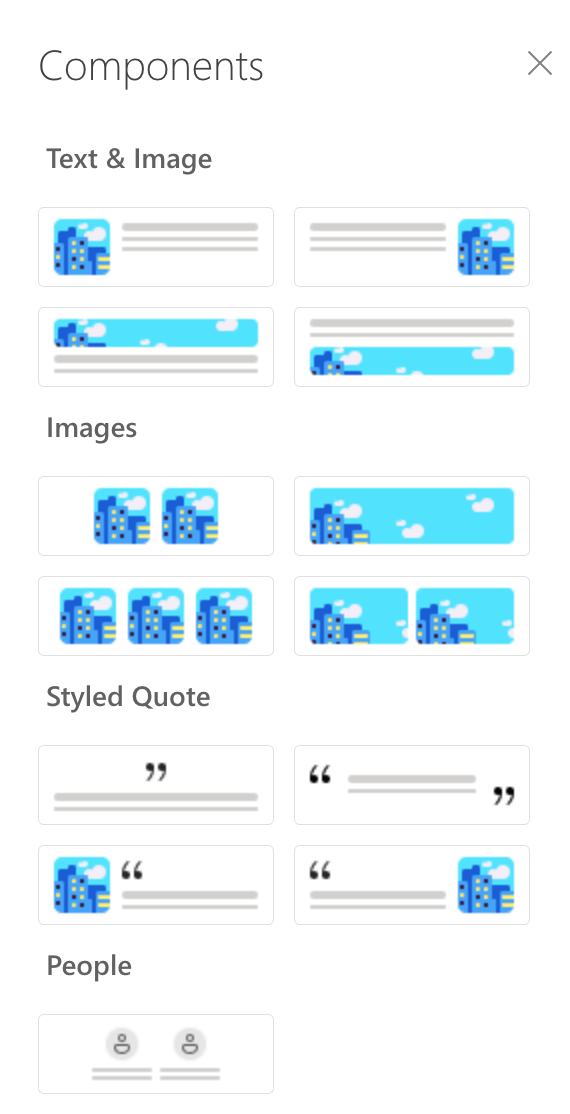
The range of components available within the Outlook newsletter editor is very limited
No media library
There’s no central place to store your images. You have to re-upload files every time you create a new issue, which slows down your workflow. Outlook also doesn’t offer built in stock photos or integrations with tools like Unsplash or Canva. Most dedicated ESPs give you access to reusable assets, stock libraries, and brand kits that save a lot of time.
Bare bones analytics
Outlook only shows how many times the newsletter was opened. You don’t see who opened it, which links were clicked, or how readers interacted with your content. Without that data, it’s hard to learn what works, improve your content, or measure success. Platforms like Brevo offer detailed metrics that make optimization much easier.
No automated emails, workflows or scheduling
There’s no way to create welcome sequences, drip campaigns, event based triggers, or any type of automation. Everything has to be sent manually. It’s also not possible to schedule sends ahead of time, or A/B test campaigns.
When it makes sense to use an email marketing platform
All these limitations make Outlook suitable for quick internal updates, but not for running a polished newsletter or building a long term audience. Once you need proper design tools, reliable delivery to external contacts, and real data to understand what your readers like, Outlook quickly feels too restrictive.
That’s where a dedicated email platform makes a huge difference. A tool like Brevo (which we use here at EmailTooltester) gives you the things Outlook can’t: flexible templates you can truly brand, reusable media libraries, detailed analytics, automations, signup forms, and an editor built for creating content that looks great on every device. In other words, everything you need to run a professional newsletter without workarounds. (Plus, if you’re sending fewer than 300 emails a day, you can even use Brevo for free!)
If you want a simple way to learn the basics, we created a free Brevo Starter course that shows you how to set up your account, design your first newsletter, and send campaigns that actually reach and engage your audience. It’s beginner friendly and a great next step if you’re ready to move beyond Outlook’s limits.

Final thoughts
Outlook’s newsletter feature is a clever addition for teams that want a simple way to share internal updates without leaving the Microsoft 365 environment. It’s quick, familiar, and great for basic communication inside your organization.
But if you’re hoping to build a real audience, grow a list, or send polished campaigns that feel like part of your brand, Outlook only takes you so far. That’s why most businesses eventually move to a dedicated email marketing platform. These give you the creative flexibility, professional templates, automation features, and audience insights Outlook doesn’t offer. And once you’ve worked with a proper editor and real reporting, it’s tough to go back.
If you’re thinking about upgrading your setup or you’re not sure which email platform would be the best fit for your goals, we also offer personalized email marketing consulting sessions. It’s a simple one-to-one call where we review your current setup, answer your questions, and help you choose the right tools and strategy for your business. If you’d like some tailored guidance before making the switch, you can learn more about the service here.
If you’d like to learn more about getting started with email marketing, be sure to check out our 10-step checklist for email marketing beginners.
And if you want to see other easy-to-use, affordable alternatives for sending newsletters, see our list of the cheapest email marketing platforms.
The authors
Learn more about us

Our Methodology
This article has been written and researched following our EmailTooltester methodology.
Our Methodology